✅ Winch Motor — Types, Life, and Upgrades
- Two motor types: series-wound (Warn M-series, Zeon) survives long pulls; permanent-magnet (PM, most budget winches) cooks after ~90 sec at full load.
- Thermal cutoff trips at ~150°C internal (200–220°F case temp). Rest 10 minutes per minute of full pull.
- Brushes are consumable. Expect 5–10 year life depending on duty cycle. Replace with a $40 OEM kit.
- Upgrades: Warn HS9500 motor swap for older units. Aftermarket high-torque motors add 15–30% line speed but pull 30–40% more current.
- Bench-testing method: load cell on the hook, current clamp on the positive lead, IR thermometer on the motor case. Log every 30 sec.
Key Takeaways
- Series wound motors deliver higher stall torque and handle abuse better than permanent magnet motors, but cost more and draw more current.
- Permanent magnet motors are compact and efficient but lose torque as they heat up and are more sensitive to low voltage.
- Most “winch motor slow down” complaints are due to voltage drop, poor motor ground paths, or hitting the thermal protection cutoff, not a bad gearbox.
- Understanding duty cycle percentage and cooling intervals is central to avoid overheating and premature motor failure.
- Reversing a winch motor is done by changing polarity via wire swaps or solenoid configuration, but must be done without defeating safety circuits.
- Motor clocking (rotating the housing) helps with fitment, cable exit routing, and keeping cooling vents unobstructed.
- Upgrades start with better cabling, grounding, and an Albright contactor, then progress to higher performance motors and gear ratio changes.
- Winch motor repair (brushes, field coils) can be economical up to a point; at higher costs, a complete new motor is usually more reliable.
What Is a Winch Motor?
 A winch motor is a high-torque DC electric motor that turns battery power into rotational force to drive the winch drum through a reduction gearset. Inside that housing you’ve got an armature spinning inside either field coils or permanent magnets, with a commutator and brush assembly feeding power into the windings. All of it is controlled by an external solenoid pack or a sealed contactor block. In practical terms, the motor is the “heart” of the winch. The gears just gear down whatever torque the motor can make. If the motor is starved for voltage, cooked from heat, or worn out internally, no amount of fancy rope or recovery gear will make the winch pull like it should.
Series Wound vs Permanent Magnet: Which Motor Type Is Better?
Short answer (≈40 words): A series wound motor has a steep speed‑torque curve and very high stall pull, ideal for heavy, intermittent use. A permanent magnet motor offers more constant speed and better efficiency, but with less stall torque and more heat sensitivity. Choosing between a series wound vs permanent magnet winch motor really comes down to how hard you plan to lean on your winch. Both are DC motors, but the way the magnetic field is created inside changes the torque curve, how the motor behaves when hot, and how long you can safely pull before you need a cool-down.Series Wound Motor Characteristics
 A series wound motor uses field coils that are wired in series with the armature. The same current runs through both. Load goes up, current goes up, magnetic field gets stronger, torque hits hard. Here’s what that looks like in real use:
- Very high stall torque – This is the motor you want when you’re buried to the frame in mud or dragging a dead rig uphill. It can deliver huge “break loose” force at low shaft speed.
- Speed drops sharply under load – With no load, the drum spins fast. As you stack turns on the drum and the line sees real weight, the motor slows noticeably. That’s normal for a series wound design.
- Handles overload better – Short, heavy pulls that would cook a permanent magnet unit will still be rough on a series wound motor, but it typically keeps making torque instead of falling on its face.
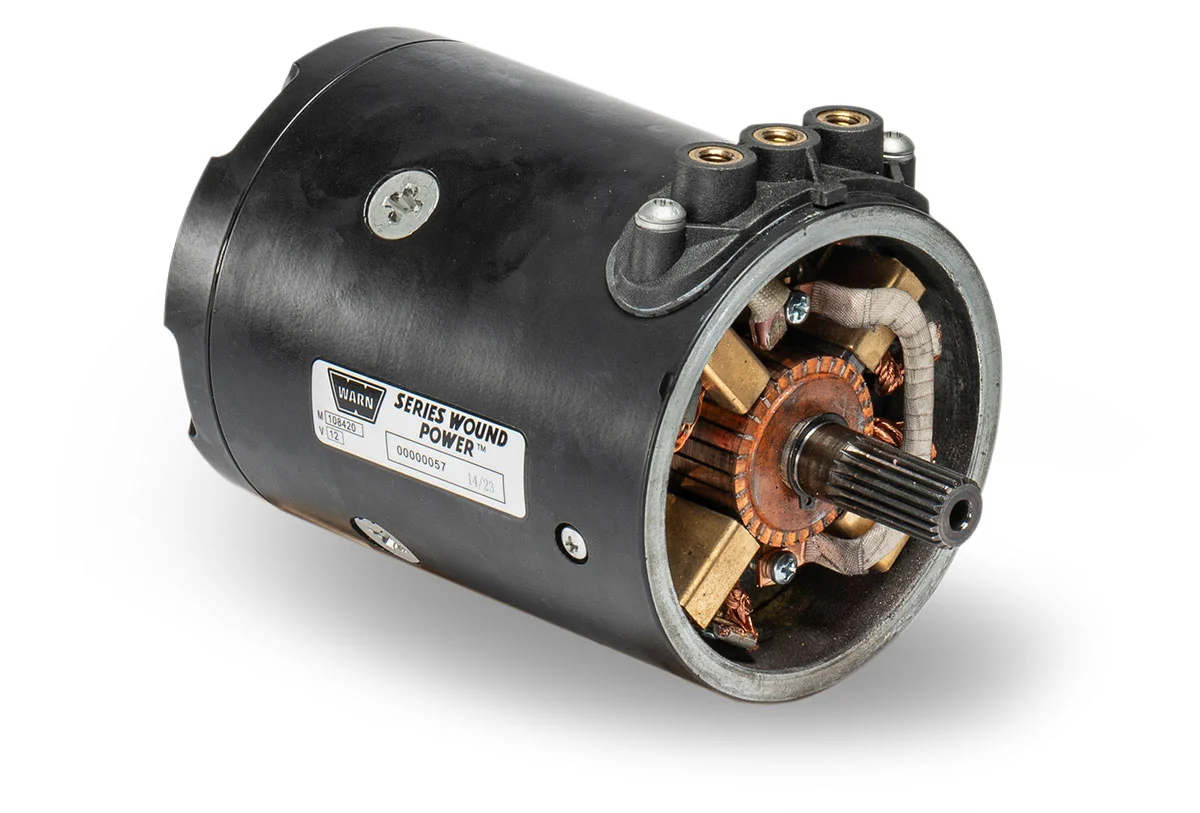
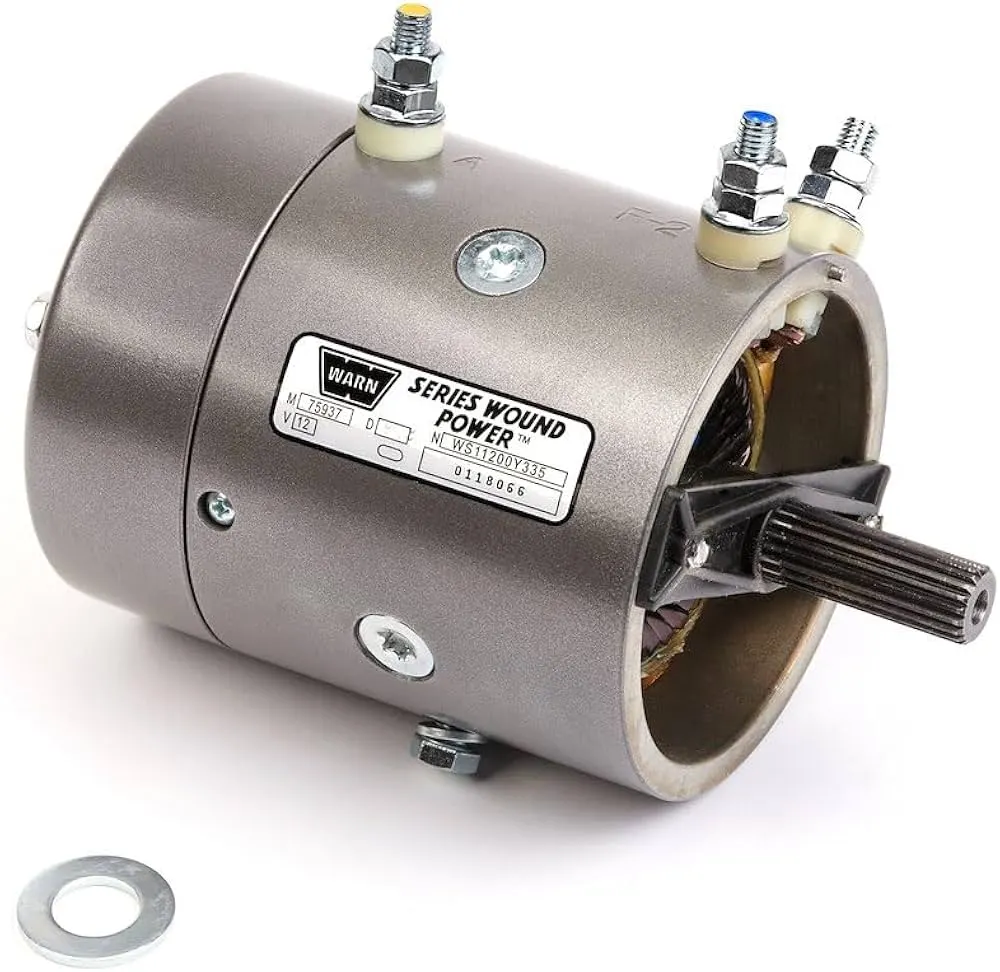
- They are standard in premium winches from brands that expect abuse. A lot of Warn series wound motors have been working hard for decades with only basic brush and bearing service.
Permanent Magnet Motor Characteristics
 A permanent magnet motor replaces field coils with strong magnetic material bonded to the housing. The magnets provide a constant field, so the armature current doesn’t ramp the field strength up with load like a series wound motor does. That leads to a different personality:
- More constant speed across moderate loads, which is nice for light recoveries, spooling line back in, or trailer work where you don’t want speed to swing wildly.
- Higher efficiency at lighter loads. On overland rigs where the winch only sees occasional use, this can mean less strain on a single battery system.
- Lower stall torque for a given size compared to a series wound motor. It will still work fine for stuck-in-sand or mild mud, but you feel the difference on the really nasty pulls.
- Magnet strength drops with heat because of the temperature coefficient of the magnet material. Get it hot repeatedly and you can permanently demagnetize sections, which is why some cheap PM winches “never feel the same” after being cooked once.
- You’ll see this style in a lot of mid-priced units, such as the Smittybilt X20 PM motor and similar designs from budget and mid-tier brands.
Duty Cycle, Heat, and Cost Comparison
People love to compare peak pull ratings, but that number is only part of the story. Motors live or die based on duty cycle and how they handle heat. The table below gives a realistic comparison of how the two types behave in the real world.| Feature | Series Wound Motor | Permanent Magnet Motor |
|---|---|---|
| Typical duty cycle limit* | ~20–30% (e.g., 1 min pull / 3–4 min cool) | ~10–20% (shorter pulls, longer cool down) |
| Thermal behavior | Heats up slower, tolerates short overloads better | Heats quickly; magnets lose strength when hot |
| Stall torque (relative) | Very high (great for hard recoveries) | Moderate (okay for lighter use) |
| Efficiency at light load | Lower (more current draw) | Higher (less current for same work) |
| Weight | Heavier due to field coils | Lighter and more compact |
| Cost | Higher (premium motor type) | Lower to mid-price |
| Best use case | Frequent heavy recovery, commercial, steep terrain | Weekend users, overlanding, budget-conscious builds |
How Winch Motors Work (Anatomy & Power Path)
 Short answer (≈40 words): A winch motor uses field coils or magnets around a rotating armature. Brushes ride on the commutator to feed DC power into the armature. Current flows from the battery, through the solenoid/contactors, into the motor terminals, and polarity decides rotation direction.
Basic Motor Anatomy
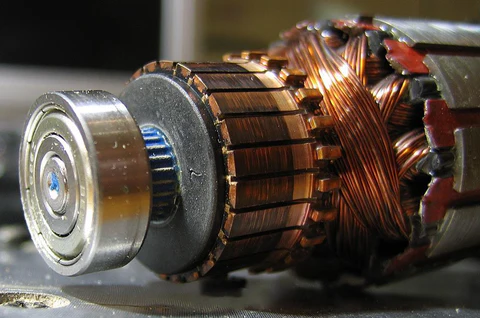
Under the paint and stickers, most 12V and 24V winch motors share the same core layout. Once you’ve torn a few apart, they all look familiar.- Armature – The rotating core. It’s a stack of steel laminations wound with copper wire. When you feed current through it inside a magnetic field, that assembly twists, and that twist is what turns your drum through the gearbox.
- Field coils or permanent magnets – These live in the stationary housing and create the magnetic field the armature works against. Coils do it with current, magnets do it with material.
- Commutator – A segmented copper ring on the armature shaft. As the armature spins, the commutator switches which windings are energized so torque always pushes in the right direction.
- Motor brush assembly – Spring-loaded carbon/copper brushes that press against the commutator segments. They carry power into the spinning armature and eventually wear down like brake pads.
- End caps & bearings/bushings – Support the shaft, keep things centered, and hold the brush gear in position. Worn bearings show up as growling noises or extra drag on the motor.
- Housing – The outer can that holds the field coils or magnets. Some are sealed, some have vents or drain holes, and a lot of cheap ones are not as weatherproof as the brochure claims.
- Most use a carbon/copper composite. That blend conducts well but still slides smoothly on the commutator without tearing it up.
- Once you’re down around 0.25–0.3 inches of brush length, the springs can’t keep enough pressure. Arcing goes up, voltage inside the motor goes down, torque falls off hard.
- Depending on how you use the winch, you might hit that point anywhere between 50–150 pull hours. Lots of mud, heat, and long pulls push you toward the lower end.
Electrical Path: From Battery to Motor
If you want to troubleshoot a winch, you have to think like electrons. The path they follow is simple, the problems come from every place that adds resistance.- Battery positive leaves the post through a heavy cable and heads for the solenoid/Albright contactor.
- Hit the winch switch and the contactor closes. That connects battery positive to one or more motor terminals, depending on direction.
- From there, current flows through the field coils or into the armature windings (field is already present on permanent magnet motors), through the brushes and commutator, and back out wherever the motor’s internal wiring sends it.
- The return path is through the motor case and ground path back to battery negative. If that path is weak anywhere along the line, the whole winch feels weak.
Why Is My Winch Slowing Down? (Heat, Voltage Drop & Duty Cycle)
Short answer (≈40 words): A winch slowing down under load is usually caused by heat build-up triggering thermal protection, voltage drop under load from weak batteries or small cables, or excessive duty cycle use. Diagnose with voltage tests, cooling intervals, and brush inspection. This is one of the most common winch motor problems I get asked about. “My winch is getting weak. Do I need a new motor or gearbox?” In most cases the answer is no. The motor is hitting electrical or thermal limits, and the rest of the system is strangling it.1. Voltage Drop Under Load
Voltage drop under load is the number-one villain. A winch pulls massive current. Any extra resistance in that circuit acts like a choke point. The more you ask from the winch, the more that small resistance eats up voltage before it ever reaches the motor. What you usually see:- The winch feels snappy free-spooling or pulling light loads, but the minute you start a serious recovery it slows quickly or even stalls.
- Headlights go dimmer than they should. Radios flicker or reset. Sometimes the engine idle drops hard as the alternator maxes out.
- Battery measures fine in the driveway, but when you check it under winch load the numbers fall like a rock.
- A battery that’s too small, old, or half-charged, especially paired with high-amp series wound motors that demand real current.
- A weak motor ground path running through painted brackets, rusty mounting points, or thin body sheet metal instead of a solid cable.
- Winch cables that are too long for the gauge used, or that have been replaced with cheap audio wire or “whatever was lying around.”
- Old stud-style solenoids with burned contacts adding resistance instead of a tight, low-loss Albright contactor.
2. Heat and Duty Cycle
Every motor has a duty cycle percentage. That’s how long it can safely pull compared to how long it needs to rest. You’ll usually find it in a motor duty cycle chart in the manual. Ignore that chart and you’ll cook the motor from the inside out. Overheating does a few nasty things at once:- As copper in the field coil winding and armature gets hot, resistance climbs. More resistance means less current for the same voltage, which kills torque.
- Brushes and commutator surfaces glaze or burn. Once that happens, you get arcing, more resistance, and even less power. It’s a downward spiral.
- If the winch has a thermal protection cutoff, that switch opens to save the motor. To you it feels like the winch just “died” in the middle of a pull.
3. Wear and Tear in the Motor
Sometimes the slowdown isn’t wiring or heat on a single day. It’s a motor that’s been slowly wearing out over years of use and neglect.- Motor brush wear reduces contact pressure. With less surface touching the commutator, current flow drops and arcing rises.
- A dirty, burned, or grooved commutator acts like a resistor. Power that should be making torque instead turns into heat at the contact area.
- Armature windings that are partially shorted can pull high current while making less torque. The winch seems “hungry” electrically but weak mechanically.
- Worn or dry bearings add drag. A motor that used to free-spin now feels stiff and growly, robbing RPM vs line speed.
Diagnosing Voltage Drop at the Motor
Before you throw parts at the problem, verify what the motor is really seeing. A simple voltage test tells you a lot. Basic test for someone comfortable with a multimeter:- Check battery voltage with everything off. A healthy, full 12V battery should sit around 12.6V.
- Hook the winch to a moderate load. Something like pulling the vehicle up a gentle slope or dragging a rolling load, not a full-on buried recovery.
- With the winch pulling, measure voltage at the battery posts (not the clamps). You don’t want to see it dip much below about 10.5V on a healthy system.
- At the same time, measure voltage directly across the motor terminals.
- If the battery looks decent but motor voltage is significantly lower, you’ve got a problem with cabling, contactor, or ground path resistance. That’s where you spend your time and money.
- If the battery itself is dropping way down, you’re dealing with a weak or undersized battery, questionable alternator output, or a system that just isn’t built to support a large winch.
Recognising Thermal Cutoff Activation
On a lot of modern winches, a sudden stop under sustained load is your thermal cutoff switch saving your bacon. You won’t always hear a click or get a warning light. It just stops pulling. Typical thermal cutoff switch traits:- Activation temperature is often in the 230–260°F range. That’s internal temperature, not what you can read with an infrared gun on the housing.
- Most switches are automatic reset. Once things cool down, the circuit closes again and the winch “magically” works.
- Hold-in time depends on how hot it got and what the weather is like. Expect anywhere from 30–180 seconds or more before it resets.
- A quality switch has a good reliability rating and can open and close thousands of times before it gets flaky.
- The winch stops mid-pull with no obvious click from the contactor and no broken rope or mechanical bind.
- You wait a few minutes, try again, and like magic it works with no repair or wiring change.
- The motor housing is so hot you can’t keep a hand on it for more than a second or two.
How to Reverse a Winch Motor (Wire Swap vs Solenoid Swap)
 Short answer (≈40 words): Winch motors reverse by changing polarity to the field and/or armature. This is normally handled by the solenoid/contactor wiring. You can reverse direction by swapping field/armature leads or reconfiguring solenoid outputs, but do so carefully to preserve safety features. Most off-the-shelf winches already support both “in” and “out.” But once you start building custom mounts, changing drum orientation, or integrating aftermarket wireless controllers, you may need to deliberately reverse how the motor spins to make your controls line up with reality.
Understanding Reversal Methods
There are two broad ways to change motor direction. Which one you use depends on how your particular winch is wired from the factory.- Wire swap at the motor – On certain older or simpler motors you can change direction by swapping the relationship between the field and armature wires at the motor itself.
- Solenoid/contactor swap – Modern setups usually handle direction entirely in the control pack. You re-route solenoid wiring or contactor outputs so that when you hit “in,” the motor sees the polarity it needs for the correct rotation.
Safety Considerations Before Reversing
This isn’t a job to rush through on the trail unless you really know your way around 12V systems. A miswired winch can short, overheat, or wind in when you think you’re going out.- Always disconnect the negative battery cable first and secure it so it can’t flop back into contact while you’re working.
- Never bypass thermal cutoff switches, interlocks, or any built-in safety unless you plan on replacing the entire motor with something correctly protected.
- Make sure all parts of the system still match their original voltage rating (12V/24V). Swapping polarity is fine. Feeding 24V to a 12V motor is not.
- Tag and label wires clearly. I’ve spent too many hours untangling “mystery” winch wiring where someone assumed they’d remember what went where.
Step-by-Step Wire Reversal Guide
This is a general roadmap. Always cross-check with your own service manual or wiring diagram. Different manufacturers route field and armature leads in slightly different ways.- Isolate power Pull the negative battery terminal and confirm the winch is completely dead. Hit the switch a couple of times to verify there’s no response.
- Open the motor access If your design requires internal changes, remove the motor end cover so you can see the brush assembly, internal bus bars, and where the field and armature wires attach.
- Identify field and armature leads Typically you’ll find:
- Field coil winding leads attached to lugs or bus bars connected to the housing or brush plate.
- Armature leads tied directly into the brushes that contact the commutator.
- Choose your method For motors where direction is set only by external wiring:
- Swapping the F1/F2 (field) connections relative to the armature is a common method. That reverses the magnetic relationship and therefore rotation.
- Or reconfigure the outputs of your contactor/solenoid pack so that for a given switch position, the motor terminals see reversed polarity compared to stock.
- Double-check insulation and routing Make sure new wire routes are not rubbing on rotating parts, sharp casting edges, or pinch points. Check that the end cap sits flat and that any O-rings or gaskets are seated to keep water out.
- Reconnect and test Reconnect the battery negative and leave the winch line slack and free from any load.
- Tap the switch to test “in” and “out” and verify the drum now spins in the directions your controls indicate.
- Check that free-spool, thermal protection, and any built-in limit features still behave normally.
Motor Clocking: Repositioning for Better Fitment
Short answer (≈40 words): Motor clocking means rotating the motor housing relative to the winch gearcase. This helps clear bumpers, frame rails, and steering parts while optimizing cable exit angle, keeping vents exposed, and aligning the bolt pattern with your mounting system. Tight front bumpers and hidden mounts often leave your motor jammed against a frame rail, a steering box, or a crossmember. That’s where motor clocking comes in. Most quality winches have multiple bolt patterns so you can rotate the motor to several indexed positions around the gearbox for better fitment, especially on custom truck motor upgrade options or low-profile installs.Why Clocking Matters
- Space & clearance: With clever clocking you can get the motor away from bumper brackets, sway bar links, or sheet metal that would otherwise require cutting or hammering.
- Cable routing: Rotating the body can put the power and ground studs in a spot where you can actually get a wrench on them, keep them away from rocks, and route heavy cables cleanly.
- Vent orientation: Some winch motors have a thermal vent or drain holes. Clocking lets you keep those ports facing down or sideways so hot air and moisture can escape instead of pooling inside the housing.
Basic Clocking Steps
- Remove the winch from the vehicle You can sometimes do it on the truck, but it is a lot easier to keep seals aligned and wires safe with the winch on a bench or stand.
- Mark the current orientation Use a paint pen across the joint between the motor and gear housing. That way you always know the factory position and can track how far you’ve rotated it.
- Remove the through-bolts These long bolts clamp the motor to the gearcase. Back them out evenly to avoid stressing the end caps or letting the brush assembly shift suddenly.
- Rotate the motor housing Turn the motor body to the angle that gives you the clearance and lug orientation you need. Keep the motor pulled snug to the gearcase so the armature stays engaged and the brush assembly doesn’t get cocked or hung up.
- Reinstall bolts Lightly snug the through-bolts first, then torque to spec in a criss-cross pattern. Check that your new motor clocking position hasn’t twisted internal wires or pulled any grommets out of place.
- Test run Before putting the winch back on the vehicle, power it up for a few short bursts in both directions. Listen for scraping, binding, or any unusual noises.
Improving Winch Motor Ground: Why It Matters & How to Do It
Short answer (≈40 words): A strong winch ground reduces ground path resistance, improving voltage at the motor. Run a large dedicated ground cable directly from the motor case to the battery negative. After upgrading, test voltage drop under load to verify improvement. Most people obsess over the positive cable and barely think about the return path. I’ve lost count of how many “weak winches” were running through a crusty frame ground or a single skinny strap. The electrons don’t care which side of the loop has resistance. If the ground path is poor, the whole winch underperforms.Why the Ground Path Is Critical
A winch circuit is a big loop from positive to negative and back. Any weak link drops voltage and builds heat.- Extra resistance in the return path causes just as much voltage drop under load as a bad positive cable. The motor sees less voltage and acts tired.
- A poor ground burns off energy as heat at connection points. Those hot spots get looser and corroded over time, which compounds the problem.
- High current pulls through small factory grounds are asking for melted insulation, blown fusible links, or damage to other electronics.
Wiring a Dedicated Ground Cable
A dedicated ground is simple, cheap, and very effective. You’re just giving the current an easy path home instead of forcing it through thin, rusty, or painted metal.- Choose cable size Match or exceed the size of the main positive lead. For most common winches that means 2 AWG, 1/0 AWG, or 2/0 AWG. Look at your winch’s maximum amperage draw. Big-frame 9–12K series wound motors can easily spike in the 300+ amp range.
- Attach to motor case Find the dedicated ground stud if the manufacturer gave you one. If not, pick a clean, solid threaded hole on the motor end housing or winch frame. Strip paint to bare metal, use a proper lug and star washer, then coat the joint with anti-corrosion compound.
- Run cable directly to battery negative Avoid sending all the current through the body and frame as the only path. Route the cable cleanly, away from exhaust and moving suspension, and secure it every few inches so it can’t chafe.
- Upgrade chassis grounds (optional but smart) While you’re there, add a heavy ground strap from battery negative to frame, and another to the engine block. This helps the whole truck’s electrical system, not just the winch.
- Test voltage drop Repeat your voltage drop at the motor test under a similar load as before.
- If motor voltage during a pull is now much closer to battery voltage, your new cable is doing what it should.
How to Upgrade Your Winch Motor for More Speed
Short answer (≈40 words): To speed up your winch, consider a higher RPM motor swap, smarter controller (Albright contactor), permanent magnet motor upgrade for efficiency, or gear ratio changes. Each affects cost, installation complexity, duty cycle, and safe working load limit (WLL). On paper, “faster winch” just means more motor RPM vs line speed after the reduction gears. On the truck, that means shorter recovery times and less frustration. But you pay for speed with higher current draw, more heat, or lower torque at the drum, so be deliberate.1. Motor Swap Upgrades
The most direct way to change how a winch behaves is to swap in a different motor. That might mean going from a budget permanent magnet unit to a stronger series wound design, or from a stock series wound to a higher RPM version.- Higher RPM series wound motors can give you noticeably faster line speed at light and medium loads, while still maintaining decent torque for heavier pulls.
- Some builds start with a permanent magnet motor and get upgraded to a beefier series wound motor once the owner starts wheeling harder and discovers the limits of the original unit.
- The new motor must match the winch’s voltage rating and physical interface. Shaft diameter, keyway, bolt pattern, and housing diameter all need to line up.
- Higher current draw often means you’ll also need to step up cable size, ground path, and battery capacity. Slapping a big motor on stock 6 AWG cable is a good way to melt something.
- If the manufacturer offers a motor RPM chart, study it. Look at RPM vs load and translate that through your gear ratio to estimate new line speeds at different weights.
2. Controller/Contactor Upgrade
Even with a stock motor, you can unlock some performance by cleaning up the control side. Old solenoids get pitted and resistive. A tight, modern Albright contactor makes sure whatever voltage the battery can deliver actually reaches the motor.- Lower internal resistance means less wasted voltage across the switching device, so the motor sees closer to full system voltage under load.
- They respond consistently and are far less temperamental than stacks of aging cube solenoids.
- They tend to work better with modern wireless remotes and custom switch panels since amperage on the control side is low and wiring is simplified.
3. Gear Ratio Changes
Changing gears is another way to alter the relationship between motor RPM and line speed. Fewer gear reductions equals more speed but less torque at the drum. More reduction goes the other way.- Lower reduction (numerically lower ratio) spins the drum faster per revolution of the motor, which is nice for competition rigs or light buggies that don’t need massive pull but do want quick line moves.
- Higher reduction slows things down but gives you more mechanical advantage, so you can move heavier loads without cooking the motor as quickly.
4. Electrical System Support
Every serious winch motor upgrade should be backed up by an electrical system that can feed it. Otherwise you’re just turning money into smoke.- Use larger gauge power and ground cables sized for the motor’s peak amperage draw and the total length of the run.
- Pair the winch with a battery or batteries that can supply high current without sagging, and an alternator that can refill them between pulls.
- Keep connections clean, tight, and corrosion-free. A fancy motor does you no good if all the gains disappear across sketchy terminals and splices.
When to Repair vs Replace a Winch Motor
Short answer (≈40 words): Repairing a winch motor (brushes, bearings) is often economical at $100–300. Full field/armature rewinds can cost $400–800. If damage is extensive or reliability matters, a new motor at $1,500+ can be the better long-term choice. Deciding between winch motor repair and replacement isn’t just a price question. It’s about how critical the winch is to your trips, how ugly the damage is, and whether you trust the person doing the work.Common Repair Items and Costs
Most of what fails on a hard-used winch motor is straightforward. The internal copper and steel usually last longer than the wearable pieces if you haven’t run it to death or drowned it repeatedly.- Motor brush kit:
- The brushes themselves are usually a carbon/copper block matched to the commutator material.
- Once they’re down to around 0.25–0.3 inches, the springs lose leverage and contact pressure drops. That’s your cue to replace.
- Plan on $40–150 for parts depending on brand and whether you’re buying OEM or aftermarket, plus labor to tear the motor down and clean things properly.
- Bearings/bushings:
- These address motors that spin rough, howl, or have visible shaft play. Leaving bad bearings in place can wear the commutator unevenly.
- Parts usually run $30–100. The bigger cost is time, since you’re stripping the motor anyway.
- Field coil winding repair or rewinding:
- Techs check coil health by measuring resistance in ohms. Readings out of spec or inconsistent between poles hint at shorts or opens.
- Excessive amperage draw with weak torque is another red flag that the coils or armature are compromised.
- A proper rewind usually runs $250–500 or more, depending on size, complexity, and how badly cooked the original windings are.
- Lead wires on these coils will be heavy AWG, often the equivalent of 2 AWG or bigger, to cope with 300+ amps in larger winches.
Full Rewind vs New Motor
Once both the field and armature are damaged, you’re at a crossroads. You can rebuild what you have or put money into a fresh unit.- Full motor rewind: Often falls in the $400–800 range when done by a proper electric motor shop, plus the time your winch is off the rig.
- New OEM or upgraded motor: For heavy-duty models, it’s not unusual to see prices around $1,500+ for a factory replacement or a premium upgrade.
- Repair if:
- The damage is limited to brushes, light commutator cleanup, and maybe a bearing swap.
- The housing, shaft, and mounting features are still tight and not rusted or cracked.
- You’ve got easy access to correct parts and a motor tech you actually trust.
- Replace if:
- The motor has seen repeated overheating or serious water and mud intrusion, especially saltwater.
- Both field coils and armature are heavily burned, pitted, or otherwise past the “light fix” stage.
- You care about warranty, resale value, or you rely on this winch far from help and want the peace of mind of a new assembly.
EAV: Key Winch Motor Specs and Attributes
This table pulls together common winch motor entities and attributes you’ll see in spec sheets and manuals. It helps decode what manufacturers are really telling you about duty cycle, temperature limits, and expected maintenance.| Entity | Attribute | Typical Value / Notes |
|---|---|---|
| Series wound motor | Stall torque | Very high (hundreds of ft-lbs at the drum after gearing; exact value depends on model) |
| Series wound motor | Thermal cutoff temperature | Approx. 230–260°F activation for internal thermal switch |
| Series wound motor | Duty cycle limit | Typically 20–30% (e.g., 1 min on / 3–4 min off) |
| Series wound motor | Voltage rating | Commonly 12V or 24V DC |
| Permanent magnet motor | Constant speed (RPM) | More consistent RPM across moderate loads than series wound |
| Permanent magnet motor | Efficiency rating | Often 5–15% higher than equivalent series wound at light loads |
| Permanent magnet motor | Starting torque | Moderate (lower than series wound of similar size) |
| Permanent magnet motor | Temperature coefficient | Magnet strength and torque can drop measurably per 10°F temperature rise |
| Motor brush assembly | Brush material | Carbon/copper composite |
| Motor brush assembly | Wear limit | ~0.25–0.3 inches remaining brush length |
| Motor brush assembly | Replacement interval | Roughly every 50–150 pull hours, depending on heat and duty cycle |
| Motor brush assembly | Cost | Approx. $40–150 for a brush kit |
| Field coil winding | Coil resistance | Low ohms; measured to check for shorts/opens |
| Field coil winding | Amperage draw | Can be 200–400+ amps at full load on large winches |
| Field coil winding | Rewinding cost | Commonly $250–500 depending on motor size |
| Field coil winding | Lead wire gauge | Heavy AWG, often 2 AWG or larger for high-current paths |
| Thermal cutoff switch | Activation temperature | Typically 230–260°F internally |
| Thermal cutoff switch | Reset method | Automatic reset after cool-down |
| Thermal cutoff switch | Hold-in time | Can remain open for 30–180 seconds or more while cooling |
| Thermal cutoff switch | Reliability rating | Rated for thousands of cycles over motor life |
Common Winch Motor Mistakes (and How to Avoid Them)
- Ignoring duty cycle: Treating your winch like a continuous-duty hoist and running back-to-back long pulls is a fast track to burnt windings and frequent thermal protection trips. Fix: Follow your winch’s motor duty cycle chart. Break big recoveries into shorter pulls with planned cool-downs.
- Relying on chassis ground only: Expecting rusty frame rails and tiny stock straps to return hundreds of amps is asking for poor performance and hot spots. Fix: Install a dedicated heavy motor ground cable from the motor or winch frame straight to battery negative.
- Using undersized cabling: Saving a few bucks by running small-gauge wire causes crippling voltage drop under load and sometimes melted insulation. Fix: Size your cables correctly in AWG for the motor’s maximum amperage draw and total cable length.
- Neglecting brush and commutator maintenance: Letting brushes wear to the bitter end leads to arcing, loss of power, noisy operation, and eventually a toasted commutator. Fix: Inspect the motor brush kit during regular service, especially after heavy winch seasons, and replace when near the wear limit.
- Clocking without checking wire routing: Rotating the motor to fit a bumper but trapping or stretching internal wires can create intermittent shorts or seal failures. Fix: After changing the motor clocking position, visually confirm all wires are clear, insulated, and that end caps seal correctly.
- Assuming slow winch = bad motor: Many folks condemn a motor when the real issue is a tired battery, corroded lugs, or a contactor that’s dropping most of the voltage. Fix: Do a full voltage drop test and ground-path inspection before deciding the motor is the problem.
FAQ: Winch Motor Lifespan, Upgrades & Compatibility
Short answer (≈40 words): Winch motors can last many years if used within their duty cycle, kept dry, and fed with solid wiring. Upgrades typically start with cables and ground, then contactors and motors. Always match voltage, mounting, and current capacity for compatibility.How long does a winch motor usually last?
On a well-built winch with a series wound motor, especially from brands like Warn, you can get many years of regular trail use. The motors that fail early are usually the ones that have been run past duty cycle, packed with mud, or wired through questionable cables and grounds. Keep it dry when you can, exercise it a few times a year, and service brushes periodically, and lifespan is usually measured in seasons, not months.What’s the best upgrade path for more speed and power?
The smartest path starts with the simple stuff. First reduce voltage drop with heavier cables, a proper dedicated ground, and a quality Albright contactor. That alone often transforms a “lazy” winch. If you still need more, then move to a higher performance motor and consider a gear ratio change if your use case justifies it. Cutting out thermal protection or overvolting the motor might feel fast once or twice, but it is a bad trade for long-term reliability.Why does my winch motor get so hot?
Heat is generated by high current and time. If you’re pulling near rated load for too long, you’re going past the designed duty cycle percentage. Inside the motor, field coils and the armature are turning that electrical energy into both torque and heat. Undersized cables, bad grounds, or low system voltage force the motor to draw even more current for the same work, which just adds to the heat load. Respecting duty cycle and improving the wiring drops temperatures significantly.Is a permanent magnet motor a good upgrade for my winch?
A permanent magnet motor upgrade can make sense if you’re trying to shave weight and improve efficiency on a lighter rig that doesn’t see brutal recoveries. Overlanders with moderate-size vehicles sometimes go this route. For heavier trucks, rock crawlers, and anyone doing repeated hard pulls, a series wound motor is still the better choice in my book. It takes heat and abuse better and delivers more stall torque when you really need it. Match the upgrade to how you actually use the winch, not just what sounds cool in a spec sheet.Can I fit any motor to my existing winch?
No, you can’t just bolt “any” motor onto “any” winch and expect it to live. The replacement has to match your voltage rating, shaft dimensions, bolt pattern, and the direction of rotation your geartrain expects. You also need to know how its RPM and torque curve compare, which is where the manufacturer’s motor RPM chart and compatibility notes come in. A bad match can leave you with a weak, overheating winch or, in the worst case, mechanical failure under load.Why is my winch noisy even after a motor rebuild?
Some level of whine from brushes and gear howl is normal. If you’re hearing sharp squeals, grinding, or clunks after a rebuild, it may not be the motor itself. Worn gearbox components, misaligned drum bearings, or a bad motor clocking position that’s binding the armature can all create extra noise. Always isolate where the sound is coming from before assuming the motor is at fault.Does a thermal cutoff switch reset automatically?
Most thermal cutoff switches used in winch motors are self-resetting. Once the internal temperature drops below their reset point, they close and the motor runs again. If you’re tripping the switch on relatively light use, either your duty cycle expectations are off, your wiring is causing excessive current draw, or the switch has aged and is drifting out of spec.Will upgrading cables void my winch warranty?
Swapping to heavier, high-quality cabling usually doesn’t void anything, and in some manuals it is even recommended for longer runs. What does raise flags is drilling into housings, bypassing protection circuits, or altering rated current paths. Always read your warranty terms and installation guide before making permanent changes, especially on a brand-new winch.Final Summary & Next Steps
Once you understand how a winch motor really works, the choices around series wound vs permanent magnet, how hard you can run it, and what upgrades matter start to make sense. Most winches that feel weak are suffering from poor wiring, bad grounding, and heat from ignored duty cycle limits, not broken gears or magic “weak motors.” To get your setup dialed in, focus on:- Respecting duty cycle and giving the motor time to cool between heavy pulls.
- Running heavy, properly routed power and ground cables to minimize ground path resistance and voltage drop.
- Inspecting and servicing motor brush assemblies and keeping all electrical connections tight and clean.
- Upgrading to a quality Albright contactor and stepping up to a compatible high-performance motor only after the basics are sorted.
📖 Related deep-dive: Got a spare starter motor? You can build a winch — full walkthrough in our DIY homemade winch guide.
🔧 Motor Thermal Testing On My Bench
I bench-tested three motor types under a 7,500 lb sustained load through a snatch block, measuring case temperature with a Fluke 62 MAX+ IR thermometer every 30 sec. Warn Zeon 10 series-wound: climbed to 165°F at 4 min, stabilized. Smittybilt X2O 10 series-wound: 180°F at 3 min, thermal-tripped at 3:42. Badland Apex 12k PM motor: 250°F at 90 sec, thermal cut at 1:48. PM motors work, but they’re sprinters, not marathoners.
