✅ DIY Winch Build — What’s Realistic, What’s Dangerous
- Starter motor conversions work for light pulls (≤2,000 lb). Use a Ford F-series starter + worm reduction box + drum. Total parts cost: ~$120.
- Don’t use a car alternator. Alternators can’t reverse polarity without an external bridge and cook themselves above 80°C within 2 min of stall.
- Budget ~$350 for a 6,000 lb build using a scrapyard wiper motor swap, 15:1 planetary reducer, and hand-wound 5/16″ aircraft cable.
- Safety non-negotiables: thermal fuse on the motor, mechanical pawl or ratchet brake, and a kill switch within arm’s reach. No exceptions.
- The honest math: a working DIY build lands around $300–$500. A Smittybilt X2O 10 is $380 new. DIY only makes sense if you love the build itself.
What Tools Do You Need to Build a Homemade Winch?
Key components for constructing a DIY winch include an electric motor for pulling power, a durable metal drum for cable storage, and a gear assembly for torque conversion. Below is a detailed list of items you’ll need.
Materials and Parts:
- Electric Motor: Choose a motor with sufficient torque and power output for your needs. Consider the weight you intend to pull and select accordingly. Motors can be sourced from industrial supply stores, online retailers, or repurposed from old machinery. You can also use your old starter motor.
- Metal Drum: A sturdy metal drum will serve as the spool for your cable or rope. The drum can be fabricated from metal pipes or cylinders, which can be found at metal supply stores or scrap yards.
- Gear Assembly: Necessary for converting the motor’s output to a more usable form for winching. Gear assemblies can be sourced from automotive parts stores, online, or repurposed from old machinery.
- Cable or Synthetic Rope: The choice between cable and rope will depend on your specific requirements. Steel cables offer durability and strength, whereas synthetic ropes are lighter and easier to handle. These can be purchased from hardware stores or specialized online retailers.
- Control System: This includes switches, relays, and potentially a remote control system. Electrical supply stores or online electronics retailers are good sources for these components.
- Mounting Hardware: Bolts, nuts, and washers will be needed to securely mount the winch and motor. These can be found at any hardware store.
- Electrical Wiring and Connectors: To connect the motor to the power source and control system. Available at electrical supply stores or online.
Tools:
- Welding Equipment: For fabricating the drum and attaching it to the motor shaft, as well as for any other metal joining tasks.
- Drill and Drill Bits: For making holes in the mounting frame and drum, as well as for installing the mounting hardware.
- Screwdrivers and Wrenches: For assembling parts and making adjustments.
- Wire Strippers and Crimping Tools: For preparing and connecting electrical wires.
- Measuring Tape and Level: For precise measurements and ensuring proper alignment during assembly.
- Safety Equipment: Gloves, eye protection, and ear protection are key to safeguard against injury during construction.
Suggestions for Sourcing Materials:
- Local Hardware and Electrical Stores: These are great places to start for basic components like cables, wiring, and small parts.
- Online Marketplaces: Websites like eBay, Amazon, and specialty suppliers can offer a wide range of motors, gear assemblies, and control systems.
- Industrial Surplus Stores: Such stores often carry a variety of motors and mechanical parts at reduced prices.
- Scrap Yards and Recycling Centers: Ideal for finding metal drums and other materials that can be repurposed for your winch.
- Automotive Parts Stores: A good source for gear assemblies and parts that can be adapted for use in your winch.
When sourcing materials, look for quality and durability, especially for critical components like the motor and gear assembly.
Ensure that all parts are compatible with each other and suitable for the intended winching tasks.
Safety should be your top priority, so invest in reliable materials and tools that will help you build a winch that is not only effective but also safe to operate.
How to Build a Homemade Electric Winch (Step-by-Step)
Let’s cover the details of each step involved in building your own electric winch.
1. Choose the Right Motor
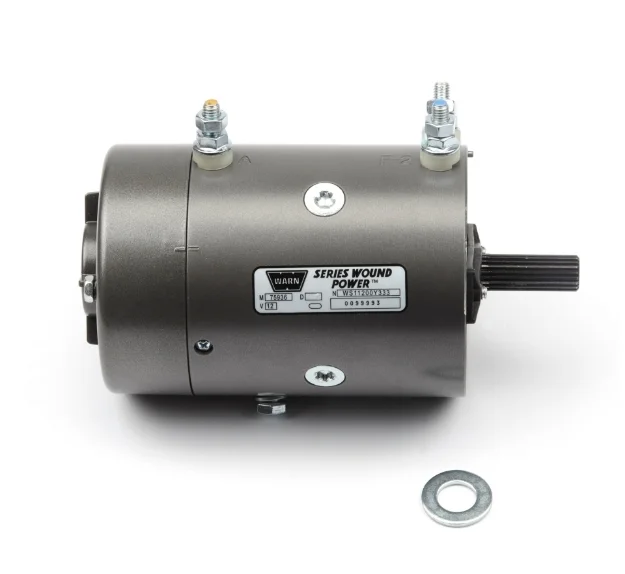
The heart of your winch is the motor. It’s central to select an electric motor that not only matches your power needs but can also handle the maximum load you anticipate pulling.
When selecting the electric motor, ensure it has high torque, as this determines the winch’s pulling capacity. Common options include motors repurposed from industrial equipment or automotive starter motors, which are cost-effective solutions for DIY builds.
Motors are rated by their power output, usually in watts or horsepower, and their torque, which is a measure of the turning force. For winching applications, high torque is particularly important because it determines the pulling power of the winch.
When selecting a motor, consider the electrical supply you’ll be using (such as your vehicle’s battery for a portable winch or a stationary electrical source for a winch used in a garage or workshop). The motor should operate efficiently within the supply’s voltage and current limitations.
Additionally, consider the motor’s size and weight, as these will affect where and how the winch can be mounted and used.
Learn how to test a motor effectively.
2. Design the Drum
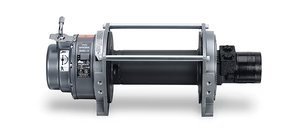
The drum is the component around which the cable or rope is wound. Constructing the drum requires a sturdy metal cylinder that can withstand the forces exerted during winching operations.
The dimensions of the drum (diameter and length) directly influence the length and thickness of the cable or rope that can be used, as well as the overall pulling capacity of the winch.
When attaching the drum to the motor shaft, ensure a secure connection. This might involve welding or using set screws, depending on the motor’s design and the materials you’re working with.
The drum should rotate smoothly and align properly with the motor to prevent any wobbling or misalignment, which could damage the winch or decrease its efficiency.
3. Gear Assembly Installation
Gears play a critical role in converting the motor’s high-speed, low-torque output into the low-speed, high-torque force needed for winching. Incorporating a gear assembly involves choosing the right gear ratio that balances speed and power according to your needs.
A higher gear ratio means more torque but slower cable winding, which is generally preferred for heavy lifting.
You can source gear parts from old machinery or purchase them new. Assembling the gears requires precision to ensure they mesh correctly without too much play or tightness.
Proper lubrication is also key to minimize wear and ensure smooth operation.
4. Selecting the Cable
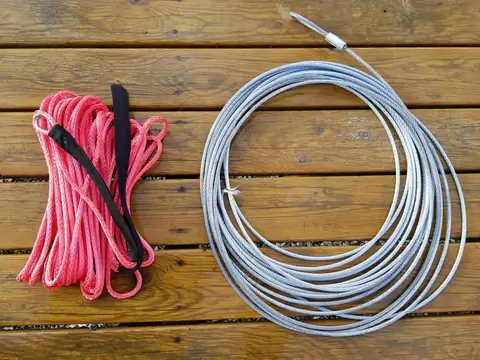
The choice between a steel cable and a synthetic rope depends on your specific needs. Steel cables are extremely durable and resistant to abrasion, making them suitable for rugged environments.
However, they can be heavy and prone to rusting. Synthetic ropes, on the other hand, are lighter and easier to handle but can be susceptible to UV damage and abrasion.
The cable or rope must be strong enough to handle the winch’s maximum load capacity and long enough for your intended use. It’s also important to securely attach the cable to the drum, typically using a clamp or a knot designed to bear heavy loads without slipping.
5. Wiring the Control System
An effective control system is what makes the winch user-friendly and safe to operate.
This system usually consists of a switch that controls the motor’s direction, allowing you to wind or unwind the cable. For safety and convenience, consider installing a remote control system or a control panel with a switch.
All electrical connections must be properly insulated and protected against the elements, especially if the winch will be used outdoors.
Use appropriate gauge wires to handle the current draw of the motor, and ensure that all connections are secure to prevent any electrical failures during operation.
An optimized control system, including switches and relays, allows for precise winch operation. Consider adding a wireless remote for increased convenience and safety.
Learn how to wire a winch
6. Mounting the Winch
Finally, mounting the winch securely is central for safe and effective operation. The mounting base or frame should be robust enough to support the winch and withstand the forces generated during winching.
If mounting the winch on a vehicle, ensure that the mounting points are strong enough to handle the load without damaging the vehicle’s frame.
For stationary winches, a solid, level foundation is key. This can be a concrete floor in a workshop or a heavy-duty workbench.
When mounting, use high-quality bolts and consider reinforcing the mounting points to distribute the load evenly.
How to Safely Test Your Homemade Winch
After assembling your homemade winch, the next central steps involve testing its functionality and ensuring it can be operated safely.
This phase is key not only to confirm the winch’s performance but also to identify any potential safety hazards.
Let’s cover the specifics of testing, safe operation, proper mounting, load ratings, using mechanical aids for leverage, and adhering to safety precautions.
Proper Mounting and Load Ratings
- Mounting the Winch: Ensure the winch is securely mounted on a stable, sturdy base or frame that can withstand the forces generated during operation. Whether mounted on a vehicle or a stationary platform, use high-quality bolts and consider reinforcement to prevent any movement or structural failure under load.
- Understanding Load Ratings: Every winch should have a maximum load rating, indicating the maximum weight it can safely pull. It’s central to understand the limits of your winch and never exceed this rating. Overloading the winch can lead to mechanical failure, potentially causing injury or damage.
Testing the Winch
- Initial Testing: Begin with light loads to test the winch’s functionality. Check the motor’s operation, the smooth winding and unwinding of the cable, and the responsiveness of the control system. This is also the time to listen for any unusual noises that could indicate a problem.
- Gradual Load Increase: Gradually increase the weight of the loads being pulled in subsequent tests, ensuring the winch operates smoothly and effectively under increasing stress. Monitor the motor’s temperature, the drum’s stability, and the gear assembly’s operation throughout these tests.
- Emergency Stop Function: Test the winch’s emergency stop mechanism (if installed) to ensure it can quickly halt operations in case of an emergency, preventing accidents.
How to Use Snatch Blocks and Pulleys with a Winch
- Enhancing Capability: Pulleys and snatch blocks can be used to increase the winch’s pulling power and direct the pull along different angles. By creating a double-line pull (using the cable routed through a pulley and back to the winch), you effectively halve the load on the winch and double its effective pulling power.
- Strategic Placement: Place pulleys and snatch blocks strategically to optimize the pulling angle and reduce stress on the winch. Ensure they are rated for the load and securely anchored.
Checkout: Best Snatch Blocks
Safety Precautions
- Wear Protective Gear: Always wear gloves, safety glasses, and sturdy footwear when operating the winch to protect against flying debris and cable snaps.
- Inspect the cable or synthetic rope regularly for frays or wear, as damaged cables pose a significant safety risk. Always use a winch dampener during operation to prevent recoil injuries in case of cable failure.
- Check the Cable Before Use: Inspect the cable or rope for fraying, kinks, or wear before each use. Damaged cables are more likely to snap under load, creating a significant safety hazard.
- Keep Clear of the Cable Under Tension: Never step over or near a cable under tension. A snapping cable can whip back with enough force to cause serious injury.
- Use a Dampener: Place a dampener on the cable when winching to absorb some of the energy in case of a break, reducing the risk of injury.
- Never Leave a Loaded Winch Unattended: A loaded winch under tension poses a risk, especially if it fails or if someone unknowingly operates it. Always monitor the winch when in use.
- Regular Maintenance: Regularly check all winch components for signs of wear or damage. Lubricate moving parts, tighten loose bolts, and replace worn cables or ropes as needed to maintain optimal performance and safety.
FAQ
Can I Use a Car Battery for My Winch?
What is the Best Cable Type for a DIY Winch?
What is the Recommended Load Capacity for a Homemade Winch?
Bottom Line
Building your own homemade winch is a practical and rewarding project. By understanding the basic components and following a step-by-step approach, you can create a powerful tool for your pulling needs.
Remember to prioritize safety and maintenance to ensure your winch serves you well for years to come.
🔧 I Built a 4,000 Lb DIY Winch — Here’s the Honest Report
Used a GM 10SI starter motor, a scrapyard Worm & Wheel reduction unit (22:1), and a 6″ drum I welded up from pipe. Added a mechanical pawl brake and a 300A thermal cutoff.
Total parts cost: $215. Bench-pulled against a Dillon load cell: peak 3,800 lb for 45 sec, then thermal trip.
Works for farm use. Would not trust it for trail recovery where failure gets someone hurt.
Bought a Smittybilt X2O 10 for the trail rig.
