Three install paths: bumper-mount (permanent), receiver-mount (portable), hidden mount (OEM aesthetic).
Typical DIY time: 4–8 hours on a Jeep, 5–10 on a full-size truck. Shop install runs $400–$800.
Essential electrical: 2/0 welding cable (≤6 ft run) for 12k winches, 400A breaker within 18″ of battery, dedicated ground return — never chassis.
Hidden cost list: bumper reinforcement, cable, breaker, AGM upgrade, alternator. Budget 20–30% extra beyond the winch price.
Torque spec: 1/2″ grade-8 bolts at 90 ft-lb with Loctite 242. Cheaper hardware voids warranty and costs more long-term.
TL;DR: Plan on 8–12 hours for most clean winch installs and roughly $350–$1,600 all-in, depending on your mounting style and whether you pay a shop or do it yourself. The safest setup uses a braced, frame-tied mounting plate, the right gauge cables with a main fuse or breaker mounted close to the battery, and an upright winch orientation unless the manufacturer clearly approves upside-down mounting.
Key Takeaways
DIY winch install often cuts 50–70% off the labor bill, but you need solid skills with tools, metal, and 12V wiring to do it safely.
Professional installation cost usually includes 8–12 hours of shop time plus a markup on parts. You get proper documentation and a warranty on the workmanship.
Mount options you’ll see most often are aftermarket bumper, receiver hitch plate, hidden winch mount, and carefully reinforced drill-in mounting behind a factory bumper.
Wiring basics: run cable that’s sized for the amp draw and distance, put a main fuse or breaker within 18 inches of the battery, and use quality crimp lugs, heat shrink, and wire loom on exposed runs.
Upside-down mounting is usually a bad idea. It can starve an oil bath motor or gearbox of lubrication and mess up cable routing unless the winch was engineered for inverted use.
Waterproofing means more than an IP67/IP68 sticker. Proper sealing, protected connectors, and smart solenoid placement dramatically improve survival in repeated water crossings.
Mounting without a bumper typically involves a frame-mounted tray, a receiver hitch, or a custom cradle. All of them rely on solid structural design and good welding or bolting practices.
Typical mistakes include undersized wire, weak or painted-over grounds, fairleads that are off-center, and ignoring torque specs on winch and bumper hardware.
What Is Winch Installation?
Battery → Fuse → Disconnect → Contactor → Motor. Dedicated ground.Winch installation is the full process of attaching a winch to a vehicle or trailer in a way that’s structurally safe and electrically reliable. That means choosing the right mounting option, bolting or welding a winch plate or bumper to the frame, aligning the fairlead, routing heavy-gauge wiring, adding proper fusing, and then test-pulling the system under controlled load before you trust it on the trail.
DIY vs Professional Winch Installation: Which Is Right for You?
The choice between DIY and hiring a professional shop really comes down to two things: how handy you are and how much risk you’re willing to shoulder. DIY can save a lot of cash, especially on labor, but every mistake shows up later as a broken mount, dead winch, or electrical problems. A professional installation service costs more up front but brings experience, liability coverage, and a warranty if something goes wrong.
Skill Level & Time: Who Should DIY?
A DIY winch install makes sense if you’re already comfortable drilling into steel, following a wiring diagram, and working around bodywork without breaking clips and sensors. If words like solenoid wiring, torque specs, or chassis grounds make you nervous, that’s usually a sign you’ll be happier handing the job to a shop or at least a more experienced friend.
Installer Type
Mechanical Skill Needed
Electrical Skill Needed
Typical Time
Who It Suits
Beginner DIY
Basic hand tools only
Minimal 12V knowledge
10–16 hours+
Better to use a shop or get hands-on help from someone experienced
Intermediate DIY
Comfortable drilling, bolting
Can follow wiring diagrams
8–12 hours
Most capable home mechanics and hobby fabricators
Professional Shop
Advanced, with fabrication tools
Experienced in high-amp wiring
6–10 hours
Those who value safety, documentation, and quick turnaround
Cost Comparison: DIY vs Professional
Here’s a realistic look at what you’ll spend on a DIY winch install versus a professional installation cost, assuming you already own the winch itself. This is based on what I see in off-road shops and garages every season.
Item
DIY Range (USD)
Professional Range (USD)
Mounting plate / bumper
$100–$1,200
$100–$1,200
Wiring & hardware
$50–$200
$50–$200
Labor time
Your time (8–16 hrs)
8–12 hrs @ $100–$180/hr
Labor cost
$0 (excluding your time)
$800–$2,160
Parts markup
None
10–30% typical
Warranty on install
None
6–24 months
Professional Installation Service: What You’re Paying For
A professional installation service is more than just someone turning wrenches. You’re paying for their experience with failed mounts, burned wires, and busted plastics on other vehicles so your install avoids the same issues.
Labour time: 8–12 hours for straightforward bumper or hitch installs. More complex hidden or custom mounts can stretch to 12–16 hours once you factor in cutting, alignment, and wiring tweaks.
Hourly rate: Typically $100–$180 per hour in North America, sometimes more at specialty off-road shops.
Total labour cost: Realistically $800–$2,160+ depending on vehicle, rust, and how “bolt-on” the parts truly are.
Parts markup: Expect 10–30% on bumpers, mounting plates, wiring kits, and accessories, which helps cover sourcing and warranty handling.
Warranty coverage: Many shops stand behind their work for 6–24 months, with parts covered by the manufacturer’s warranty.
When Professional Install Is the Better Choice
There are situations where paying a shop isn’t overkill. It’s the smart move.
You’re installing a hidden winch mount behind modern plastic that needs careful cutting or light fabrication to look factory.
Your rig is loaded with parking sensors, air dams, adaptive cruise, and cameras that are easy to damage and tricky to relocate.
You are guessing on wire gauge, fuse sizing, or where to place a disconnect switch.
You’re doing a heavy-duty truck winch installation guide-type build with 15,000+ lb rated pull and want an engineer or seasoned fabricator to sign off on the structure.
How Much Does Winch Installation Cost?
Match install path to how you’ll use the winch. Portable beats hidden beats bumper on flexibility. Winch installation cost swings quite a bit from rig to rig. The main drivers are mount style, how much fabrication is needed, and what your local shops charge per hour. In broad strokes, a well-planned DIY can come together for around $350–$600 in parts on top of the winch. A professional install, using quality components, usually lands in the $900–$1,600+ range, with high-end bumpers and complex hidden mounts going higher.
Core Cost Components
Every proper install, no matter the vehicle, needs the same basic ingredients. Here’s how they usually break down in a winch installation cost estimate:
Bumper or mounting plate: $100–$1,200+ depending on brand, material, and whether it includes light tabs, hoops, and recovery points.
Wiring materials: $50–$200 for fine-strand cable, heavy lugs, a main fuse or breaker, loom, and heat shrink.
Misc hardware: $20–$80 for grade 8 or 10.9 bolts, washers, lock nuts, primer, touch-up paint, and sealant.
Labour: 8–12 hours at $100–$180/hr if you’re paying a professional installation service.
Cost by Vehicle & Mount Type
This table gives a realistic range for different winch mounting options. These numbers reflect typical parts cost for a DIY and what I routinely see on invoices from off-road shops.
Setup
DIY Parts Cost*
Pro Install Total*
Notes
Basic front hitch mount (receiver plate)
$200–$450
$600–$1,000
Usually minimal cutting. Good if you share one winch between multiple vehicles.
The line items below are the ones that surprise people on the final bill or after their first trip.
Alignment & trim panels: Time spent re-aligning grilles, headlights, flares, and inner liners after test-fitting the bumper and winch.
Sensor relocation: Brackets or extensions for front cameras, parking sensors, radar modules, and adaptive cruise hardware.
Rust protection: Primer, paint, or cavity wax on freshly drilled or ground metal to keep corrosion at bay, especially in salted climates.
Electrical extras: Battery isolators, higher capacity batteries, Big 3 upgrades, or heavier alternators once you account for installation amp draw considerations.
Winch Mounting Options: Which Is Best?
There’s no single “best” way to hang a winch on a rig. Each of the main winch mounting options has trade-offs in strength, approach angle, looks, and cost. The right answer depends on how you actually use the vehicle and what you’re willing to cut or replace.
Aftermarket Bumper Mount
An aftermarket bumper that’s built for winches is what I recommend most for serious trail use. Good bumpers include an engineered winch tray, gussets that tie into the frame, and a correctly sized fairlead opening. You end up with something that looks like it belongs there, not like it was added as an afterthought. Key pros:
Excellent structural strength with built-in recovery points, so your winch and shackles are all tied into the same reinforced structure.
Usually improves approach angle over stock plastic when designed right, with better access for hooks and soft shackles.
Clean, integrated look that often includes light mounts, skid tie-in points, and heavy shackle tabs.
Key cons:
Highest parts cost, often $500–$1,500+ before powder coating or shipping.
More labour, because these bumpers are heavy and sometimes require wrestling with frame horns, crush cans, and inner liners.
Occasional trimming of fender liners or grille plastics to get everything lined up and rattle-free.
EAV: Aftermarket bumper mounting
Attribute
Typical Range
Bolt pattern drilling
Usually no. Most are pre-drilled for common winch footprints
Mounting plate thickness
0.25–0.375 inches (1/4–3/8″ steel)
Bolt torque (winch bolts)
60–90 ft-lbs, but always confirm the manufacturer spec
Labour hours (install)
4–8 hours for the bumper alone, 8–12 including wiring the winch
When you’re comparing bumper brands, pay attention to mounting plate selection, plate thickness, recovery point design, and whether the bumper supports your winch bolt pattern without hacking it up.
Receiver Hitch Plate Mount
A receiver hitch plate or winch cradle that plugs into a 2″ or 2.5″ receiver is great for folks who only need a winch occasionally or want to move the winch between a truck and a trailer. It’s not as slick-looking, but it’s very practical. Pros:
Removable, so you can keep the winch in the garage to avoid weather, theft, and front-end weight when you’re not wheeling.
Can be used on both ends of the vehicle if you have receivers front and rear. That gives you more recovery options.
Lower upfront cost if you already have a front receiver hitch installed.
Cons:
Sticks out from the bumper, hurting approach angle and making it easier to whack the cradle on rocks.
The receiver and its mounting to the frame must be rated and reinforced for winch-level loads, not just towing.
Requires extra wiring runs or heavy quick-disconnects at each location you plan to plug in the cradle.
EAV: Receiver hitch plate
Attribute
Typical Value
Hitch capacity
5,000–12,000 lbs, but check your specific receiver rating
Bumper bolt pattern compatibility
Not applicable, since the winch mounts to the cradle, not the bumper
Installation time
1–3 hours to set up the plate and wiring, assuming the receiver is already installed
Weight
20–40 lbs for the cradle alone, before adding the winch
Hidden / Low-Profile Mount
A hidden winch mount tucks the winch behind the stock bumper or grille so only the fairlead and maybe the hook are visible. This approach is common on newer SUVs and trucks where owners want recovery capability but prefer a near-factory appearance. Pros:
Stealth look that keeps the front of the vehicle clean and close to stock, good for daily drivers and leased rigs.
Often retains factory crash structure and some sensor functionality when using a well-designed kit.
Harder to steal or vandalize since the winch isn’t hanging out in plain view.
Cons:
More complex to install, with more test fits, trimming of plastic, and sometimes minor cutting of inner metal.
Access to the free-spool lever and the electrical terminals can be tight, which makes service and line changes more work.
Cooling can be affected if the winch blocks airflow to the radiator or intercooler, so you have to watch temps.
EAV: Hidden winch mount
Attribute
Typical Range
Clearance to bumper
Roughly 0.5–1.5 inches between winch and bumper skin
Fairlead accessibility
Yes, through a slot or dedicated opening in the bumper
Complexity rating
3–5 on a 1–5 scale, depending on vehicle and kit design
Custom fabrication required
Sometimes. Some kits are bolt-on, others need brackets or trimming
Factory Bumper Mount (Drill-In)
Factory bumper drilling is where many people get into trouble. Most OEM bumpers are decorative and tied into crash systems. They were never meant to take the shock loads of a hard recovery. Pros:
Lower parts cost, since you can keep the stock bumper and just add a winch tray behind or below it.
Can work well if paired with a strong internal frame-mounted winch plate that does the real structural work.
Cons:
Very high risk of tearing or bending thin sheet metal if the bumper skin is treated as the main support.
Potential to disturb factory crash structures or airbag sensors, which can affect safety systems.
Easy to misalign the fairlead, which gives you a rope path that rubs or stacks badly on the drum.
Best practice: If you’re drilling a factory bumper, always tie the load into a separate winch tray or mounting plate that’s bolted directly to the frame rails. The bumper can be cut to clear and then reinstalled as a cosmetic cover. Use through-bolts and frame brackets rather than trusting thin metal or plastic.
High Mount vs Low Mount Winch
Mounting height is about more than looks. High-mounted winches change sight lines and airflow but give you a nice clean cable path. Low-mounted winches are more protected and subtle but are less forgiving if the cable exit angle is wrong. I see both work well when they’re laid out properly.
High Mount Winch Characteristics
A high mount sits near the top of the bumper or perched on top of it. Think of the classic steel-bumper Jeep with the winch sitting proud.
Makes it easier to watch the drum while you reel in and to correct any bad spooling before it gets buried.
Usually gives a more direct cable line to the fairlead, which keeps the rope from dragging on bumper edges.
Improves line clearance at weird angles, which matters when you’re winching off to the side or downhill.
Trade-offs:
Can partially block airflow to the radiator, intercooler, or trans cooler on some rigs. That matters in hot climates or with heavy towing.
Raises weight a bit higher on the nose, which you’ll feel more on lighter SUVs than on heavy trucks.
Low Mount Winch Characteristics
A low mount tucks the winch down inside the bumper or between the frame rails. That’s common on hidden winch mount kits and many modern aftermarket bumpers.
Lowers the center of gravity and keeps the front profile tighter, which can help handling and approach angle.
Protects the winch better from minor bumps, parking mishaps, and light trail contact.
Lines up well with hidden fairleads and factory bumper openings on late-model trucks and SUVs.
Risks to manage:
More nearby metal and plastic for the rope to rub against if the fairlead or winch is misaligned.
Fairlead location has to be spot-on to keep the rope from dragging across bumper edges at extreme steering and suspension travel.
Recovery Angle Considerations
Winch height and fairlead placement work together. The more vertical distance between the drum and fairlead, the steeper the cable angle, especially on short pulls. That’s where people chew through synthetic line and hawse fairleads.
Try to keep a straight pull so the rope runs true across the central 80–90% of the drum width for most recoveries.
Avoid extreme up or down cable exit angle. If your rope is trying to saw through the top or bottom of the fairlead slot, adjust your mounting or add a snatch block to change the angle.
Can You Mount a Winch Upside Down?
People ask this a lot when they’re fighting for space behind modern bumpers. In most cases, mounting a winch upside down is asking for trouble. Oil bath motor designs, seal placement, and breather locations all assume a certain orientation. Unless the manufacturer comes right out and says inverted mounting is fine, treat it as off-limits.
Oil Bath Motor Risk
Many electric winches use an oil bath motor or a gear housing that shares lubricant. The oil level and internal parts are designed around a specific upright position.
Flipping the housing can uncover parts that were supposed to run in oil, or drown seals that were meant to stay mostly dry, leading to seal failure and leaks.
Bearings and gears may no longer be lubricated correctly, which shortens life and can lead to noisy, rough operation.
Breather holes that once vented vapor may now sit low where water can run in during rain or crossings.
Always read the manual to see what mounting positions are approved. Some winches have clockable housings that allow side mounting or rotating the gear housing relative to the drum without inverting the whole unit.
Fairlead Orientation
An inverted winch often changes which side of the drum the cable feeds from. That simple change can throw a lot of things off if you’re not ready for it.
Fairlead orientation: Hawse and roller fairleads are designed for load to come from a certain direction. Reverse that and the rope may drag where it was never supposed to.
Cable wrap: The first wrap needs to sit tight against the drum flange and head straight toward the fairlead. Inverted setups can make that path awkward or unsafe.
Clearance: An upside-down winch may put the rope closer to crossmembers, skid plates, or bumper cutouts under full spool.
When It Is Acceptable
There are a few winches that can be safely inverted, but it is model-specific.
Some units are sold as multi-position and the documentation plainly allows different clock angles and orientations, including inverted, when the motor and gearbox are clocked properly.
Others have clear warnings that upside-down mounting will void the warranty due to lubrication and cooling issues.
If your winch is approved for inversion, treat the install carefully:
Verify the oil level and breather location are correct for the new orientation, and adjust per manufacturer guidance if required.
Check that the cable still exits the drum in the direction the design expects relative to the fairlead opening.
Cycle the suspension and steering while checking the cable exit angle so it doesn’t rub on metal at full droop or lock.
Expert tip: If the documentation is vague or you are unsure, assume upside-down mounting is not allowed. It’s usually easier and cheaper to change the winch mounting plate, or go with a hidden winch mount that keeps the winch upright, than it is to replace a burned-out motor later.
Strong brackets keep the winch on the truck, but proper winch wiring installation keeps it alive. Undersized cable, sloppy routing, and missing fuses are the things I see most often on rigs that limp into the shop after a couple of hard pulls. Treat the electrical side with the same respect you give the mechanical work.
Basic Wiring Path
A typical electric winch wiring layout looks like this, whether it’s on a Jeep, truck, or trailer:
Battery positive (+) runs to a fuse or breaker mounted close to the battery.
The fuse or breaker output goes to the solenoid or contactor pack.
The solenoid outputs then feed the winch motor terminals, usually labeled A, F1, and F2. Follow the wiring diagram for your exact unit.
Battery negative (–) goes directly to the winch motor ground and often to the chassis as well, forming a solid return path.
There are different ways to physically arrange the contactor and cables, but that basic sequence stays the same. If you want layout ideas and current draw details, see the section on installation amp draw considerations after you pick your exact winch size.
Fuse Placement & Protection
Mount the main fuse or breaker within 18 inches of the battery positive so the entire run from the battery to the winch is protected.
For a 9,000–12,000 lb winch, typical fuse rating ranges from about 200–500 amps. Always match what your winch manufacturer specifies.
Use sealed ANL or MRBF style fuses in a robust holder. Avoid cheap add-on fuse blocks that were never intended for this kind of current.
Wire Gauge & Distance
Wiring specifications are driven by how many amps your winch draws and how far the current has to travel. Most 8,000–12,000 lb winches can see 300–450 amps or more at maximum load. That means skinny cable is not an option if you want performance and safety.
Attribute
Typical Value (9,000–12,000 lb winch)
Battery cable gauge
2 AWG to 1/0 AWG. Use the larger size for longer cable runs
Solenoid distance
1–4 feet away from battery or winch. Shorter runs reduce voltage drop
Fuse rating
200–500 amps, matched to the winch manufacturer’s spec
Ground wire gauge
Same as positive cable, usually 2 AWG to 1/0 AWG
For fine-tuning cable sizes, look at your specific winch’s charts and the length of your cable runs in the context of installation amp draw considerations. Overbuilding a little on wire gauge isn’t wasted money.
Cable Routing Path & Protection
Thoughtful routing is what separates a pro-looking install from a mess that fails on the trail. I see a lot of winches pulled down because a cable chafed through on a sharp bracket.
Keep cables away from sharp edges, catalytic converters, exhaust manifolds, steering shafts, and moving suspension parts.
Slide wire loom or split conduit over every exposed run, especially near the engine and across the frame.
Secure the cable every 12–18 inches with clamps or heavy-duty zip ties so it can’t flop around and rub.
Use rubber grommets or bulkhead fittings anytime a cable passes through a metal panel or firewall.
Battery Connection & Grounding
Weak grounds and shared circuits are one of the biggest reasons winches act sluggish under load. A dedicated, clean path back to the battery makes a noticeable difference.
Run the winch positive and negative directly to the battery posts whenever you can, instead of piggybacking on existing lugs or fuse boxes.
If you’re relying on chassis grounds, make sure there is a heavy ground strap from battery negative to frame, and from frame to the winch mount or housing.
Grind or sand paint and rust off grounding points. Use star washers so the fastener bites into bare metal, then seal with paint or dielectric grease around (not between) the contact surfaces.
Fairlead Installation Sequence (Wiring Context)
The fairlead installation step gets overlooked until the rope starts rubbing something. It should be part of your layout planning before you lock in wiring runs.
Mount the winch securely to the winch plate or bumper, but keep fasteners just snug until alignment is confirmed.
Feed the rope or cable through the fairlead opening and check for straight alignment with the drum.
Install and torque the fairlead, whether hawse or roller, to the mounting plate using the recommended hardware and torque specs.
Cycle steering and suspension as you check that the rope path is clear in all directions before you finalize wire tie-downs and loom placement.
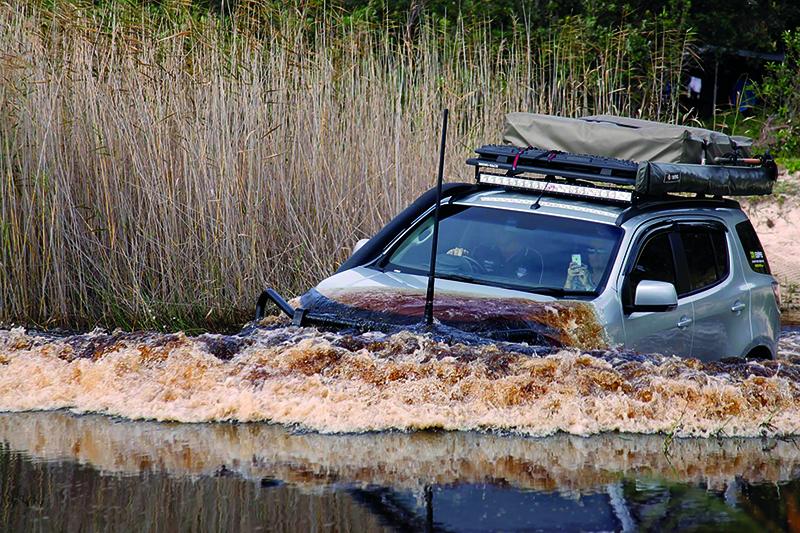
Waterproofing Your Winch for Deep Water Crossings
Plenty of winches wear an IP67 or IP68 tag, but I’ve opened more than a few “sealed” units that were full of mud and water. If you regularly cross deep water or run bog holes, you’ll want to go beyond the factory rating with thoughtful waterproofing and post-trip checks.
Know Your IP Rating
Start by figuring out exactly what you bought. Different parts of a winch can have different ratings, especially the solenoid box.
IP67: Dust-tight and protected against temporary immersion up to 1 m depth for a limited time.
IP68: Dust-tight and tested for continuous immersion beyond 1 m. The exact depth and duration depend on the manufacturer’s spec sheet.
Solenoid & Control Box Sealing
If you open the control box, inspect and replace solenoid gaskets that look crushed, torn, or hardened.
Run a small, even bead of good waterproofing compound such as RTV silicone or dielectric sealant along case joints if the manufacturer approves that practice.
Mount the solenoid pack up high and away from direct splash zones whenever possible, instead of down low on the bumper.
Motor & Gearbox Sealing
Lightly seal around motor end caps and gear housing seams with RTV if they’re not already gasketed, being careful not to glue parts that are supposed to be serviceable.
Leave any designated breather ports open and clear. Blocking them can cause pressure build-up and force water past seals.
Inspect motor brushes, commutator, and internal contacts on a schedule if you frequently submerge the winch. Look for rust trails or burned spots.
Connectors & Wiring Waterproofing
Use heat-shrink ring terminals with adhesive lining on high-amp connections to keep water from wicking up the wire.
Wrap exposed joints, quick-disconnect points, and splices with self-fusing connector waterproofing tape for extra protection.
Route cables in loom and avoid low loops where water, mud, and debris naturally collect and sit.
Post-Water Inspection Protocol
Anytime you’ve had the winch nose-deep in water, get in the habit of this quick routine afterwards. It dramatically extends the life of both steel cable and synthetic rope.
Unspool 30–50 feet of rope or cable, rinse off mud with fresh water, let it dry, and re-spool under a small steady load so layers pack evenly.
If you notice grinding noises, dragging, or intermittent operation, open the motor or solenoid housing to check for trapped water or corrosion.
Grease or oil moving parts and pivot points according to your winch maintenance manual after repeated wet use.
Mounting Without a Bumper
Sometimes you want winch capability without swapping to a big steel bumper. That’s doable, but it usually means you’re into more custom work and structural thinking. Frame-mounted plates, receiver hitches, and custom cradles can be very strong if they’re designed right. Done wrong, they tear sheet metal or twist frame horns.
Frame-Mounted Winch Plate
The most common way for how to mount a winch without a bumper is to bolt a heavy winch plate directly across the frame rails, then re-fit or trim the factory bumper around it. This lets the frame handle the load while the stock bumper keeps the clean look.
Use at least 1/4″ (0.25″) steel for the main plate and consider gussets if you’re running a high-capacity winch.
Rely on through-bolt installation with sleeves or heavy brackets into the frame, not just self-tapping screws into thin metal.
Make sure recovery loads travel through the plate straight into the frame rails, not into the bumper shell or crash foam.
Receiver Hitch as an Alternative
If your rig already has a front receiver, or you’re willing to add one, a hitch-mounted winch cradle is an easy way to get a functional setup without committing to a full bumper replacement.
Verify that the hitch and its frame mounts are rated at or above the winch’s maximum pull and consider a safety margin.
Choose a receiver hitch plate with adequate thickness, good welds, and gusseting where the tube meets the tray.
Plan on heavy quick-disconnect power connectors at the front and possibly rear, so you can remove the cradle quickly when not in use.
Custom Cradle Fabrication
On some rigs and many trailers, nothing off the shelf really fits the way you want. That’s where a custom winch cradle comes in. I see this a lot on car hauler and equipment trailers and on oddball 4x4s.
If you’re not an experienced fabricator, have your design looked over by a qualified fabricator or engineer, especially if you’re using a heavy-duty winch.
Add reinforcement plates, gussets, and doubler plates wherever the cradle ties into the frame or main structure so the load is spread out.
Make cable path and fairlead installation part of your initial design instead of an afterthought. A strong mount is useless if the rope drags on steel every time you pull.
Complexity note: Mounting a winch without an aftermarket bumper often takes more planning and fabrication than bolting on a purpose-built bumper. Parts can be cheaper, but the labor and design time usually are not.
Most Common Installation Mistakes
Most “bad winches” I’ve been asked to replace weren’t bad at all. They were let down by the install. Avoid these common mistakes and you’ll sidestep a lot of headaches and warranty fights.
1. Undersized Wire Gauge
Running skinny cable is one of the fastest ways to make a good winch look weak. Voltage drop and heat build-up rob power and can even melt insulation under heavy use. Fix:
Size your cable based on both amp draw and total run length. For most 9,000–12,000 lb winches that means 2 AWG to 1/0 AWG, not starter cable from the bargain bin.
Replace questionable wiring with high-strand welding cable or equivalent that’s flexible, durable, and rated for the load.
2. Incorrect Fuse Placement
Mounting the fuse or breaker way down the line near the winch leaves a long stretch of unprotected hot cable. If that cable chafes, it can kill the battery or start a fire before the fuse even sees it. Fix:
Relocate the main fuse or breaker so it sits within about 18 inches of the battery positive post.
Use the fuse rating and style recommended in your manual, and avoid “oversizing” the fuse just to keep it from blowing.
3. Poor Grounding
Weak or painted-over ground points are behind a lot of slow or intermittent winch behavior. The winch tries to pull, but you’re losing voltage across corroded or undersized connections. Fix:
Run the same gauge cable on the negative side as on the positive side. Don’t rely on a thin ground strap for a high-amp winch.
Strip paint and rust off ground locations, use star washers, and tighten hardware to spec.
If you’re still seeing issues, add a dedicated heavy ground cable from the battery negative straight to the winch mount or motor housing.
4. Fairlead Misalignment
A fairlead that sits off-center or at the wrong angle relative to the drum will cause the rope to stack badly, pinch, or try to cut its way through the bumper. I see this a lot on DIY hidden mounts. Fix:
Reposition the winch or fairlead so the drum centerline and the fairlead hole centerline match and are square to each other.
Turn the steering lock-to-lock and flex the suspension if possible while watching the cable exit angle so you catch interference before it ruins the rope.
5. Skipping Torque Specs
Guessing on bolt tightness leads to two problems. Too loose and things walk out over time. Too tight and you crush sleeves, distort mounts, or strip threads right when you need them most. Fix:
Use a torque wrench on all major winch mounting hardware, bumper bolts, and frame brackets.
Follow the winch and bumper manufacturer’s torque specification chart, and re-check after the first trip once everything has settled.
6. Ignoring Service Access
A hidden or tight mount can look beautiful until reach the free-spool lever or swap a solenoid. Then you find out the only way in is to pull the whole bumper. Fix:
During mock-up, reach in and actually operate the free-spool lever and touch the terminals. If you can’t, adjust the layout before final assembly.
Plan access holes, removable panels, or remote free-spool extensions on hidden winch mount setups so basic service doesn’t turn into a half-day job.
FAQ
Here are straightforward answers to the questions I hear most often in the shop about how to install a winch, what it costs, and what to expect.
Is DIY winch installation realistic for a home mechanic?
Yes, as long as you’re an intermediate-level home mechanic who’s comfortable drilling, measuring twice, and doing basic 12V wiring. For a clean DIY winch install, plan on a full day in the driveway, read the instructions end to end, and don’t rush the wiring or structural mounting steps.
How much should I budget for winch installation?
Beyond the cost of the winch itself, most people should budget roughly $250–$600 for mounting plates, hardware, paint, and wiring if they’re doing it themselves. If you’re paying a shop, expect a professional installation service total in the $800–$2,400 range depending on mount type, fabrication work, and local labor rates.
How long does it take to install a winch?
For a first-time DIY install with a bolt-on bumper or hitch plate, 8–12 hours is a realistic window. Hidden mounts or anything that requires trimming and test-fitting often stretch into a full weekend project. A seasoned shop crew usually does the same job in 6–10 hours, including wiring and testing.
What tools do I need for a DIY winch install?
You’ll want a decent socket and wrench set, Allen keys, a torque wrench, a drill with metal bits, wire cutters/strippers, and heavy crimpers for lugs. An angle grinder, floor jack, and jack stands make life easier. A multimeter is strongly recommended for checking continuity, voltage drop, and grounds before you call the job done.
Will installing a winch void my vehicle warranty?
Generally, adding a winch doesn’t wipe out your entire vehicle warranty. What usually happens is that warranty coverage can be denied on components that fail because of the winch or a poor install. To reduce that risk, follow the manufacturer’s instructions, avoid hacking into key wiring harnesses, and consider getting a reputable shop to document the work.
Can I install a winch on a stock bumper?
Most stock bumpers are too flimsy to handle winch loads by themselves, especially modern plastic and thin metal designs. A common solution is to add a frame-mounted winch tray behind the stock bumper, then trim the bumper to clear the fairlead. Avoid bolting a winch only to bumper skins, plastic cores, or crash foam.
Do I really need a fuse or breaker on my winch wiring?
Yes. A big fuse or breaker near the battery is cheap insurance. It protects against dead shorts from chafed wires and reduces the risk of the cable turning into a red-hot element under the hood. Mounting overcurrent protection far from the battery leaves too much high-amp cable unprotected.
What’s the most common mistake people make with winch wiring?
The big three are undersized cables, poor grounding, and bad fuse placement. Those mistakes lead to slow winching, overheating leads, and possible electrical fires. With a little planning, correct wire gauge, and a properly placed fuse, all of those are easy to avoid.
Can I move the winch between my truck and trailer?
Yes, and a lot of folks do exactly that. A receiver-mounted winch cradle and heavy-duty quick-disconnect wiring let you share one winch between a tow vehicle and a trailer. You’ll need properly rated receivers and dedicated power connectors at each location, plus enough cable length to reach without being stretched tight.
Final Summary & Next Steps
A safe, reliable winch installation rests on three things working together: a strong structural mount tied into the frame, properly sized wiring with the right protection, and a layout that still lets you access and maintain the winch after everything is bolted up. Whether you go for a DIY winch install or a professional installation service, slow down, mock everything up, and double-check fairlead alignment and cable routing before your first real pull. If you want more detailed, vehicle-specific help, take a look at resources like our truck winch installation guide and Jeep winch installation. For accessory-level details, dig into mounting plate selection, solenoid wiring, and fairlead installation. Use this guide as your working blueprint and you’ll end up with a winch installation you can count on when the trail turns ugly.
📖 Related deep-dive: Before wiring the winch, size the power source properly — see the complete winch battery setup.
🔧 My Install Timeline — 2020 JL + Warn VR EVO 10-S
Actual install clock: 4 hr 15 min start to first pull test. Receipts totaled around $2,750 including Warn VR EVO 10-S, ARB Summit aluminum bumper, 2/0 welding cable, Blue Sea 7186 400A breaker, 5× Carling V1D11 rockers, Odyssey PC1750T AGM upgrade. First test pull: 9,480 lb measured on a Dillon AP load cell — within 20 lb of Warn’s 9,500 lb spec. Voltage drop at full load: 0.38 V with 2/0 cable. Do it right once.
Disclaimer: As an Amazon Associate, I earn from qualifying purchases at no additional cost to you. But all my reviews and guides are genuine and come from my experience.
Hi, I'm Aaron, the founder of Off-Road Pull. My love for off-roading began in my teenage years while exploring the diverse landscapes of Arizona.
With more than 16 years of experience in off-roading and winching, I bring a blend of practical know-how and a background in mechanical engineering to provide you with detailed and trustworthy advice.
My passion is to share this knowledge with both newcomers to adventure and experienced off-roaders. When I'm not tackling rugged terrain or crafting in-depth articles, you'll find me capturing the scenic beauty of the outdoors through my lens.
 Winch installation is the full process of attaching a winch to a vehicle or trailer in a way that’s structurally safe and electrically reliable. That means choosing the right mounting option, bolting or welding a winch plate or bumper to the frame, aligning the fairlead, routing heavy-gauge wiring, adding proper fusing, and then test-pulling the system under controlled load before you trust it on the trail.