You can convert a car starter motor into a DIY electric winch capable of pulling small vehicles or heavy equipment. This guide walks you through the process step-by-step, including motor selection, drum fabrication, wiring, and safety testing.
Understanding Starter Motors
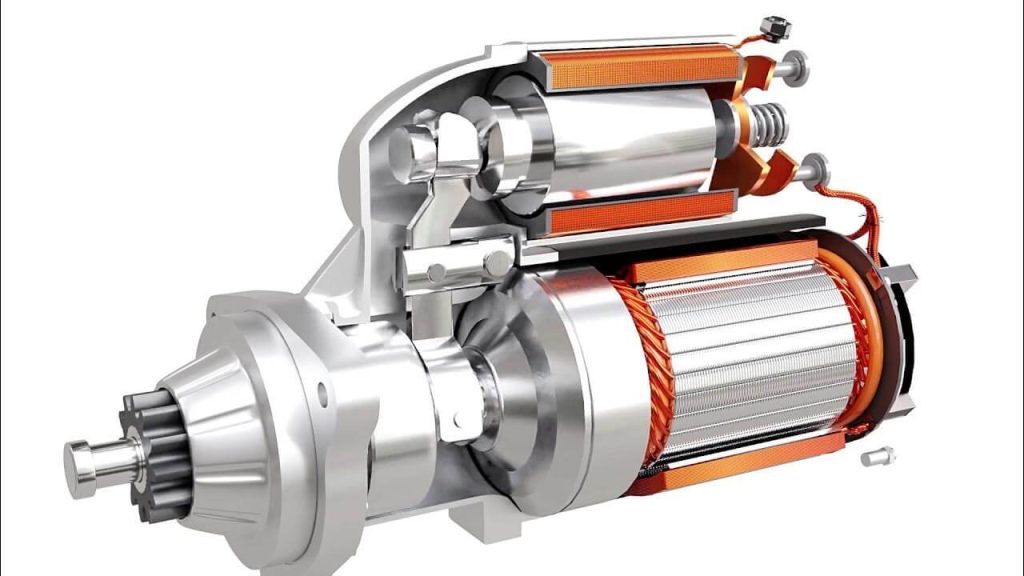
First, let’s talk about the heart of our project: the starter motor. Commonly found in cars, these motors are designed to kick-start the engine.
What makes them perfect for a DIY winch is their robustness and high torque. Essentially, we’re leveraging their power to pull heavy loads, something they’re inherently designed to do, albeit in a different context.
Tools and Materials Needed
Starter Motor
The centerpiece of your winch. Ideally, choose a starter motor from a larger vehicle, like a truck or an SUV.
These motors are generally more powerful and can handle larger loads.
The starter motor should be in good working condition to ensure it can generate enough torque for winch operations.
Winch Drum
This is where your cable or rope will be wound. The drum needs to be sturdy enough to handle the tension and stress of pulling.
A steel drum is a common choice due to its strength and durability.
The size of the drum will dictate how much cable it can hold, so consider the length and thickness of the cable you plan to use.
Heavy-Duty Cables
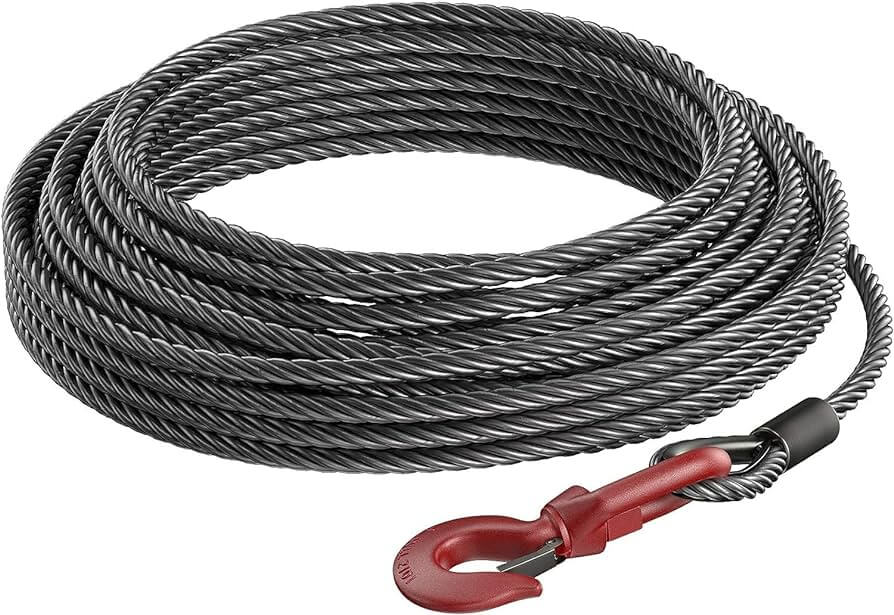
These are essential for connecting the winch to a power source and for the winch cable itself.
The winch cable needs to be strong and durable, typically made of steel or synthetic materials.
For electrical connections, ensure the cables can handle the current required by the starter motor without overheating or degrading.
Reliable Power Source
Your winch needs power to operate. A standard 12-volt car battery is often sufficient, but ensure it can deliver the necessary current. If your starter motor is from a large vehicle, it may require a more powerful battery or an alternative power source.
Bolts, Nuts, and a Sturdy Frame
You’ll need various bolts and nuts to securely assemble your winch. The frame holds everything together and supports the entire mechanism.
It needs to be robust enough to withstand the forces exerted by the winch during operation. You can fabricate this from steel or any other strong material.
Safety Gear
Safety cannot be overstated in such projects. Gloves protect your hands from sharp edges and abrasions, while goggles shield your eyes from any flying debris or sparks during the assembly. Also, consider wearing protective clothing to safeguard against any unforeseen accidents.
Step-by-Step Guide to Making the Winch
Creating a winch from a starter motor involves several detailed steps, each critical for the functionality and safety of the final product. Here’s a deeper dive into each step:
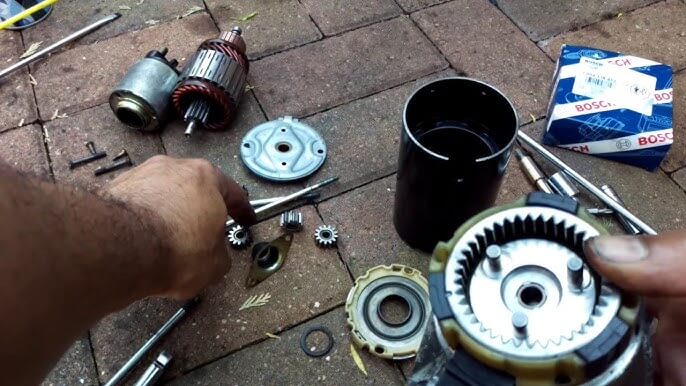
Preparing the Starter Motor

Begin with a thorough inspection and cleaning of the starter motor. This is not just about dusting off dirt; it’s about ensuring the motor is in optimal working condition.
Look for signs of wear, such as frayed wires or corroded terminals, as these could impact performance. If you find any damage, it’s best to repair or replace the affected parts before proceeding.
The motor should be free of grease and grime, which could otherwise hinder its operation. This step is vital because the entire winch’s efficiency hinges on the motor’s condition.
Building the Winch Drum
The drum is a critical component that will hold and wind the winch cable or rope. Constructing a winch drum requires precision and understanding of the load it will bear.
The drum should be made from durable materials, typically metal, to withstand the tension and weight during winching operations. Its diameter and width should be sufficient to accommodate the length and thickness of your chosen cable or rope.
Additionally, the drum must have a mechanism for easy and secure attachment to the starter motor, ensuring that the rotational force from the motor is efficiently transferred.
Understanding Gearing for Speed Reduction and Torque Increase
In its original form, a starter motor is designed to deliver high-speed, low-torque output to quickly start an engine. However, for a winch, we need the opposite: low speed and high torque. This is where a gear reduction system comes into play.
By using gears, we can significantly reduce the speed of the motor while increasing the torque delivered to the winch drum. This increase in torque is essential for effectively pulling heavy loads, as winching requires strong pulling power rather than high speed.
Types of Gear Systems
There are several types of gear systems that can be used to achieve the necessary reduction in speed and increase in torque for your DIY winch:
- Planetary Gears:
- How it works: A planetary gear system consists of a central sun gear, planet gears that rotate around the sun gear, and an outer ring gear. This setup allows for high torque multiplication and compact design.
- Why it’s suitable: Planetary gears are widely used in commercial winches because they offer a great balance of torque increase and size reduction.
- Application: You can purchase a pre-made planetary gear system, or salvage one from a broken winch or automotive part, and adapt it to your winch design.
- Spur Gears:
- How it works: Spur gears are the most basic type of gears, consisting of two gears that mesh directly. By using a large spur gear connected to the drum and a smaller spur gear connected to the motor, you can reduce the speed and increase the torque.
- Why it’s suitable: While less compact than planetary gears, spur gears are simple, easy to find, and can provide significant torque increases.
- Application: You can find spur gears in industrial machinery, or you can purchase a set online that fits the specifications of your motor and drum.
- Worm Gears:
- How it works: A worm gear setup uses a worm (a screw-like gear) that meshes with a worm wheel (a regular gear). As the worm turns, it drives the worm wheel at a much slower speed but with increased torque.
- Why it’s suitable: Worm gears are very effective at reducing speed and increasing torque, and they also have the benefit of self-locking properties, meaning the winch drum won’t spin backward under load.
- Application: Worm gears can be sourced from old mechanical devices or purchased from gear suppliers.
How to Install Gears on Your DIY Winch
To install a gear reduction system between the starter motor and the winch drum, follow these steps:
1. Calculate Gear Ratio
- First, determine the desired gear ratio. A typical winch needs to reduce the motor’s speed by 10 to 50 times, depending on the power of the motor and the weight of the load. For instance, a 10:1 ratio will make the winch drum rotate 10 times slower but with 10 times the torque of the motor.
2. Mount the Gears
- You will need a sturdy frame or casing to mount the gears between the motor and the winch drum. Ensure that:
- The output shaft of the motor is aligned with the input of the first gear.
- The output of the gear system is aligned with the shaft of the winch drum.
- Tip: Use metal brackets and welded connections for durability, as plastic or loose mounts will not withstand the forces involved in winching.
3. Connecting the Gear System to the Motor and Drum
- Use a coupling or shaft adapter to connect the output shaft of the starter motor to the input gear of your gear system. Then, connect the output of the gear system to the winch drum.
- Alignment is key: Ensure that all components are tightly aligned to avoid wobbling or excess strain on the system.
4. Test for Smooth Operation
- After mounting the gears, test the system without any load. Ensure that the gears mesh smoothly, and there is no grinding or slipping.
- If you hear unusual sounds or feel vibrations, stop and adjust the alignment or inspect the gear teeth for wear.
Example Gear Setup
Let’s consider a scenario where you are using a starter motor from a large vehicle (which outputs about 2,000 RPM) and a 10:1 planetary gear system.
This will reduce the speed to 200 RPM at the drum, but increase the torque by a factor of 10. This setup would allow you to pull much heavier loads while operating the winch at a reasonable speed.
Advantages of Using Gearing for Your Winch
- Increased Torque:
- By reducing the motor’s speed, you significantly increase the torque available at the drum, allowing your winch to pull much heavier loads.
- Improved Control:
- A winch operating at lower speeds gives you better control over the load, which is critical for safety, especially in recovery or lifting operations.
- Energy Efficiency:
- Gearing reduces the strain on your power source by allowing the motor to operate within its optimal RPM range, which can extend the life of both the motor and the battery.
Assembling the Winch Components
This step involves connecting the drum to the starter motor. It’s crucial that this connection is robust and capable of handling the rotational force exerted by the motor.
Typically, a coupling is used to join the motor’s output shaft to the drum. This coupling must be perfectly aligned to prevent any wobbling or imbalance during operation.
Bolts and welding can be used to secure the coupling and drum in place. It’s important to ensure that the assembly is as compact as possible while still maintaining its functionality, as this will aid in the stability and durability of the winch.
Electrical Connections and Setup
Wiring the starter motor to a power source is a delicate task that requires attention to detail for safety reasons.
First, identify the motor’s voltage requirements and ensure your power source matches these specifications.
For instance, if you’re using a 12-volt car battery, it should be capable of delivering the necessary current without overloading.
Connect the motor to the battery using heavy-duty cables, and ensure all connections are secure and insulated to prevent short circuits.
Additionally, it’s wise to install an on-off switch between the motor and the battery for easy control of the winch.
Double-check all connections for tightness and proper insulation, as loose or exposed wiring can be hazardous.
Testing and Safety Checks
After assembling your winch, it’s essential to conduct thorough testing and regular safety checks. This process ensures that your DIY winch is not only effective but also safe to operate. Let’s delve into these crucial steps in more detail:
Initial Testing with Small Loads
Start by testing your winch in a controlled environment. This means an area where, if something were to go wrong, it wouldn’t cause injury or significant damage.
Begin with small loads that are well within the estimated capacity of your winch. The purpose here is to observe the winch’s performance under actual working conditions.
Pay attention to how the motor responds when the winch is in operation. Does it struggle or operate smoothly? Also, monitor the drum and the cable.
Are they functioning as expected without any slippage or unusual noises? This initial testing is crucial for identifying any issues that might not have been apparent during the assembly.
Gradual Increase in Load
If the winch handles small loads successfully, gradually increase the weight. This step-by-step approach helps in assessing the winch’s capacity limits and overall durability.
It’s essential not to rush this process. Incrementally increasing the load allows you to spot potential problems before they lead to failure or accidents.
For example, you might discover that the winch can handle a certain weight but starts to show signs of strain beyond that point. Identifying these limits is vital for safe operation.
Regular Maintenance Checks
Regular maintenance is key to the long-term safety and functionality of your winch.
This involves inspecting all parts of the winch for wear and tear, especially after heavy use. Check the starter motor for any signs of overheating or electrical issues.
Inspect the winch drum and cable for any damage or wear. Bolts and other fastenings should be checked for tightness, as vibrations during operation can loosen them over time.
Also, pay attention to the electrical connections, ensuring they remain secure and well-insulated.
Monitoring During Use
Each time you use the winch, keep a close eye on its performance. Be alert for any unusual sounds or behaviors, such as excessive vibration, the motor straining, or the cable not winding smoothly. These could be signs of underlying issues that need immediate attention.
Keeping a Record
It’s helpful to maintain a log of your winch’s usage and any maintenance activities. This record can be invaluable in keeping track of its condition over time, scheduling regular maintenance, and identifying recurring issues that may need a more permanent solution.
Applications and Limitations
The DIY winch you’ve created from a starter motor can be a versatile and practical tool, but it’s important to understand both its applications and limitations to ensure safe and effective use. Let’s dive deeper into where your winch can shine and where caution is needed.
Applications
- Pulling Loads
- Your homemade winch is excellent for pulling various loads. This could include dragging heavy items like logs, moving large equipment in a yard, or even assisting in landscaping tasks. The key here is to ensure the load is within the winch’s capacity.
- Lifting Items in a Workshop
- In a workshop setting, your winch can be invaluable. It can be used to lift engines out of vehicles, hoist heavy machinery parts, or move large workpieces around. The controlled environment of a workshop allows for safer operation, as long as the items being lifted are within the winch’s limits.
- Vehicle Recovery Tool
- Another practical use of your DIY winch is in vehicle recovery. This can be especially handy if you’re into off-roading or live in an area with challenging terrain. The winch can help pull a stuck vehicle out of mud, sand, or snow. It’s important to anchor the winch securely and use it judiciously to avoid vehicle damage.
Limitations
- Not for Extremely Heavy-Duty Tasks
- While your DIY winch is robust, it’s not designed for industrial-level heavy lifting or pulling. It’s crucial to understand that the strength of the winch is partly determined by the starter motor’s original design, which is intended for starting car engines, not for moving extremely heavy loads.
- Load-Bearing Limits
- The winch should be used within its load-bearing limits. This limit is influenced by several factors: the power of the starter motor, the strength of the winch drum, and the durability of the cable or rope. Exceeding these limits can lead to equipment failure, which can be dangerous.
- Not for Continuous, Heavy Use
- Your homemade winch is not designed for continuous, heavy use. The starter motor, while powerful, is not built for prolonged operation like commercial winches. Using the winch for extended periods can cause overheating and wear out the motor quickly.
- Precision and Control Limitations
- The DIY nature of the winch means it might lack the precision and control features of commercial winches. This can be a factor when delicate maneuvering is required, such as in certain types of vehicle recovery or intricate lifting tasks.
Troubleshooting Common Issues in Your DIY Winch
When using a winch made from a starter motor, you might face certain issues like overheating or lack of power. Let’s explore these common problems in detail and understand how to troubleshoot them effectively.
Overheating
- Causes of Overheating
- Overheating in your DIY winch can occur for several reasons. Continuous or heavy use can strain the motor beyond its capacity, leading to excessive heat build-up. Inadequate ventilation around the motor can also contribute to overheating, as can electrical issues like short circuits or overloaded circuits.
- How to Address Overheating
- To tackle overheating, first, let the motor cool down. Then check if you’ve been running the winch for extended periods or lifting loads beyond its capacity. If so, reduce the load and usage time. Ensure there’s enough space around the motor for air circulation. Examine the electrical wiring for any signs of damage, like melted insulation or exposed wires, which could indicate a short circuit. Replacing damaged wires and ensuring all connections are secure can often resolve overheating issues.
Lack of Power
- Causes of Power Issues
- A drop in power output can be due to several factors. The most common is battery-related issues, where the battery isn’t providing enough power or is drained. Other causes can include worn-out parts in the motor, poor electrical connections, or issues with the winch drum or cable creating excessive resistance.
- Troubleshooting Power Problems
- First, check the battery. Is it fully charged? Is it capable of delivering the required current? If the battery is old or has been used extensively, it might need replacement. Then, inspect the motor itself. Look for signs of wear and tear, such as corroded contacts or damaged components, which can reduce efficiency. Ensure all electrical connections are tight and free from corrosion. Finally, inspect the winch drum and cable. If the drum isn’t rotating smoothly or the cable is frayed, it can cause resistance that reduces the motor’s power output.
General Maintenance Tips
- Regular Inspections
- Regularly inspect your winch for any signs of wear or damage. Pay special attention to the cables, connections, and the motor itself.
- Lubrication
- Ensure moving parts, especially the winch drum, are well-lubricated to reduce friction and prevent wear.
- Electrical Health
- Keep an eye on the electrical health of your system. This includes checking the battery, wiring, and connections regularly.
Conclusion
Creating a winch from a starter motor is not just about building a handy tool; it’s about the satisfaction of giving new life to an old part.
This project teaches valuable skills and offers a sense of accomplishment. Remember, the key is to approach it with patience, safety, and a bit of mechanical curiosity.
