✅ Diagnose Before You Replace
- Solenoid clicks, motor silent: direct-jump the motor from the battery (12V to post A, ground to post B via jumper cables). If it spins, the solenoid is dead. If it doesn’t, the motor is the problem.
- Silent — no click at all: start at the rocker switch feed. Test the trigger wire for 12V when energized. No 12V = wiring/fuse issue. 12V but no solenoid click = bad solenoid coil (see test sequence above).
- Brush wear is the #1 motor failure. Pull the motor end cap, check brush length. Minimum usable: 0.25″ (6.4 mm). Below that, pigtails drag on the commutator and arcing starts.
- Commutator condition: bright copper ring segments = healthy. Blue-heat-tinted bars = motor has been overloaded. Deep grooves or pitting = resurface or replace the armature.
- Armature and stator resistance: healthy armature reads 0.05–0.2 Ω between opposite commutator bars. Infinity = open winding. Stator field: 0.3–1.2 Ω. Those two reads take 90 seconds and tell you whether to repair or replace.
If your winch motor isn’t responding, moves slowly, or fails under load, you’re not alone. In this How to Release a Jammed Winch Motor guide, we’ll show you exactly how to diagnose and repair a winch motor step by step—including how to test it with just a 12V battery.
Whether you’re dealing with corroded solenoids, a faulty switch, or worn brushes, this guide will help you restore your winch’s pulling power safely and efficiently.
Quick Step-By-Step: How to Test a Winch Motor with a Battery
- Disconnect the winch from your vehicle’s power system.
- Use jumper cables to connect the motor directly to a 12V battery.
- Connect the black cable to the motor housing (ground).
- Touch the red cable to each motor terminal separately.
- Watch for movement—if the motor spins in both directions, it’s likely functional.
- No response? You may have a brush or solenoid issue.
🛑 Safety Tip: Always wear gloves and goggles when testing live wires. Keep clear of the drum to avoid injury.
Safety Precautions
Before we roll up our sleeves, let’s talk safety. Winch motor repair involves dealing with electrical components and heavy machinery, posing risks of electric shock and physical harm.
Always wear protective clothing, durable gloves, and safety glasses. Ensure your workspace is well-ventilated and free of any flammable materials.
Remember, safety is not just a protocol, but a non-negotiable aspect of DIY repairs.
Diagnosing Issues
Diagnosing issues with a winch motor is a critical step in ensuring its efficient operation and longevity. Let’s break down this process in detail:
- Visual Inspection of Exterior Housing and Cables:
- Why It’s Important: The exterior of the winch motor can reveal a lot about its condition. Damage or wear on the outside often indicates internal problems.
- What to Look For: Check for cracks, rust, or any signs of physical damage on the motor’s housing. Inspect cables for fraying, cuts, or corrosion. These are telltale signs that the winch motor has been exposed to harsh conditions or is aging.
- Outcome: This initial inspection can quickly identify external problems that may affect the motor’s performance.
- Testing Motor with Direct Battery Connection:
- Purpose: This test helps determine if the issue lies within the motor itself or with its control box.
- Process: Safely disconnect the motor from its control box and connect it directly to a battery. Ensure that all connections are secure and that you’re using a battery with the correct voltage.
- What It Reveals: If the motor operates correctly when connected directly to the battery, the issue may lie in the control box or the connections between the box and the motor. If the motor still doesn’t work, the problem is likely within the motor itself.
- Load Testing Hooks and Pulley System:
- Importance: The hooks and pulley system are subjected to significant stress during the operation of the winch. Testing these components is key to ensure they can handle the loads without failure.
- How to Conduct: Apply a load to the winch that is within its rated capacity. Observe how the hooks and pulley system respond. Listen for any unusual noises and watch for smooth operation of the pulleys.
- Key Observations: Any signs of strain, unusual sounds, or jerky movements can indicate wear or damage in these components. It’s important to address these issues as they are central for the safe operation of the winch motor.
For more in-depth article, check out this guide about how to test a winch motor
Disassembling Motor Housing
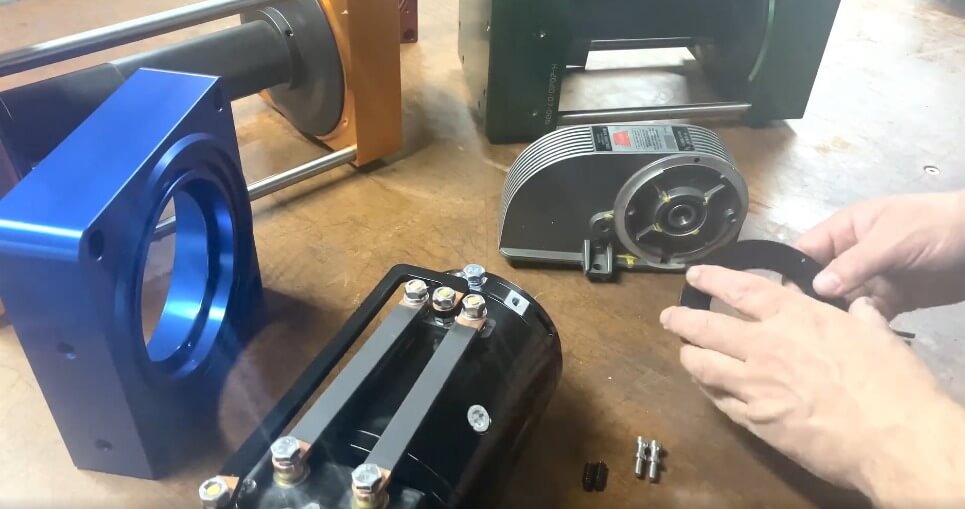
Disassembling the motor housing of a winch is a critical step in performing a detailed inspection and repair. Here’s a detailed look into this process:
- Removing Mounting Bolts and Plates:
- Preparation: Before starting, ensure the winch motor is disconnected from any power source to avoid electrical hazards.
- Process: Locate the mounting bolts and plates that secure the motor housing. These are typically found on the exterior of the motor.
- Tools: Use the appropriate tools, such as wrenches or screwdrivers, depending on the type of bolts or screws used.
- Careful Handling: Remove these bolts and plates gently to avoid damaging the housing or the threads on the bolts. This is important as damaged threads can make reassembly difficult.
- Tagging Each Connection:
- Importance: As you disconnect each part, it’s central to keep track of where everything goes. This step is vital for a hassle-free reassembly.
- Method: Use tags or labels to mark each connection. You can also take pictures or make a diagram as you go, which acts as a reference for putting everything back together.
- Lifting Off the Housing:
- Technique: Once all bolts and connections are detached, carefully lift off the housing. Some housings can be heavy or awkwardly positioned, so it can be necessary to have assistance.
- Insight Gained: Removing the housing reveals the internal components of the winch motor, such as the armature, gears, brushes, and windings.
- Visual Inspection: With the housing removed, you can now inspect these internal components for signs of wear, damage, or dirt accumulation.
- Understanding the Mechanism:
- Learning Opportunity: This step is like opening a window into the heart of the winch motor. It allows you to understand how the different components interact and work together.
- Identifying Issues: With a clear view of the internal mechanism, you can identify issues that aren’t visible from the outside, like worn bearings, damaged gears, or burnt windings.
Inspecting Components
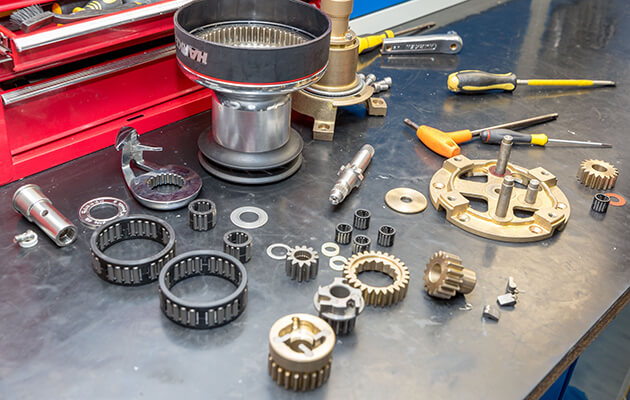
Inspection the components of a winch motor is a detailed process that involves several key steps. Each component plays a vital role in the motor’s functionality, and assessing their condition is central for ensuring the motor operates effectively and safely.
Let’s cover the specifics:
- Examining the Armature Winding:
- What to Look For: The armature winding consists of copper wire coils around the armature. Check for any signs of damage, such as broken wires, burnt areas, or corroded bars.
- Laminations: These are thin metal sheets in the armature designed to reduce electrical losses. Inspect for any signs of separation, warping, or damage.
- Measuring Brush Length and Wear:
- Importance of Brushes: Brushes conduct electricity to the armature. Over time, they wear down due to constant contact with the commutator.
- Measuring: Use a ruler to measure the length of the brushes. If they are worn down to under a quarter inch, it’s time to replace them. Worn brushes can lead to poor motor performance and even damage to other components.
- Testing Windings and Armature for Continuity:
- Purpose: This test checks for any breaks or shorts in the windings.
- How to Test: Use a multimeter set to the continuity setting. Place the probes on the windings and armature. A continuous beep indicates good continuity, while no sound suggests a break in the circuit.
- Electrical Integrity: Ensuring the electrical integrity of these components is central for the motor’s efficient operation.
- Inspecting Bearings, Gears, and Brake Mechanism:
- Bearings: Check for signs of wear, rust, or corrosion. Worn bearings can cause noise, heat, and reduce motor efficiency.
- Gears: Inspect the gears for any signs of wear or damage like chipped teeth. Damaged gears can impair the motor’s performance and lead to further mechanical failures.
- Brake Mechanism: This is central for controlling the winch. Inspect for wear and proper operation. A malfunctioning brake can lead to dangerous situations, especially when lifting or hauling heavy loads.
Each of these components is integral to the smooth operation of the winch motor.
Cleaning and Repairs
Cleaning and repairing the components of a winch motor are central steps in maintaining its functionality and extending its lifespan. Let’s explore these steps in detail:
- Sanding the Armature Commutator:
- Identifying Wear: The commutator is the part of the armature that makes electrical contact with the brushes. Over time, it can become worn, pitted, or dirty, which hampers its performance.
- Process of Sanding: Use fine-grit sandpaper to gently sand down the surface of the commutator. The goal is to achieve a smooth, clean surface without removing excessive material.
- Precautions: Be cautious to sand evenly and lightly. Over-sanding can lead to uneven surfaces, resulting in poor contact with the brushes and potentially more significant motor issues.
- Replacing Worn Brushes:
- Importance of Brush Length: Brushes are critical for conducting electricity to the motor’s rotating parts. Over time, they wear down due to friction.
- Measurement and Replacement: If the brushes are worn down to under a quarter inch, they should be replaced. Worn brushes can lead to inefficiency and damage to the commutator.
- Selection of Brushes: Ensure that the replacement brushes are the correct size and type for your motor model.
- Lubricating Gears, Bearings, and Pulleys:
- Lubrication: Proper lubrication reduces friction, wear, and overheating in moving parts.
- Choice of Lubricant: Use a high-quality lubricant suitable for your motor’s specifications. Different types of motors may require different lubricants.
- Application: Apply the lubricant evenly to gears, bearings, and pulleys, ensuring that it penetrates into the moving parts.
- Tightening and Lubricating Brake Parts:
- Brake Mechanism Inspection: The brake is central for controlling the winch. Ensure that all its components are in good condition and properly aligned.
- Tightening: Check for any loose parts in the brake mechanism and tighten them as needed.
- Lubrication of Brake Parts: Lubricating the brake mechanism helps maintain smooth operation and prevent seizing. However, be cautious to use an appropriate lubricant, as some types may degrade brake performance.
Reassembly
Reassembling a winch motor is a critical phase where attention to detail is paramount. It involves putting back together the disassembled parts in a precise manner to ensure the motor functions correctly.
Let’s break down the reassembly process:
- Remounting the Armature and New Brushes:
- Precision: The armature must be placed back into the motor housing carefully, ensuring it sits correctly in its bearings. This is central for the smooth operation of the motor.
- Installing Brushes: The new brushes need to be installed in their holders. Make sure they are properly aligned and have a good contact with the commutator. Incorrect installation can lead to motor failure or damage.
- Reconnecting Mounting Plates and Covers:
- Reattachment: The mounting plates and covers that were removed during disassembly need to be reattached. This step involves aligning them correctly and securing them with bolts.
- Bolt Security: Ensure each bolt is tightened appropriately. Over-tightening can strip the threads, while under-tightening might leave parts loosely connected, leading to vibration or disassembly during operation.
- Verifying Housing Sealing and Electrical Insulation:
- Housing Seal: Check the seal of the motor housing. Any gaps or misalignments can allow dust, dirt, or moisture to enter, potentially damaging the motor.
- Electrical Insulation: Inspect the insulation on wires and other electrical components. Damaged or worn insulation can lead to electrical shorts and motor malfunction.
- Ensuring Everything Fits Perfectly:
- Double-Check: Go over each part again to ensure everything is correctly placed and secured. This step is central, as any oversight during reassembly can lead to operational problems.
- Alignment: Ensure that all parts are properly aligned. Misalignment can cause excessive wear, noise, and reduce the efficiency of the motor.
Testing Repaired Motor
Testing a repaired winch motor is a key step to ensure it operates correctly and safely after maintenance or repair. This process involves several key tests:
- Low Voltage Bench Test:
- Purpose: This initial test is to ‘gently wake the motor up.’ It involves running the motor at a low voltage to ensure it operates smoothly without immediately subjecting it to full power.
- Process: Connect the motor to a power source that provides a lower voltage than its full operational capacity. This can be done using a variable power supply or a bench tester.
- Observations: Look for smooth starting and running of the motor. Listen for any unusual noises and watch for erratic movements. This test helps identify issues that might not be evident under full power.
- Powering Winch at Half Capacity:
- Step-Up Testing: After the successful low voltage test, the next step is to test the motor under more strain. Run the motor at half of its rated capacity.
- Observation: Pay attention to how the motor handles the load. It should operate smoothly without overheating or making unusual noises. This test is more demanding and can reveal issues that the low voltage test might not.
- Water Pressure Check on Exterior:
- Purpose: This check is to ensure that the motor housing and seals are intact and there are no leaks.
- Method: Apply a gentle water spray on the motor housing, mimicking rain or splashing water.
- Inspection: Look for any water seeping into the housing. Even a small leak can lead to significant problems by allowing water to reach the electrical components of the motor.
- Verifying Automatic Brake Lock Functionality:
- Importance: The automatic brake lock is a critical safety feature in winch motors. It prevents the winch from releasing its load unexpectedly.
- Testing: Engage the winch to lift or pull a load and then stop the motor. The brake should automatically engage and hold the load securely.
- Check: Ensure the brake engages promptly and holds without slipping. Any malfunction in the brake lock can lead to dangerous situations, particularly when handling heavy loads.
Preventative Maintenance
To keep your winch motor in top shape, conduct monthly load tests. Regularly check the health of the battery and cables, as they are the lifelines of the motor.
After every use, inspect the pulley, gears, and drum. Preventative maintenance is the key to avoiding unexpected breakdowns and ensuring the longevity of your winch motor.
Bottom Line
understanding common faults and their resolutions in winch motors is vital. Remember, after repairs, avoid overloading the motor and adhere to its rated capacity.
The real secret to a well-functioning winch motor lies in continuous and meticulous maintenance. This approach not only saves you time and resources but also ensures reliability and safety in your winching operations.
🔧 Where These Numbers Come From
I keep a parts bin of three dead Warn M8000 motors and two Smittybilt X2O motors picked up cheap for teardown practice. All resistance values above came from a Fluke 87V reading on known-good (freshly cleaned commutator, new brushes) vs known-bad units.
For the direct-jump test, I run a pair of 2/0 AWG jumper cables off a fresh Odyssey 34R-PC1500. A healthy field-and-armature motor draws about 60–80A at no-load and spins to operating speed in under a second. Anything that draws 150A+ at no-load is shorted internally — don’t bother trying to save it.
