Dual-pawl ratchets are the only acceptable design. Single-pawl budget units can skip under shock load — dangerous.
Mechanical advantage math: 4:1 gear × 14″ handle ≈ 32:1 total MA. 150 lb on handle → ~4,800 lb at hook.
Release properly. Always slowly unload with the release lever. Dropping the load or snapping release can break teeth or pawl spring.
TL;DR: A come-along winch (come-along cable puller) is a portable, hand-operated ratchet lever tool that multiplies your pulling force through a steel cable and internal ratchet mechanism. You use it for controlled pulling, lifting, and tensioning in places where a motorized winch, tractor, or fixed hand winch just doesn’t make sense.
Key Takeaways
A come-along is a portable cable puller that uses a ratchet lever to multiply your effort and an over-centre brake to lock the load at every click.
Compared to a hand winch, a come-along is more portable and precise, better for short, controlled pulls, but usually slower and not ideal for long distances.
Always size by working load limit (WLL), not “max load” or “breaking strength.” Aim for a 2:1–3:1 safety factor and use a come-along capacity chart if you’re unsure.
Safe use boils down to four things: a solid anchor point, correct rigging, smooth ratcheting, and controlled tension bleed when you release.
There are three main ways to release under tension: normal release, partial-load release, and emergency stuck-lever release. Each one has its own steps.
Common headaches include cable kinking, stuck ratchet pawls, slack that won’t free-spool, and tired load brakes. Most are preventable with inspection and simple maintenance.
Top 2026 picks come from NEIKO, Maasdam, TR Industrial, and American Power Pull in the 1/2 ton to 3 ton range, covering everything from fence work to off-road recovery.
Never stand in the line of pull, never exceed WLL, and always make sure your anchor point rigging is stronger than your come-along before you lean on it.
What Is a Come-Along? (Quick Definition)
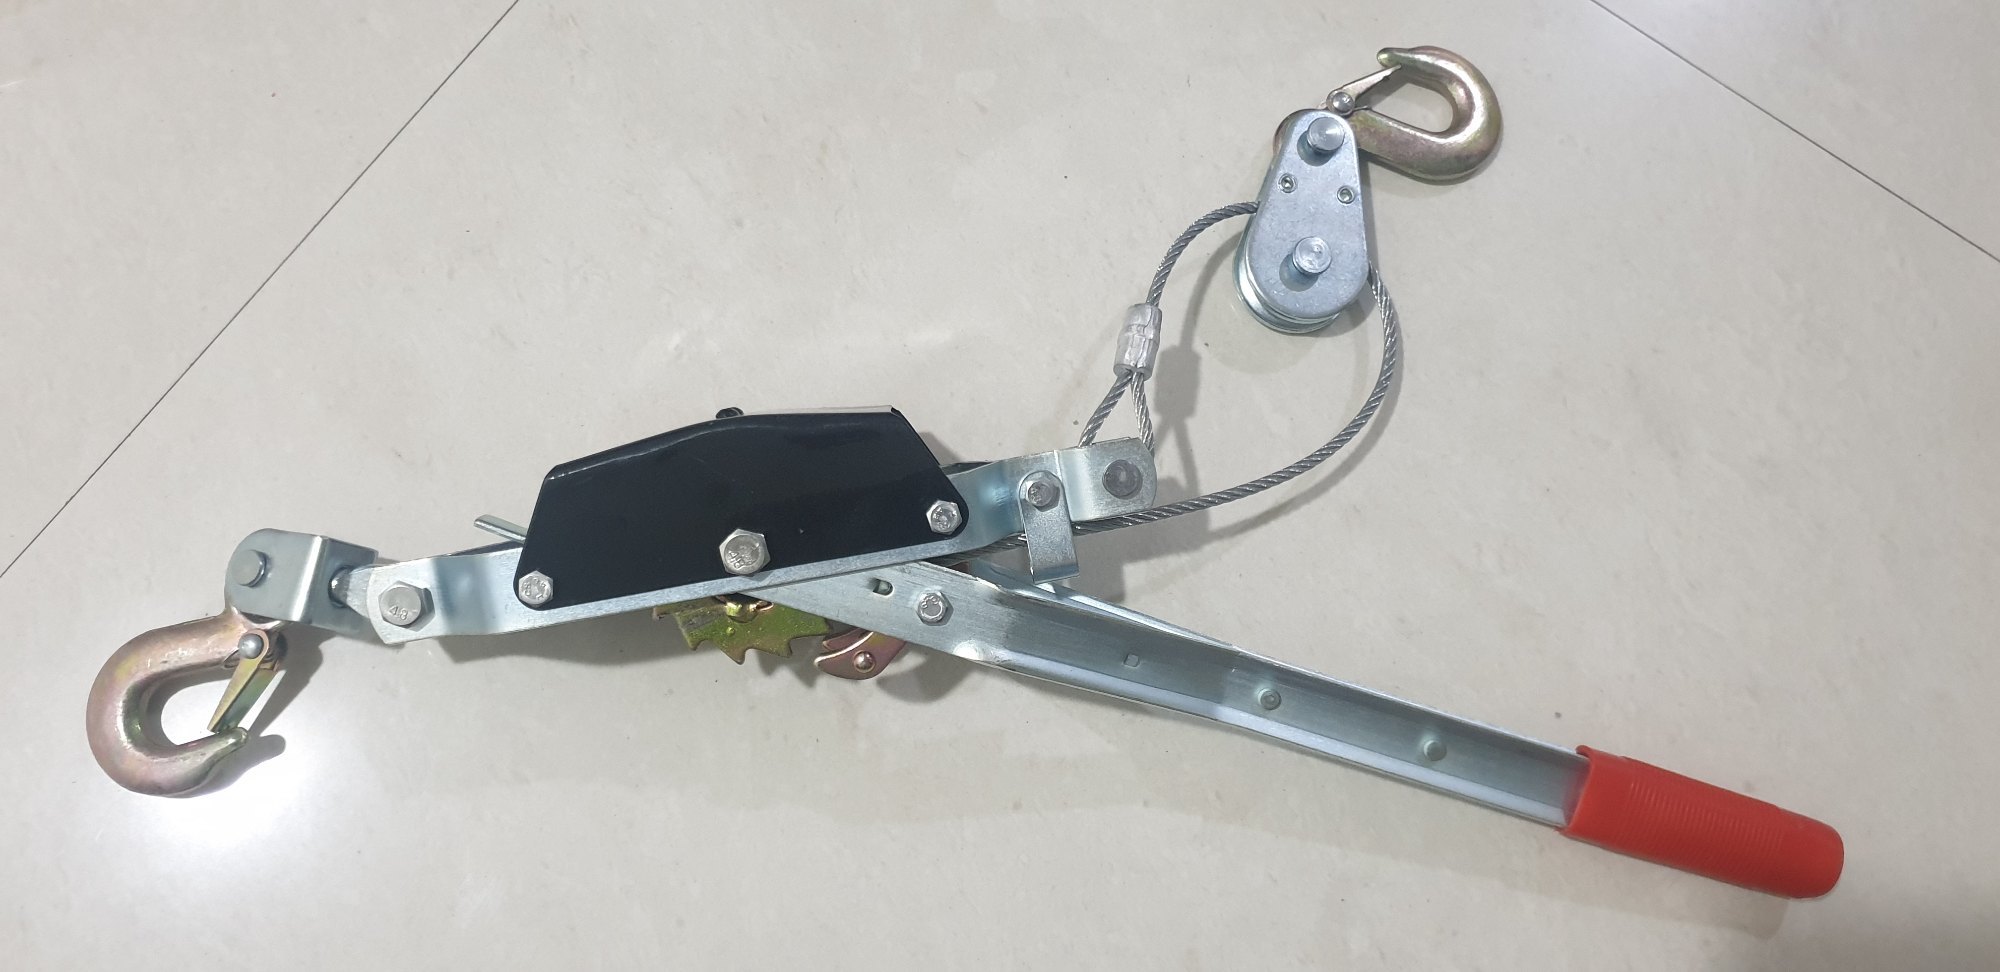
Two hooks, a ratchet body, and a handle. Simple mechanism, big mechanical advantage.What is a come-along winch? A come-along is a hand-operated cable puller that uses a ratchet lever mechanism and steel cable to pull, lift or tension heavy loads. Each pump of the lever advances the cable a notch while an internal load brake (over-centre brake and pawl) bites into the ratchet and locks the load at every step so you get slow, controlled movement instead of sudden jumps.
What Is a Come-Along? (How It Works — Ratchet Mechanism Explained)
A come-along, often called a come-along cable puller, is a compact tool built to pull or tension heavy loads wherever you can’t bring power tools or mount a permanent winch. You see them in off-road recovery kits, farm trucks, fencing work, small construction jobs, and light rigging setups. The heart of the tool is the ratchet lever mechanism. You move the handle, the handle turns a drum in small steps, and the drum hauls in cable or rope. After each stroke, a spring pawl drops into the ratchet teeth. That pawl is what keeps the drum from rolling back and dropping your load.
Ratchet Lever Action & Mechanical Advantage
The come-along gives you a mechanical advantage using simple physics. You trade distance and time for power:
Lever length (inches): A longer handle gives you more torque on the drum. Most decent units run handles in the 12–24 inch range. Long enough for leverage, short enough that you’re not swinging a flagpole.
Stroke length (inches): Each full swing of the handle only moves the drum a small amount, often under an inch of cable travel. That’s why you get such fine control, but you won’t be dragging a truck 50 feet in a hurry.
Mechanical advantage (ratio): A typical come-along turns your hand force into something like 10:1 to 30:1 at the load. That means a 70–100 lb push on the handle can move hundreds or even a couple thousand pounds, as long as you stay inside the rated pulling capacity (ton).
In real use, that mechanical advantage is what lets one person shift a dead ATV, tension long fence runs, or ease a roof truss into position without a crew of four hanging off the handle.
Over-Centre Brake & Load Holding
On a good come-along cable puller, the load brake assembly is your insurance policy. It does the holding for you:
Over-centre engagement: As you pull, the brake passes a “center” point and locks the drum in the direction of pull. On modern tools that over-centre function is standard. If it doesn’t have it, skip it.
Load brake safety rating: Quality units are built so the brake can safely hold at least 100% of the working load limit (WLL). A lot of them are spec’d at 125–150% so there’s a little headroom if the load spikes.
Pawl material: The pawls and ratchet teeth are usually hardened steel so they don’t mushroom or chip when they’re holding serious weight.
This design is why a come-along is great for precise, incremental positioning. Every click is a locked position. You don’t have to “hold” the load with your arms. The mechanism does it for you, as long as you keep it clean and within WLL.
Come-Along vs Ratchet Lever Hoist
People throw around “come-along” and ratchet lever hoist like they’re the same thing. They’re cousins, not twins.
Come-along cable puller: Usually built around a steel cable and hooks, mostly for horizontal pulling or diagonal pulls. Common on farms, job sites, and in truck toolboxes. Often lighter-duty and meant for quick, portable use.
Ratchet lever hoist: Typically uses chain instead of cable, has beefier brakes and is specifically rated for lifting as well as pulling. You’ll see them in industrial shops and overhead lifting rigs.
Here we’re talking about cable-based, portable come-along pullers. Not chain hoists, not electric winches. Different tools, different rules.
Come-Along vs Winch: Key Differences
Dual pawls only. Avoid single-pawl generic units for safety-critical work. People say “come-along winch,” but a come-along and a standard hand winch aren’t set up the same way. Both wrap cable on a drum, but they live in different worlds and mount very differently.
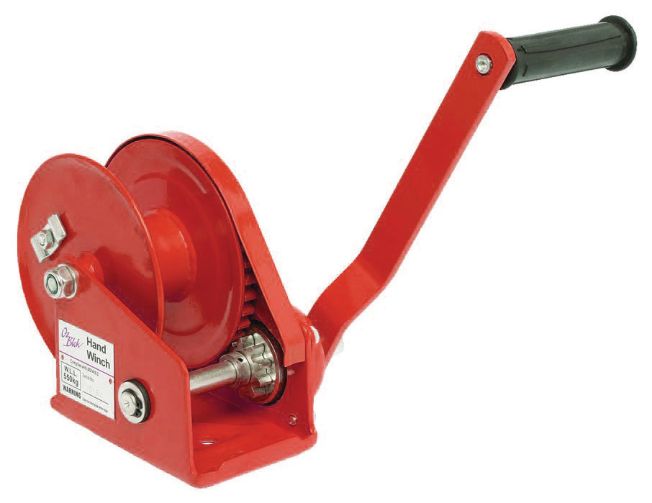
A come-along is a portable, lever-actuated cable puller for short, precise pulls and tensioning wherever you can reach with your hands. A hand winch is usually frame-mounted with a crank handle, better suited to longer, repeat pulls on a fixed setup like a trailer.
Speed vs Control
Hand winch: The crank handle and larger drum make it quicker for long pulls. Perfect for loading a boat, dragging a car up a trailer, or any job where you need 20–30 feet of movement in one go.
Come-along: The ratchet lever action is slower but much more controlled. Each stroke is a small step forward, which is what you want when you’re trying not to overshoot or shock-load a sketchy setup.
Portability vs Fixed Mount
Come-along: Usually 7–15 lb, hooks at both ends, and small enough to toss behind a truck seat. You can carry it into the woods, flip it around, or re-rig it mid-job without tools.
Hand winch: Built for fixed mounting on a tongue, post, frame or stand. You move the thing it’s bolted to, not the winch itself.
When a Come-Along Excels
You reach for a come-along when you need:
Portable pulling away from a vehicle or power source: off-road recovery on narrow trails, dragging logs, repositioning equipment in a field.
Fine positioning of beams, machinery, or panels where an inch matters and you don’t want the load to jump.
Precise tensioning jobs, like pulling fence wire tight, snugging guy lines, or tensioning support cables without overdoing it.
If you want more detail on how these compare and where each one shines, check out our full come-along vs hand winch breakdown.
Come-Along Capacity Guide (1/2 Ton to 3 Ton & When to Use Each)
Picking the right come-along capacity isn’t guesswork. These tools are rated for a reason, and real-world conditions like mud, slope and friction can push a marginal setup into the danger zone fast.
Rating System: Working Load vs Max Load
Working Load Limit (WLL): This is the safe, everyday load the tool is designed to handle. It’s listed in tons or pounds, like 1 ton (2,000 lb) or 2 ton (4,000 lb). Treat this number as the red line you don’t cross.
Maximum load / breaking strength: This is the lab failure number. Parts start to deform, stretch, or snap at this point. It can be 2–4 times the WLL, but that doesn’t mean ever work anywhere near it.
Always size and plan around WLL only. If you’re pushing into the top of that range, you’re undersized for the job.
Load Factor & Real-World Conditions
On paper, a 3,000 lb car looks like a job for a 1.5 ton come-along. In the mud or uphill, that math goes out the window. Actual pulling force depends on friction, surface, slope and how stuck the load is.
Flat rolling resistance: On smooth concrete with inflated tires, you might only need 10–20% of the vehicle weight to move it.
Dragging on dirt or grass: Now you’re often closer to 50–100% of the weight. Add ruts or roots and it can climb even higher.
Uphill or buried in mud: The required pull can match or exceed the full weight of the object. I’ve seen “light” SUVs feel like 8,000 lb once they’re buried to the frame.
That’s why you want a come-along rated at least 2–3 times the expected pull. The safety factor isn’t just for fun, it’s what keeps cables and hooks from letting go when things aren’t perfect.
Capacity Selection Chart by Task
Here’s a simple come-along capacity chart to point you in the right direction. Use it as a starting point and size up if conditions are ugly. For deeper math and edge cases, see the dedicated come-along capacity table.
Task / Application
Typical Load
Recommended WLL
Notes
Fence wire tensioning
Light wire
1/2 ton (1,000 lb)
What matters here is reach, not brute force. A longer cable or rope saves you re-rigging every few posts.
Small equipment positioning (generators, compressors)
300–800 lb
3/4–1 ton
Gives room for friction, small slopes, and awkward angles without working the tool at its absolute limit.
Light vehicle recovery (ATVs, small cars)
1,500–3,000 lb
1–2 ton
Plan on using snatch blocks or double-line pulls when the terrain is soft or the wheels are buried.
Medium vehicle recovery (SUVs, trucks)
3,000–6,000 lb+
2–3 ton
A 3:1 safety factor is smart off-road. Mud, sand and hills all multiply the load on the tool.
Tree, post, and structural bracing
Varies
1–3 ton
Structural loads are hard to estimate. Err on the high side and use redundant supports whenever possible.
Key EAV Specifications to Look For
Specs on the box actually matter here. This table breaks down the main attributes read carefully instead of glossing over. Each one points at how the come-along cable puller will behave in real use.
Entity
Attribute
Typical Values
Why It Matters
Come-along cable puller
Pulling capacity (ton)
0.5–3 ton
This is your WLL window. It tells you what sort of jobs the tool can handle safely without being pushed to failure.
Come-along cable puller
Cable length (feet)
6–35 ft
Limits how far you can move a load in a single rig. Short cable means more resets and more work.
Come-along cable puller
Mechanical advantage (ratio)
10:1–30:1
Higher ratios feel easier to pump but you’ll take more strokes to move the same distance. There’s always a tradeoff.
Come-along cable puller
Weight (lbs)
7–18 lb
Lighter is nice when you’re packing it out, but heavier units usually mean more steel and more durability.
Ratchet lever mechanism
Lever length (inches)
12–24 in
Too short and you’re working hard. Too long and it’s awkward in tight spaces. You want something that matches your reach.
Ratchet lever mechanism
Stroke length (inches)
1–3 in
Controls how much cable feeds per stroke. Shorter strokes are smoother and easier to control around fragile loads.
Ratchet lever mechanism
Lever angle engagement (degrees)
~30–45°
That’s the minimum swing you need for the pawl to catch the next tooth. If you can’t hit that angle, the tool just clicks at you.
Ratchet lever mechanism
Holding force (% of WLL)
≥100%
The brake and pawl should hold the full rated load without inching backward. Anything less is a retirement case.
Load brake assembly
Over-centre engagement
Yes
This stops the drum from back-driving under load. No over-centre action, no trust.
Load brake assembly
Manual release requirement
Yes
You want the brake to stay locked until you intentionally flip a lever or control. No surprises.
Load brake assembly
Load holding safety rating
100–150% WLL
This is the margin before the brake slips. Higher is better, but it’s not an excuse to overload the tool.
Load brake assembly
Pawl material
Hardened steel
Soft metals wear fast, then you get slipping under load. Hardened steel stands up to thousands of cycles.
Cable configuration
Cable diameter (inches)
1/8–1/4 in
Thicker cable usually means higher capacity and better abuse tolerance, but it also adds bulk on the drum.
Cable configuration
Cable length (feet)
10–35 ft
Longer reach is handy for recovery and tree work. Just keep an eye on drum fill and spooling quality.
Cable configuration
Loop end style
Hook / eye
Determines what rigging hardware you can clip into quickly without cobbling together unsafe adapters.
Cable configuration
Breaking strength (lbs)
2×–4× WLL
The cable should always be stronger than the tool’s WLL so it’s not the weakest link in your system.
Anchor point rigging
Minimum anchor strength (lbs)
2–3× WLL
The anchor has to out-muscle the tool. If the anchor fails, everything downstream is along for the ride.
Anchor point rigging
Connection method
Loop / hook / shackle
Good rigging keeps the load straight and secure. Poor rigging twists gear and drops your safety margin.
Anchor point rigging
Safety factor (ratio)
2:1–4:1
Covers you when loads spike or angles change. Without a safety factor you’re gambling, not working.
Anchor point rigging
Verification requirement
Yes
Always inspect and confirm the anchor before you load up. One weak link can wreck a whole job.
How to Use a Come-Along Step-by-Step
Using a come-along safely is more than “hook it and pull.” A clean setup is what separates a controlled pull from a flying hook or a crushed fender. The process covers choosing a real anchor, rigging everything straight, running the ratchet lever smoothly, and only then worrying about release.
40-Word Overview
To use a come-along, pick a strong anchor point, attach the anchor and load hooks with proper rigging, remove slack, then ratchet the lever to pull while the load brake locks each increment. Once the load is set, secure it and bleed off tension carefully.
Step 1 — Set Your Anchor Point
Your anchor point rigging is where the whole system lives or dies. It should comfortably handle at least 2–3 times the WLL of your come-along, not “about that much” by eye. Good anchor examples:
Big, healthy trees with deep roots. Use a wide tree strap or sling so you don’t cut into the bark or ring the tree.
Structural steel beams, columns, or properly installed bollards with known ratings.
Rated ground anchors meant for winching or recovery, driven or set per manufacturer spec.
Poor anchors to stay away from:
Skinny fence posts, saplings, mailbox posts or random signposts. They bend or snap before you even reach WLL.
Unrated bumpers, tow balls, cheap hitch inserts. Tow balls in particular have a bad habit of turning into shrapnel when they fail.
Loose boulders, rotted stumps, or anything you’ve “kinda tested” with a kick instead of real inspection.
Anchor connection tips from the field:
Use the anchor hook on the come-along to clip into a strap, chain, or shackle that’s already wrapped around or bolted to the anchor.
If you’re using chain, set it up as a choker chain and make sure the chain’s WLL beats the tool’s WLL by a healthy margin.
Pre-load the system lightly. Put a small amount of tension on the line and watch for movement, cracking sounds, or shifting before you lean into it.
For more complex rigging scenarios, different anchor types, and some do’s and don’ts, the anchor point rigging guide is worth a read.
Step 2 — Attach the Cable Loop to the Load
On the load side, your job is to connect so that the come-along can pull hard without slipping, biting into sharp edges, or pulling at odd angles that twist everything around.
You want an attachment that won’t slip off once the line goes tight.
The pull should be as straight as possible. Steep side angles chew up cable and hardware.
Every shackle, hook, or strap in the system needs to be rated equal to or higher than your come-along WLL.
Common load attachments that work well:
Hook to recovery point: Hook into a rated tow eye, recovery point, or lifting lug on the frame, not just a hole in sheet metal or a welded tab with unknown strength.
Cable loop-back: Wrap a strap or cable around a log, post, or beam, then connect back to itself with a shackle or hook. This choker-style setup grabs tighter as you pull.
Choker chain: Run a choker chain around trees, big posts, or beams. It spreads the load around the object instead of digging in at one spot.
Avoid running bare steel cable around sharp corners. Use corner protectors, rubber, or rated straps where the line bends. That extra padding keeps your cable from getting flattened and cut, which keeps your breaking strength where it should be.
Step 3 — Ratchet to Pull
Once the rigging looks good, you’re ready to put the ratchet lever action to work.
Set direction: Flip the direction selector or release lever on the come-along to the “pull in” or “tighten” position. If you skip this, you’ll just free-spool or click uselessly.
Take up slack: If the tool has a free-spool trigger, pull the cable out by hand until it’s snug, then let the mechanism grab. Otherwise, start ratcheting gently until all the slack is gone.
Check rigging: Before you apply real force, walk the line. Check the anchor, the load connection, and every shackle and hook. Make sure no one is standing in line with the cable.
Begin ratcheting: Pump the lever through the full lever angle engagement range, usually 30–45°. That’s what lets the spring pawl seat solidly in each ratchet tooth.
Monitor the load: Every few strokes, stop and look. Listen for pops or groans at the anchor, watch for cable kinks, and check that the load is moving like you expect.
Use steady strokes: Smooth, consistent strokes keep shock loads down. Jerking the handle is how you surprise an already stressed hook or post into failing.
Load Brake Engagement & Final Positioning
As you ratchet, the load brake and pawl are locking in at each tooth. That’s what gives you those controlled, step-by-step movements.
Near the final position, shorten your strokes. That lets you “sneak up” on the exact spot you want.
Once the load is where it needs to be, get it onto its final supports. That can be jack stands, blocking, cribbing or a proper mount point.
Don’t leave a load hanging from a come-along as the only support if people are going to work underneath or next to it. That’s what permanent supports are for.
Safety Rules During Operation
Stay out of the line of pull: Always stand to one side of the cable or rope. If anything fails, it will usually recoil along the line of pull.
Wear PPE: At least use work gloves and eye protection. Frayed cable strands can slice skin, and small pieces of metal do fly if something breaks.
Do not exceed WLL: If you’re maxing out effort and the load isn’t moving, stop. You either need a bigger come-along, a snatch block for mechanical advantage, or a better recovery method.
Keep fingers out of the ratchet mechanism: The ratchet mechanism can pinch or crush fingers when the lever snaps back to neutral between strokes.
Watch cable spooling: Make sure the cable winds on in neat layers, not stacking high on one side or crossing over itself chaotically.
If you want to step up your rigging game, take a look at our come-along cable attachment methods write-up. It covers different ways to terminate and extend your line without killing your safety margin.
How to Release a Come-Along Under Tension (3 Scenarios)
Releasing a come-along is where people get nervous, and for good reason. Once you’ve stored energy in that line, you want to bleed off tension gradually, not let it explode out in one go.
40-Word Overview
To release a come-along, first make sure the load is supported, then use the release lever or pawl control to step the ratchet backward under control. The technique changes depending on whether the load is fully off, partially on the tool, or the lever is stuck.
Normal Release After Load Is Freed
Use this method when the load is already where it belongs and fully supported by something other than the come-along.
Verify support: Double-check that the load is sitting on the ground, on stands, or locked into its structure. If you’re unsure, add temporary cribbing or blocking.
Remove traps: Clear chocks, wedges or restraints that might cause a surprise shift once the line relaxes.
Switch to release mode: Move the selector or release lever to the “unwind” or “release” marking for your model. If the manual says a specific sequence, follow it.
Control the lever: Most come-alongs use the same lever to back the drum off one tooth at a time. Hold the handle firmly and let it walk back under your control, not under its own speed.
Walk it off: Keep stepping the tension down until the cable hangs slack and you can unhook everything by hand.
Releasing Under Partial Load
This is where people hurt themselves. Here the come-along is still sharing or holding the load, but back it off or adjust position. Treat this as a high-risk move and go slow.
Step 1 — Reduce load if possible: Jack the load, crib it, or rig a second line so the come-along isn’t carrying everything by itself.
Step 2 — Clear the danger zone: Get everyone, including yourself, out of the line of pull and away from potential rebound paths.
Step 3 — One tooth at a time:
Engage the release lever or secondary pawl so the drum can move back exactly one tooth.
Guide the handle through a controlled arc. If it wants to run, resist it and shorten your movement.
Let the primary pawl re-seat, check that the load is stable, and only then repeat.
Step 4 — Keep watching the load: After each small release, look at your supports and anchor. If anything starts to shift, stop and re-support before going further.
That slow, “click by click” approach is what people mean by a controlled tension bleed. You’re easing the system back to zero instead of letting it snap there.
Stuck Lever Release (Emergency Method)
Sometimes the ratchet pawl won’t disengage, the selector jams, or the lever just won’t move. That usually means high tension, dirt, or minor damage in the mechanism. The temptation is to beat the pawl with a hammer. Don’t do that. Use this safer roadmap instead:
1. Stabilize the load: Treat the tool as if it might suddenly let go. Add jacks, blocks or even a second come-along on a different line so you’re not relying on the stuck unit.
2. Try reducing tension: In some cases, ratcheting one or two extra clicks tighter will relieve binding inside the mechanism and make the release easier afterward.
3. Lube and clean the ratchet & pawl: Spray a light oil into the ratchet pawl area, work the selector back and forth, and clear mud or rust with a small brush if you can.
4. Gentle rocking motion: With the release lever engaged, rock the main lever through a very small range. Often that tiny movement is enough for the spring pawl to pop free without a sudden full release.
5. Last resort: If the tool is clearly damaged, don’t fight it under load. Use external supports or another puller to take every bit of tension off, then tag the come-along out of service for inspection or replacement.
Cutting a loaded cable or chain is never a solution. That’s how you end up with hardware flying around at head height.
Common Come-Along Problems & Fixes
Even if you bought a solid tool, rough work, dirt, and neglect will catch up sooner or later. Catching early warning signs in the ratchet lever mechanism, cable, and brake assembly keeps a cheap problem from becoming a serious accident.
40-Word Overview
Typical problems include jammed levers, kinked or bird-nested cable, free-spool that won’t work, and ratchets that slip instead of holding. You can usually solve these by cleaning, lubricating, re-spooling, or swapping worn pawls, springs, cables and hooks before they fail in use.
Problem 1: Stuck Lever or Pawl
Symptoms: The lever won’t swing, the direction selector won’t flip, or the ratchet just refuses to engage. Likely causes:
Packed dirt, rust or paint in the ratchet teeth or around the pawl pivot.
Slightly bent lever, frame, or misaligned pawl after overloading or dropping the tool.
Tired or broken spring pawl that no longer snaps into the teeth.
Fixes:
First, remove the load or support it with something else. Don’t try to fix a binding mechanism while it’s still holding weight.
Scrub the ratchet mechanism with a wire brush and a mild solvent to get grit and old grease out.
Oil the pivots and moving joints lightly with machine oil so they move freely.
Replace worn pawls or springs. Brands like Maasdam rope puller and American Power Pull usually offer service parts, which is one reason they’re worth buying.
Problem 2: Cable Kinking or Bird-Nesting
Symptoms: The cable forms tight loops, flat spots, or a tangled ball on the drum instead of neat wraps. Causes:
Free-spooling the cable without any tension, then loading the tool hard right away.
Repeated pulling at extreme side angles so the cable stacks on one side.
Overfilling the drum by swapping in extra-long cable beyond what the tool was built for.
Fixes:
Unspool the cable fully and inspect it for broken strands, crushed sections, or hard kinks. Retire damaged cable instead of trying to “straighten” it.
Re-spool under light tension, guiding the cable evenly by hand so it lays in tidy rows.
Re-rig the pull so the line runs straighter. If you can’t avoid an angle, use snatch blocks to redirect rather than bending the cable sideways on the drum.
Problem 3: Slack Not Returning or Cable Won’t Free-Spool
Symptoms: You try to pull cable out by hand and nothing moves, or the free-spool trigger doesn’t seem to do a thing. Fixes:
Check the manual or diagram for the correct free-spool trigger or pawl position. A lot of “broken” tools are just in the wrong setting.
Sometimes there’s still a bit of tension on the drum. Ratchet one or two extra strokes in, then try the free-spool again to relax the mechanism.
Clean and oil the drum shaft and the release linkage so corrosion and grime aren’t locking things up.
Problem 4: Ratchet Slips or Fails to Hold Load
Symptoms: You hear the ratchet clicking but the load doesn’t advance, or worse, the load slowly creeps backward while supposedly locked. Likely causes:
Ratchet teeth or pawls have rounded edges, chips, or excessive wear.
Pawl springs are weak or broken so they don’t bite firmly.
You’ve been working regularly above the tool’s WLL and the internals are telling the truth about it.
Fixes:
Get the load supported some other way and take the come-along out of service immediately.
Inspect the ratchet wheel and pawl under good light. Look for rounded corners, deformation, or missing material.
Replace the damaged parts with OEM spares. Don’t try to file ratchet teeth “back into shape.” That removes hardened material and weakens the part even more.
Problem 5: Hooks, Latches or Anchor Hardware Damage
Hooks and hardware usually tell you a story before they fail. You just have to look.
Check hook throats for any signs of spreading, twisting, or hairline cracks, especially near the base.
Verify safety latches close fully and spring back on their own. A missing or bent latch is an accident waiting in line.
Spin the swivels and shackle pins by hand. Any grinding, seizing, or extreme wobble needs attention.
If a hook, shackle, or swivel looks wrong or feels rough, replace it with rated hardware. Don’t reuse something you wouldn’t trust on your own truck.
Common Mistakes When Using a Come-Along (and How to Fix Them)
Even people who’ve dragged a lot of rigs out of mud still cut corners with portable cable pullers. Fixing a few bad habits makes your pulls safer and usually faster too.
Mistake 1: Underestimating load and oversizing effortProblem: Someone hooks a 1-ton come-along to a full-size pickup sunk to the axles and then hangs their whole body off the lever, maybe with a cheater pipe for “extra help.” Fix: Use a capacity chart, bump up to a 2–3 ton unit for that sort of job, and build mechanical advantage into the system with snatch blocks or multiple shorter pulls, not just brute force.
Mistake 2: Ignoring anchor point rigging strengthProblem: Anchoring to a skinny post or a small tree that uproots once the load really bites. Fix: Treat your anchor as part of the rigging, not scenery. It should be 2–3× stronger than the come-along WLL. If you’re not sure, move to a bigger tree, structural steel, or a rated ground anchor.
Mistake 3: Standing in the line of pullProblem: Operator stands directly in front of, or behind, the cable to watch the load. If a hook or cable lets go, they’re standing in the exact path of the recoil. Fix: Always set up so you can work from the side and route the line so any failure path points into empty space, not into people or vehicles.
Mistake 4: Poor cable handlingProblem: Letting the cable twist, knot, overlap or kink on the drum because “it’s just a quick pull.” Fix: Take the extra minute to re-spool under light tension and straighten the wraps. Retire cable with deep kinks or obvious broken wires instead of trying to rescue it.
Mistake 5: Using the come-along as permanent supportProblem: Leaving a vehicle, beam, or structure braced by the come-along for days or weeks like it’s a permanent fixture. Fix: Treat the come-along as a temporary movement and positioning tool only. Once the load is where you want it, hand it off to proper blocking, jacks or structural supports.
Mistake 6: Lubricating the wrong partsProblem: Spraying heavy oil all over the cable and brake surfaces. They get slick, collect dirt, and suddenly the brake doesn’t hold as well. Fix: Lightly lube pivots, pawls and ratchet teeth. Keep the brake friction surfaces and cable relatively clean and dry, adding only a thin corrosion inhibitor when storing long term.
FAQ: Come-Along Winch Use, Capacity & Safety
How do I verify the load rating of my come-along?
Look for the label on the tool or stamping on the frame. It should clearly list the working load limit (WLL) in tons or pounds, along with cable size and sometimes cable length. If you can’t read the rating anymore, don’t use that tool for anything critical.
How often should I maintain and inspect a come-along?
Give it a quick visual inspection before every use. Check hooks, latches, cable, pawls and the frame. If you use it a lot, pull it from the truck once a month for a deeper clean, lubrication of moving parts, and closer inspection. Retire anything with cracks, heavy rust, or bent load-bearing components.
What are the storage and safety rules for a come-along?
Store the come-along in a dry, clean place, not tossed in a wet truck bed under leaking chemicals. Hang it on a wall or keep it in a case so the cable doesn’t get crushed or kinked. Always release full tension before storage and leave the cable just snug, not cranked tight against the drum.
Are there legal or code requirements for anchor points?
On job sites, OSHA and local building codes often spell out minimum anchor strengths and approved anchor types, especially for lifting or fall protection. As a general guideline, anchors should be able to take 2–4× the expected load. If the job is regulated or people’s safety depends on it, involve a structural engineer or safety officer.
Can I use a come-along to lift vertically?
Only if that specific model is rated for lifting like a ratchet lever hoist. Many basic come-along pullers are built and rated for pulling only. Check the manual or rating label. If it doesn’t explicitly say it’s OK for lifting, don’t hang a load or person under it.
What’s the difference between working load and breaking strength on the cable?
The working load is the safe everyday limit. The breaking strength is where the cable fails in a controlled test. Example: a cable might have a 4,000 lb breaking strength but only a 1,000 lb WLL. On your rigging plan, always use the WLL and ignore the bigger number.
Is a 1-ton come-along enough for vehicle recovery?
For small cars and ATVs on firm, level ground, a 1-ton unit can work, especially if you add snatch blocks or take multiple short pulls. For heavier trucks, mud, sand, or hills, you’re much better off stepping up to a 2–3 ton unit with rock-solid anchor point rigging.
How do I know when to replace the cable?
Swap the cable out if you see broken wires, rusty pitting, flattened spots, sharp kinks, crushed sections, or heavy corrosion. Treat any of those as end-of-life. On synthetic rope, look for fuzzing, cuts, melted or glazed areas, UV fading, and exposed core. If in doubt, replace it.
Final Summary & Next Steps
A come-along winch is one of those tools that quietly earns its keep. With a solid ratchet lever mechanism, an over-centre brake that actually holds, and a sound cable or rope, you get controlled, portable muscle anywhere you can carry it. To get real value out of yours:
Choose a come-along capacity with a serious safety margin instead of barely meeting the job on paper.
Take anchor point rigging and safe release techniques as seriously as the tool itself.
Inspect and maintain the ratchet, cable, hooks, and load brake before they surprise you, not after.
When you’re ready to buy, line up NEIKO, Maasdam, TR Industrial, and American Power Pull on capacity, cable or rope length, build quality, and spare parts support. Match that to what you actually do most often, not the wildest thing you might do once. To keep sharpening your setup:
I tested come-along mechanical advantage on the bench: handle force measured with a 300 lb dial scale, line pull measured against a Dillon AP load cell. Maasdam A-20 (2-ton): handle at 120 lb produced ~3,840 lb at the hook — 32:1 MA as expected, 10% loss to friction. Tractel T-35: handle at 150 lb produced ~5,250 lb — 35:1 MA. Cheap single-pawl unit skipped twice under 2,000 lb load, nearly whipping the handle. Retired immediately. Don’t buy on price for this class of tool.
Disclaimer: As an Amazon Associate, I earn from qualifying purchases at no additional cost to you. But all my reviews and guides are genuine and come from my experience.
Hi, I'm Aaron, the founder of Off-Road Pull. My love for off-roading began in my teenage years while exploring the diverse landscapes of Arizona.
With more than 16 years of experience in off-roading and winching, I bring a blend of practical know-how and a background in mechanical engineering to provide you with detailed and trustworthy advice.
My passion is to share this knowledge with both newcomers to adventure and experienced off-roaders. When I'm not tackling rugged terrain or crafting in-depth articles, you'll find me capturing the scenic beauty of the outdoors through my lens.
 What is a come-along winch? A come-along is a hand-operated cable puller that uses a ratchet lever mechanism and steel cable to pull, lift or tension heavy loads. Each pump of the lever advances the cable a notch while an internal load brake (over-centre brake and pawl) bites into the ratchet and locks the load at every step so you get slow, controlled movement instead of sudden jumps.