✅ Winch Cable — Steel Wire Rope Fundamentals
- Cable = wire rope. For trail winches, 6×26 IWRC (Independent Wire Rope Core) galvanized is the standard construction.
- Sizing by winch capacity: 3/16″ for 3,500 lb winches; 1/4″ for 4,500 lb; 5/16″ for 9k–10k; 3/8″ for 12k; 7/16″ for 16.5k+.
- Kinks = permanent failure. A single kink can cut strength 40–70%. Inspect before every pull; retire if kinked.
- Steel cable recoils violently if it parts (up to 200+ mph whip). Always use a cable damper.
- Cable vs synthetic: steel is more abrasion-resistant but 6× heavier and dangerous if parted. Synthetic is modern trail standard.
TL;DR: A steel winch cable will remain safe and strong only if you treat it right. Keep it clean and lubricated, spool it on under real tension, fix minor damage the right way, and retire it the moment you see serious kinks, birdcaging, or clusters of broken strands.
What follows walks you through winch steel cable anatomy, field and shop repairs, rust prevention, and how to know when it is time to stop trusting that line.
Key Takeaways
- Steel vs synthetic: Galvanized steel winch cable is heavier than synthetic rope, and it will add weight to the nose of your rig, but it is cheaper and handles abrasion and heat from the drum and brake far better. The tradeoff is you have to stay ahead of rust, watch for kinks, and manage cable fatigue.
- Know your cable: Wire rope codes like 7×19 or 6×19 IWRC describe how many strands, how many wires in each strand, and what type of core you have. Those details control flexibility, durability, and the working load limit (WLL) that you can safely pull.
- Repairs: Out on the trail, field repairs with ferrule crimps are only to limp you home at reduced loads. Proper, permanent repairs use correctly sized swaged fittings in a shop with a swage machine and should be proof-tested before you put that winch back into hard service.
- Untangling & spooling: Always straighten and untangle the line under light tension, never by yanking. Avoid forcing knots, kinks, and birdcaging, and re-spool in tight, even layers so you do not end up with binding, webbing, or nasty crossovers on the drum.
- Lubrication & rust control: Use a proper wire rope lubricant such as Fluid Film or other light oils that will penetrate the strands, avoid goopy chassis grease, and use corrosion inhibitor spray regularly so rust never gets a foothold.
- Cutting & crimping: Clamp and tape your cable before you cut it so the strands do not explode apart. Seal the fresh end with ferrules or end caps, and always match ferrule and swage sleeve size to the cable diameter and its intended WLL.
- Extensions & hardware: Only use rated extensions, shackles, and recovery gear that keep your overall WLL honest. Avoid backyard splices, and never pull harder than the weakest rated piece in your whole rigging chain.
- Winch Hooks Complete Guide: How to Safely Replace a Winch Cable with a Strap your winch cable whenever you see multiple broken wires in a short section, deep corrosion, measurable loss of diameter, hard kinks, or any birdcaging. That is especially true if you off‑road often or use the winch for work.
What Is a Winch Steel Cable?
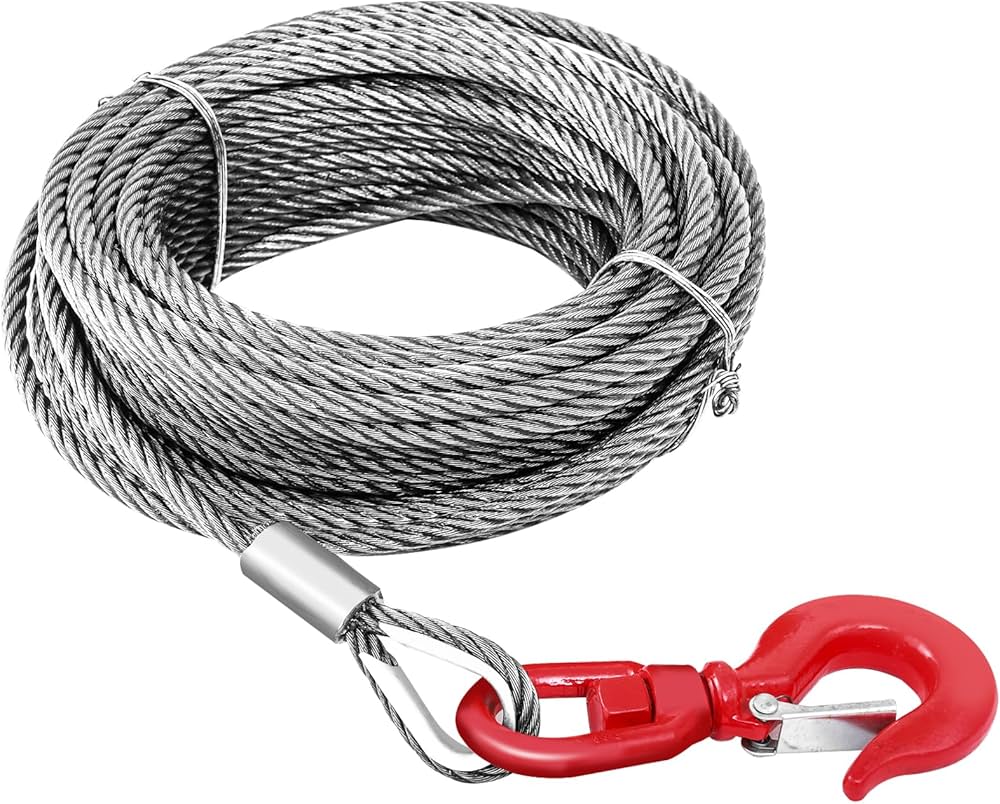
Winch steel cable, often called steel wire rope, is the multi-strand steel line wrapped on your electric or hydraulic winch drum.
It is built from many small steel wires twisted into strands, such as 7×19 construction, then wrapped around a core like IWRC to balance strength, flexibility, and fatigue resistance.
Every cable is rated with a working load limit (WLL) in pounds, which is the safe amount of pull you can apply when the cable is in good condition.
Steel Cable vs Synthetic Rope — Quick Comparison Table
Steel winch cable and synthetic rope will both drag a stuck truck out of a hole, but they behave very differently in your hands and on the drum.
Galvanized steel holds up better to heat and abrasion and tends to hold its WLL longer if kept clean and rust-free.
Synthetic rope is easy to handle and light, though it can lose strength faster from UV exposure, sharp edges, and melt damage.
If you want to stack steel cable against straps and synthetic options in more detail, see:
| Feature | Galvanized Steel Cable | Synthetic Rope (e.g., Dyneema, Master Pull rope) |
|---|---|---|
| Weight | Heavy. Adds noticeable front-end weight on truck winches and can affect springs and approach angle. | Much lighter. Easier to drag up a muddy hill and improves vehicle dynamics over rough terrain. |
| Cost | Usually cheaper. Common OEM choice on many Warn cable, Smittybilt cable, and ARB cable equipped winches. | Higher upfront cost, especially for quality brands like Dyneema or Master Pull rope, though some people see it as “pay once, cry once.” |
| Strength & WLL over time | Excellent heat and abrasion resistance. WLL stays more consistent if you keep rust and kinks under control and avoid shock loads. | Very high initial strength, but the WLL can drop quicker if the rope sees lots of UV, high heat from brakes, or gets cut or abraded on rocks. |
| Safety when it breaks | Stores a lot of energy. If it snaps, it can whip violently and damage anything in its path. Use dampers and keep everyone out of the danger zone. | Stores less kinetic energy. Usually falls to the ground if it fails, which is still dangerous but tends to be less violent than steel. |
| Maintenance | Needs rust prevention, lubrication, and careful re-spooling. Keep an eye out for broken wires and internal crushing. | Does not need lubrication, but protect it from UV, chemicals, and abrasion. Frequent inspection is still mandatory. |
| Handling | Gloves are mandatory. Even a single broken wire sticking out can slice your hand open. | Easier on the hands and less likely to stab you, but gloves are still smart for grip and general safety. |
| Environmental exposure | Galvanized steel cable fights corrosion longer, but salt, mud, and moisture eventually chew their way in, especially near the core. | Does not rust, but UV, engine heat, winch brake heat, and contaminants slowly weaken the fibers. |
For a lot of off-roaders, galvanized steel cable makes sense if you care about durability, heat resistance, and lower cost, and you are willing to maintain it and manage kinks and cable fatigue.
If you want less weight hanging off the front bumper and prefer the failure behavior of synthetic, dig into our synthetic rope comparison page.
Winch Cable Anatomy & Construction (What the Numbers Mean)
Those numbers stamped on the cable tag are not just there to look official.
If you understand what they mean, you will know how hard you can bend the cable, how it should behave on the drum, and what kind of wear to watch for during inspections.
Codes such as “7×19” or “6×19 IWRC” tell you the strand count, wires per strand, and the core design.
In broad terms, higher wire counts = more flexible cable that wraps nicely but wears faster. Lower wire counts = tougher surface that resists abrasion but is stiffer and less friendly to tight radius bends.
An IWRC core gives you more strength and better resistance to crushing on the drum than a fiber core.
Wire Rope Construction Basics
Most winch steel cables are true wire rope, not just a single, stuck-together cable. You have three main things to pay attention to:
- Diameter: Measured in inches such as 5/16″ or 3/8″. Diameter controls the raw strength potential and tells you where to look on the cable gauge chart for WLL numbers.
- Strand pattern: Designations like 7×19 or 6×19 describe how many strands the rope has and how many little wires are in each strand.
- Core type: The central support piece the strands wrap around. For winch lines this is usually IWRC wire rope, a smaller steel rope, instead of a softer fiber core.
What “7×19” and “6×19” Mean
- 7×19: Seven strands, each built from nineteen small wires, which gives you a total of 133 wires. Very flexible, wraps nicely on small drums, and is common on winches that see frequent, tight spooling.
- 6×19: Six strands with roughly nineteen wires each. Exact patterns vary, but this style is a workhorse construction that balances flexibility with better abrasion resistance on the outer surface.
As you increase the number of wires per strand, the cable bends around the drum with less internal stress. That helps reduce cable fatigue from constant bending and unbending during pulls.
The catch is that each wire is smaller, so it is more vulnerable to rust, wear, and snapping off if you neglect lubrication or drag it through grit.
IWRC (Independent Wire Rope Core)
IWRC wire rope means the cable has a tiny steel wire rope running down its middle instead of a bundle of fiber. That difference is easy to miss until you crush a fiber-core line on a hard pull and watch it flatten on the drum.
- Core type: The center is steel wire rope, not hemp, sisal, or synthetic fibers that can rot or compress.
- Flexibility: Slightly stiffer than fiber-core, but still flexible enough for normal winch drums and fairleads. You trade a little bendability for toughness.
- Break strength: Generally 7–15% more break strength than a fiber-core cable of the same diameter. That is free safety margin if everything else is done right.
- Recommended use: Ideal for truck winch cable setup, serious off-road recovery, tilt beds, industrial winches, and any situation where the drum loads the inner wraps hard or you see shock loads.
Cable Diameter & WLL Coding
Cable diameter is not something to guess at. Every size has a specific tensile strength and working load limit (WLL) tied to its construction. You will see these listed in pounds for each size and pattern of galvanized steel cable.
| Cable Type | Diameter (in) | Strand Pattern | Approx. Tensile Strength (PSI) | Typical WLL (lbs) | Corrosion Resistance | Price Range (USD / 100 ft) |
|---|---|---|---|---|---|---|
| Galvanized steel cable | 5/16″ | 7×19 | ~180,000–200,000 PSI | ~4,000–5,000 lbs | Good (zinc coating) | $80–$130 |
| Galvanized steel cable | 3/8″ | 6×19 IWRC | ~180,000–200,000 PSI | ~5,400–7,000 lbs | Good | $110–$170 |
Note: Always base your decisions on the manufacturer’s published cable gauge chart and WLL, not just a generic table.
Never exceed that rating, and remember that visible damage means the real-world WLL is already lower than what is printed on the tag.
How to Repair a Broken Winch Cable (Field Fix vs Shop Fix)
So the line let go or you found a bad section in the middle. Now you have to decide whether you can safely patch it enough to get out, or if the cable is done and needs a proper end fitting or full replacement.
Field repairs with ferrule crimps are short-term, get-you-home fixes. Shop repairs with swaged fittings are the only way to get back to full-rated work.
If you uncover bigger issues while you are in there, like a smoked motor or chewed-up gearbox, you will want to dig into winch-specific repair resources before you keep yanking on it.
Field Repair with Ferrule Crimp
A ferrule crimp, often called an oval sleeve, lets you form a loop or join two cable ends with basic tools. It is handy out on a trail when you do not have a shop nearby.
Just remember this is a get-out-of-trouble fix, not something you keep trusting for full winch capacity.
Ferrule Crimp Basics:
- Ferrule diameter: Has to match the cable size. A 3/8″ cable uses a 3/8″ ferrule. If you go bigger “so it is easier to slide on,” you slash the holding strength.
- Minimum quantity per loop: On anything critical, use at least 3 ferrules in a row on that loop or splice. One or two might hold for a light drag, but they will not give you reliable strength.
- Hold strength: Good aluminum or copper ferrules can reach 60–80% of the cable’s WLL when crimped with proper tools. Out in the dirt with a hammer crimper or questionable pliers, figure on less.
- Field repairability: They are made to be used with basic swage tools, which is why off-road kits include them. Just do not confuse that with a shop swage.
Field Repair Procedure (Emergency Only):
- De-tension and inspect: Get all the load off the cable and pull out the damaged section. If you see serious birdcaging, several broken wires clustered together, or big kinks on either side, write that cable off instead of trying to patch it.
- Cut clean ends: Use proper cable cutters if you have them, or a cut-off wheel, and always tape and clamp both sides before cutting so the strands do not unlay.
- Slide ferrules on: Before you form the loop or overlap, get at least 3 correctly sized ferrules onto one of the cable ends.
- Form the loop or join: For an eye, run the cable around a thimble. For a straight splice, overlap the two cable ends at least 20 times the cable diameter. That tail length helps the ferrules grab enough steel.
- Crimp ferrules: Use the best tool you have. A manual swager is ideal, hammer-type crimpers work in a pinch. Crimp each ferrule completely, from end to end, so there are no soft spots.
- Test under light load: Before a real recovery, do a gentle pull at maybe 10–20% of your winch rating. Watch for any movement at the ferrules or distortion in the splice.
Expert Tip: Put a small paint mark or marker line on the cable right where it enters each ferrule. After your test pull, if those marks have moved, the cable is slipping and the repair is not safe for anything more than the lightest load.
Shop Repair with Swaged Fitting
A swaged fitting is the proper way to terminate winch steel cable. The shop uses a hydraulic swage machine and calibrated dies to squeeze the fitting around the cable with controlled pressure.
If you are hauling heavy loads or you winch often, this is the only kind of repair that should live on your drum long-term.
Swaged Fitting Attributes:
- Cable diameter match: The fitting has to be built for your exact cable size, like 5/16″ or 3/8″. Undersize or oversize hardware means unpredictable strength.
- Holding strength: When installed correctly, a swaged fitting can hold 90–100% of the cable’s WLL. That is why industrial and commercial outfits insist on them.
- Installation tool type: These require a proper hydraulic or mechanical swage machine with the right dies, not hand crimpers or a vise and wishful thinking.
- Cost range: Typically $20–$60 per fitting plus labor. On a long line or heavy truck winch, that is cheap compared to the cost of a failure.
Shop Repair Procedure (Permanent):
- Bring the full cable: A good rigging shop will not just fix the visible end. They should inspect the whole length for kinking, cable fatigue, rust, crushed sections, and any noticeable change in diameter.
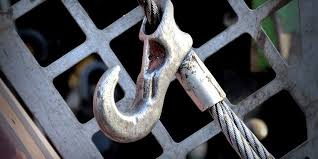
- Select correct fittings: Choose hooks, eyes, or thimbles that are rated above both your winch rating and the cable’s WLL. Do not put bargain-bin hardware on a serious recovery line.
- Swage machine setup: The operator matches the die size to the cable and sleeve, then sets the correct crimp stroke pressure for that combination.
- Multiple pressings: Longer sleeves usually get a series of presses down their length so the compression is even from one end to the other.
- Load testing: When the shop has the gear, they will proof-load the finished assembly to around 1.5–2 times the WLL to confirm it holds without slipping or deforming.
Any time your winch cable has seen a serious overload, hard kink, or obvious birdcaging, the safest move is often to start fresh with a new cable from Warn, Smittybilt, ARB cable, or another reputable brand, instead of trusting a repaired line.
How to Untangle a Winch Cable Without Damaging It
Tangled winch cable usually comes from reeling it in with no load or from side pulls that stack wraps on one side of the drum.
If you attack a tangle by jerking or bending the cable sharply, you will turn a minor headache into a ruined section of line. The trick is slow, controlled tension and patience.
Step-by-Step: How to Untangle Winch Cable
- Secure the vehicle: Work on level ground if you can. Set the parking brake, chock the tires, and put the winch in free-spool if your model has that option.
- Pull out the cable: Walk the cable out in as straight a line as possible until you reach the problem area. Always wear heavy gloves because even one broken wire can be nasty.
- Apply light tension: Clip the hook to a solid anchor or to a cable extension shackle on another vehicle or tree strap. Use the winch to put just enough tension on the line to keep it from flopping, not enough to pull the vehicle.
- Work the tangle by hand: With that light tension holding things steady, start loosening the loops and feeding cable back through the mess one turn at a time. Do not fold the cable sharply or kink it just to get it free.
- Watch for birdcaging: If you see the strands starting to bulge outward and the core looking hollow or loose, stop. That section has lost its structure. Mark it so you can either cut it out or retire the cable.
- Inspect for damage: Once the tangle is out, check that whole region for:
- Flattened or shiny rubbed spots
- Permanent bends or “S” shapes
- Broken wires poking out
- Rust, pitting, or visible loss of diameter
- Re-evaluate WLL: If you find any serious defect, treat that cable as de-rated. Either cut the bad section out and have a pro install new terminations or replace the whole cable.
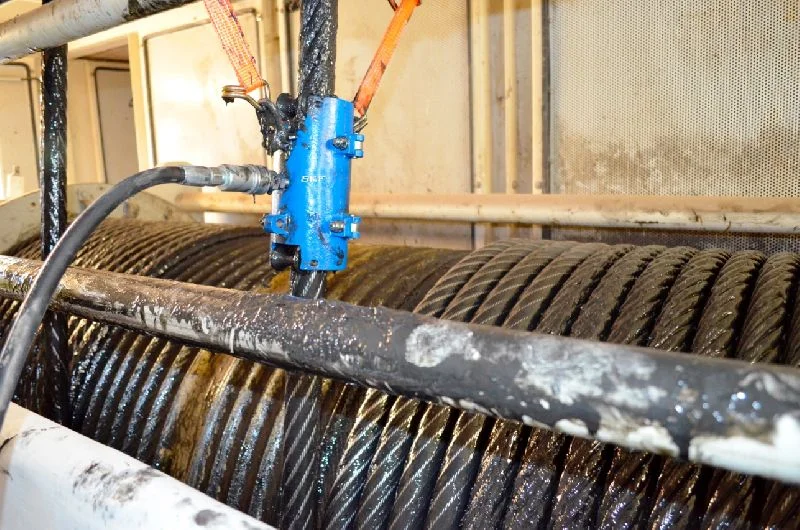
- Re‑spool under load: After you are sure it is straight, re-spool the cable with real tension so the wraps lay down properly and you do not end up back in the same situation.
Preventing Future Tangles (Proper Spooling Technique)
Most winch cable issues start at the drum. Poor drum layer winding means slack wraps, crossovers, and crush points that show up during the next hard pull. Neat spooling under load almost always pays off later.
- Keep constant tension: Do not reel in a loose line from across the yard. Use the winch to pull something with weight, even if it is your own vehicle rolling in neutral or a loaded sled.
- Guide side-to-side: Stand off to one side, out of the line of fire, and use a gloved hand or guide bar to walk the cable back and forth across the drum as it winds in.
- Align through the fairlead: Proper cable routing through fairlead matters. If the line is entering the fairlead at a heavy side angle, it will stack on one side of the drum and eventually try to climb and dive through the lower wraps.
- Use neat, tight rows: Pack the first layer snug with each wrap right against the last. Each layer above should sit in the grooves between the wraps below instead of just mounding up.
- Avoid back-and-forth jerking: If you keep changing direction quickly under load, the line will cut across itself and create buried crossovers that are hard on the strands.
If you make careful spooling a habit after each serious recovery, your steel winch cable will last longer and you will spend less time fighting tangles on the trail.
How to Cut Winch Cable (Tools, Safety & Sealing the End)
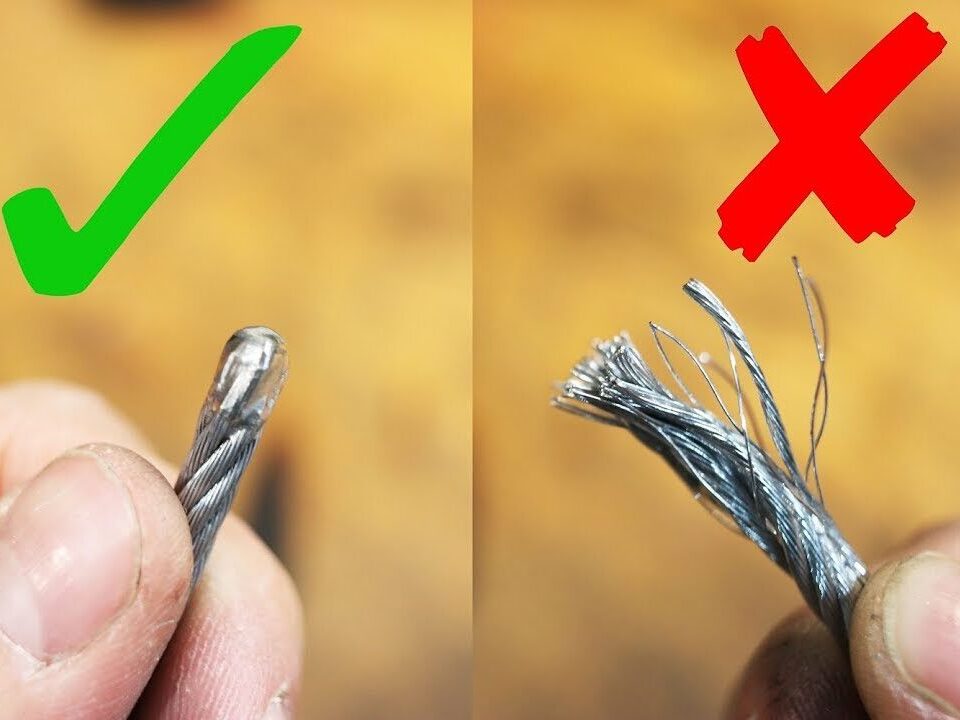
Cutting winch cable looks simple until the strands spring apart or a wire shard hits you in the face.
The goal is a clean, square cut with all the wires contained so you can terminate the end without fraying.
The wrong tool or sloppy setup will wreck the last few inches of an otherwise good cable.
Abrasive wheels and plasma cutters will slice through cable fast, but they can overheat the steel and burn off galvanizing near the cut.
In a typical garage, heavy mechanical cutters or an angle grinder with care and clamping are the better choice.
Tools & Safety Gear
- Heavy-duty cable cutters or an angle grinder with a thin cut-off wheel
- Optional: plasma cutter, but only if you are already comfortable running one
- Two strong clamps or locking pliers to hold the cable on both sides of the cut
- Electrical or duct tape for wrapping the cut zone
- Safety glasses and a face shield
- Leather gloves and decent work clothing
Step-by-Step: How to Cut Winch Cable
- De-tension and secure: Make absolutely sure the line is slack. Power off the winch, set the brake, and chock the tires so nothing moves unexpectedly.
- Mark the cut: Use a marker or a wrap of tape to mark exactly where you want to cut. Plan ahead for any loop or fitting you will be adding.
- Tape the cut zone: Wrap several tight layers of tape centered on the cut mark. This holds the strands together as the tool bites through.
- Clamp both sides: Put strong clamps or locking pliers on each side of the taped section. That extra grip keeps the rope from unlaying as soon as the cut is complete.
- Make the cut:
- With mechanical cutters: Line them up square and apply one firm, steady squeeze. Do not nibble at it with multiple partial cuts.
- With grinder or plasma: Cut straight through with a steady hand. Keep the heat as low as you can and direct sparks away from the truck and any flammables.
- Seal the end: As soon as the cut is made, slide a small ferrule, end cap, or stop sleeve onto the fresh end and give it a light crimp. That locks the strands so they do not start unwinding.
- Inspect: Peel the tape off and look closely. The end should be tight, round, and free of flared wires or jagged edges.
Whenever the new end will see real load, such as a hook eye or anchor point, follow up with proper ferrule crimping or a professionally swaged fitting so the termination can safely carry the cable’s WLL.
How to Lubricate Winch Cable: Best Products & Frequency
Good lubrication is the difference between a cable that stays smooth for years and one that starts popping wires after a couple of harsh seasons.
Lube reduces friction inside the rope where the strands rub and also slows rust from the inside out. The catch is using the right type and the right amount. Thick, sticky grease just becomes sandpaper once dirt sticks to it.
Types of Cable Lube Products
The best cable lube products share three things. They are thin enough to creep into the rope, they resist being washed off, and they play nice with galvanized steel and any rubber or synthetic parts nearby.
| Product Type | Example | Viscosity Grade | Application Frequency | Waterproof | Compatibility |
|---|---|---|---|---|---|
| Light penetrating oil | WD-40 (as cleaner, not heavy lube) | Very low (thin) | Every 1–2 months in harsh or daily use | Limited | Great for steel cleaning. Safe around synthetic, but it rinses off quickly. |
| Dedicated wire rope lubricant | Fluid Film, similar products | Low–medium | Every 3–6 months for typical off-road rigs | Yes, good water resistance | Designed for steel, generally compatible around synthetic if you do not soak the rope. |
| Heavy grease | General-purpose chassis grease | High | Not recommended for winch cable | Good water resistance | Fine on steel parts, but it traps grit and sand in your cable. |
Expert Insight: Use WD-40 as a cleaner and water chaser. Soak the dirty sections, wipe the muck off, and then come back with a proper wire rope lubricant like Fluid Film for long-term protection.
Cable Lube Schedule & Procedure
Your cable lube schedule should match how and where you use your winch. A mall crawler that only sees the occasional snowbank will not need the same attention as a recovery truck in coastal salt air.
- Light recreational use: If you only winch a few times a year, lubricate the cable every 6–12 months, usually at the start or end of a wheeling season.
- Regular off-road or work use: For weekly or monthly pulling, aim for a fresh lube job every 3–4 months.
- Saltwater, coastal, or de-icing salt use: Inspect monthly and plan on lubrication every 1–3 months, especially in winter.
How to Lubricate Winch Cable:
- Clean the cable: Pull most of the line off the drum and wipe off mud, sand, and old lube with rags. A light mist of WD-40 helps loosen grime so you are not grinding grit into the steel.
- Inspect as you go: Look over every foot of cable for broken wires, rust, flattened spots, kinks, or birdcaging. This is your best chance to catch issues before they become a failure.
- Apply lubricant:
- Brush method: Dip a small brush in your wire rope lube and work a thin coat into the strands as you move down the line.
- Spray method: Use a spray-style wire rope lubricant to coat the cable, slowly rotating it in your hand so you hit all sides.
- Prevent pooling: Avoid soaking any one spot. A thin, uniform film is what you want. Excess lube just attracts dirt and can drip into the winch housing.
- Re-spool under tension: With the cable still lightly wet, hook up to a moderate load and reel it in so the lubricant works into the core and the wraps seat properly.
A cable that looks slightly oily but not dripping is right where you want it. The steel is protected, but the line is not turned into a dirt magnet.
How to Crimp Winch Cable: Ferrules, Swage Sleeves & Load Rating
Any time you put a hook, eye, or stop on the end of a winch steel cable, the quality of that cable termination decides how safely it will carry the load.
The ferrules or swage sleeves must match the cable, and they have to be compressed correctly or the termination becomes your weakest link.
Selecting Ferrules & Swage Sleeves
- Match cable diameter: Ferrules are stamped or labeled “for 3/8″ cable” or similar. That is not a suggestion. Do not try to make a bigger sleeve “work” with extra crimping.
- Material: Aluminum and copper ferrules are the usual choices. For wet, salty environments, copper often holds up better against corrosion, though both are fine if maintained.
- Quantity: On any critical termination meant to carry close to full WLL, run at least 3 sleeves in a row. It spreads the load and gives you redundancy if one is not perfect.
Crimping Procedure (General)
- Measure and mark: Before cutting, mark where the loop will start so the finished eye is the right size for your hook or shackle.
- Install ferrules: Slide the required number of ferrules or swage sleeves onto the free end of the cable in the order you will crimp them.
- Form the loop: Pass the cable through the fitting eye or around a properly sized thimble. Bring the tail back through the ferrules, keeping enough tail length for all the sleeves to grip fully.
- Position ferrules: Space the ferrules evenly along the tail, snug against the loop but not crushing the thimble. Make sure the thimble is seated and not cocked sideways.
- Crimp:
- With a hand swage tool: Put the ferrule in the correct die, then complete a full crimp stroke. Do not half-squeeze and move on. Each sleeve needs a full, even press.
- With a machine: Follow the swage machine setup instructions and apply the specified crimp stroke pressure. Machine crimps should be uniform with no gaps.
- Verify: Inspect the ferrules. They should be evenly compressed with no cracks, no sharp edges, and the cable jacket should not look cut or pinched through.
- Load test: Before betting your rig on a new termination, test it at a light to moderate pull. Watch for slippage, deformation, or any movement at the ferrules.
Safety Note: A bad crimp looks fine right up until it lets go. If you are not confident in your tooling or technique, treat that termination as a reduced-strength point or have it professionally swaged before you use the full capacity of your winch.
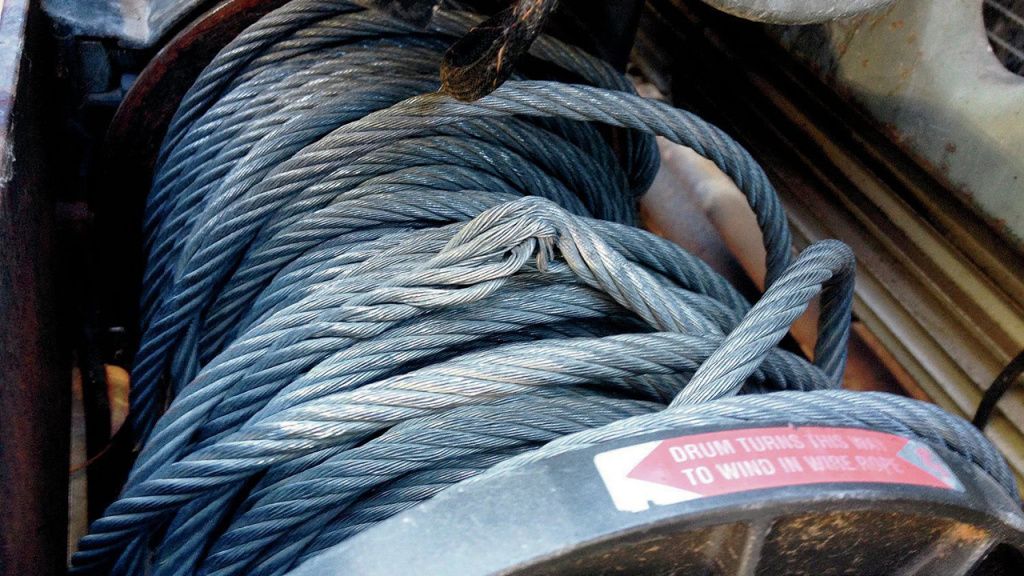
Preventing Cable Binding, Webbing & Crossover on the Drum
Binding, webbing, and crossover are the hidden killers of winch steel cable. They happen when one layer bites into another or crosses itself under load.
That crushes the core, especially in IWRC cable, flattens the outer strands, and creates hard spots that like to break during future pulls.
Even-Layer Winding Technique:
- Start with a perfect first layer: The first layer needs to be tight and flat from drum flange to drum flange. Every wrap you put on after that depends on this foundation.
- Maintain tension: Always reel in under some kind of load. Free-spooling and then taking up slack with no tension is the fastest route to loose wraps and bunching.
- Guide by hand (safely): Stand to one side, never in line with the cable, and guide it across the drum using a gloved hand. Take your time and keep the wraps stacked nicely.
- Watch the fairlead alignment: If your fairlead is bent or misaligned, the cable will try to climb toward one side of the drum. Fix the mount and alignment instead of fighting the line every use.
Fairlead Hooks & Alignment:
- Use a fairlead built for steel cable. Steel line will chew up a soft aluminum hawse that was intended for synthetic rope, and that rough edge will start damaging your cable.
- Check that the fairlead and winch mount are square to each other. A twisted mount sends the line in at an angle, which encourages crossovers and uneven packing on the drum.
After heavy or awkward pulls, it is smart to unwind and re-spool the cable under controlled conditions. That small habit keeps binding, webbing, and crossovers from stacking up across multiple recoveries.
How to Keep Winch Cable Tight on the Drum
Loose wraps on a drum are just waiting to get crushed when you pull hard next time. Keeping your winch cable tight on the drum stops inner wraps from shifting suddenly and helps the rope carry load evenly across its width.
Key Steps to Maintain Drum Tension
- Secure the first layer: Inside the drum there is usually a screw, bolt, or wedge block holding the cable’s inner end. Check:
- Anchor bolt torque: Make sure it is firmly snugged to spec. Do not reef on it so hard that you crush or cut the cable at the anchor point.
- Use a preload: On a brand-new cable, spool it in while pulling the vehicle up a slight grade or towing a load. That first winding should be under decent tension so the base layers never slip.
- Friction tape (optional): A single wrap of thin friction tape on the bare drum before installing the cable can give those first wraps something to bite into. Do not use thick padding that changes your drum diameter significantly.
- Avoid slack after pulls: At the end of a recovery, do not just unhook and walk away. Pull a short distance under moderate tension while guiding the line so the last wraps are tight and tidy.
If you keep tension on that cable every time you wind it in, you will see fewer surprises, less cable fatigue, and you will be more likely to hit or exceed the expected cable replacement interval.
How to Extend Winch Cable: Extensions, Shackles & Splicing
Sometimes the tree, rock, or another vehicle you want to pull from is just out of reach. Extending a steel winch cable can be done safely, but only if every piece in the system is properly rated.
A sketchy splice out in the field might move the truck once. It might also be the part that fails and turns hardware into shrapnel.
Important: Your system is always limited by the weakest component. If one shackle or strap is rated lower, that is the number you treat as your maximum.
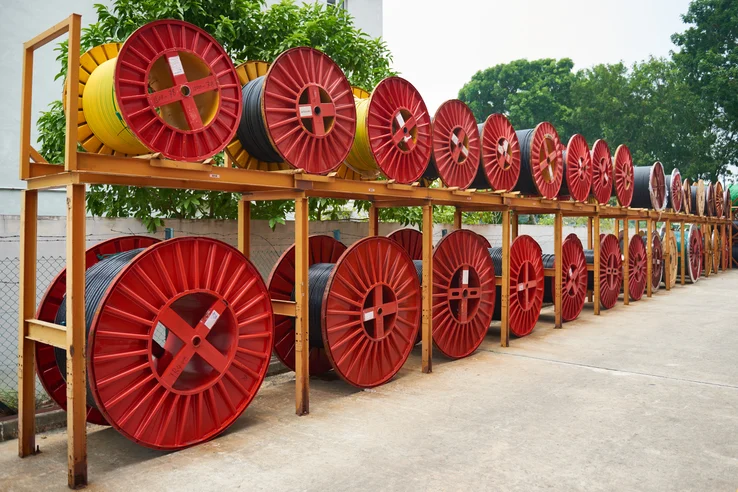
Options for Extending Winch Cable
- Cable or rope extensions: Pre-made lengths of steel cable or synthetic rope with eye terminations and hooks sized for your winch rating are the cleanest way to add reach.
- Shackles: Steel cable extension shackles or soft shackles are used to join the eye of your main line to the eye of the extension or to rigging at the anchor. Never hook a hook directly to another hook.
- Tree savers & straps: Rated recovery straps and tree savers protect the anchor object and give you flexibility in where you attach, while also adding a bit of extra length.
Safe Connection Techniques
- Use rated hardware only: Your shackles, hooks, and straps should all have a stamped WLL or rating that meets or exceeds the cable’s WLL and the winch’s pulling power.
- Connect eye-to-eye: Run shackles through the thimbled eyes or loops at the end of cables and straps. Do not choke bare cable around things or hook to the cable body itself.
- Load alignment: Line the system up so the pull is as straight as possible. Side loading shackles or hooks reduces their strength and can twist hardware apart.
Field Splicing & WLL Reduction
Wrapping steel cable around itself and calling it “good enough” is how people get hurt.
Field splices should be seen as last-ditch solutions at low load, not standard practice. Even careful ferrule work in the field rarely restores full strength.
- WLL reduction: Improvised splices and knots can cut the effective WLL to 50% or less, even if they look strong.
- Safety standards: In professional rigging and lifting, terminations have to be full-rated and proof tested. That mindset is worth copying, even if you are “just” recovering a trail rig.
- When extension is inappropriate: If you cannot build a safe, rated chain from winch to anchor, adjust the recovery plan. Reposition the vehicle, use a snatch block, or find a closer anchor instead of gambling with unsafe extensions.
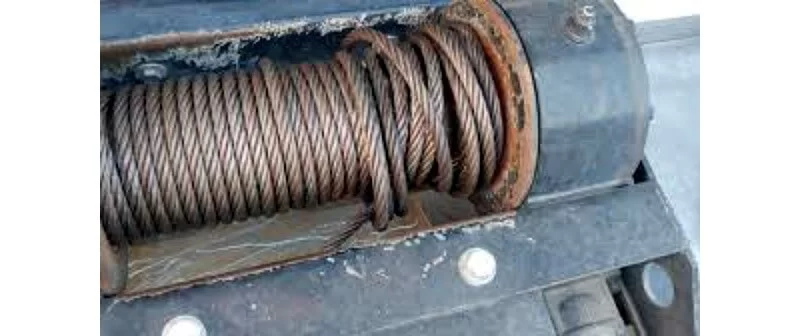
How to Prevent Rust & Corrosion (Long-Term Storage Tips)
Galvanized steel cable is tough, but it is not magic. The zinc layer slows rust, it does not stop it forever.
Mud, saltwater, and winter road salt work their way into the strands and start attacking the core where you cannot see the damage until it is advanced.
Staying ahead of corrosion is cheaper than replacing a cable, especially if you are running nicer Warn cable, Smittybilt cable, or ARB cable assemblies.
Rust & Corrosion Prevention Methods
- Galvanized protection limits: The zinc coating takes the first hit and sacrifices itself so the steel lasts longer. Deep scratches, abrasion from rollers, and kinks scrape that coating off and leave bare steel open to rust.
- Corrosion inhibitor spray: After you have cleaned and lightly lubricated the cable, mist a thin coat of corrosion inhibitor spray such as Fluid Film or similar products along the length. It seeps into the small gaps where moisture likes to hide.
- Dry storage: If the rig will sit for weeks or months, store it where the winch is not buried in wet mud or sitting in constant rain. A covered parking spot or garage makes a big difference.
- Temperature control: Repeated swings from hot to cold in a damp space cause condensation on the cable and inside the drum housing. That trapped moisture starts rust from the inside. Better ventilation or more stable temps help.
Inspection Frequency for Harsh Environments
- Offshore / Saltwater: Check the cable before each serious use. After any saltwater exposure, rinse the line with fresh water, let it dry as much as possible, then re-lube and re-apply inhibitor every 1–2 months.
- Road salt / winter use: During winter, inspect monthly. After drives on salted roads, rinse the front of the truck and winch area thoroughly and let things dry before storage.
- Normal off-road use: For typical trails and mud, inspect every few trips and hit it with lube and inhibitor every 3–6 months depending on how dirty it gets.
If you start seeing deep pits, flaky rust, or orange rust dust seeping from between strands, that is a big red flag that internal corrosion has already eaten into the rope. At that point, replacement should be on your short list.
When to Replace Your Winch Cable (6 Signs of Wear)
Every steel cable has a service life. You can stretch it by maintaining it, but you cannot stop wear and fatigue forever. Hanging on to a cable that has already shown you serious damage is one of the biggest mistakes people make with winches.
Six Clear Signs It’s Time to Replace
- Visible corrosion: Brown or red rust on the surface, especially near the hook end or buried wraps on the drum, means there is already metal loss. What you see outside is usually less than what is happening inside.
- Broken wires: If you spot 3 or more broken wires in a single strand or a pattern of broken wires along any short length, that part of the cable can no longer be trusted to hold its rated WLL.
- Kinks and sharp bends: Any kink that permanently changes the rope shape puts a stress riser right in the middle of your line. Those points are where cables usually fail under load.
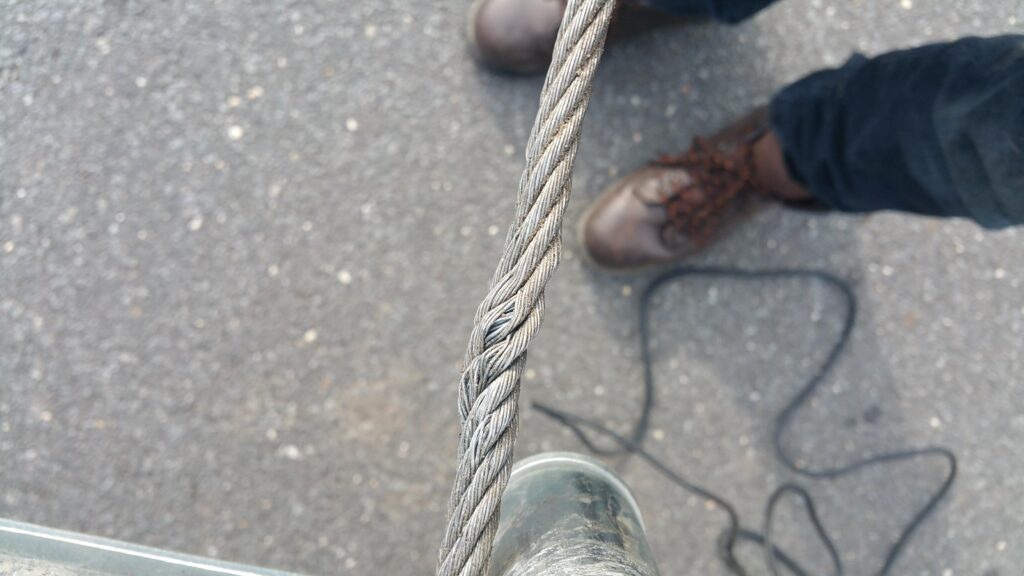
- Birdcaging: When the strands balloon outward from the core after a shock load or crush event, that is a sign the core has failed or shifted. Birdcaged cable goes straight to the scrap pile.
- Diameter loss (>5%): Use calipers to measure. If the actual diameter is more than 5% less than the nominal size, you are looking at significant wear and internal crushing.
- Performance degradation: If the cable slips oddly on the drum, stretches unevenly, or you hear grinding and popping noises as it loads, there is likely internal damage beyond what is visible.
Replacement Interval by Use
Your personal cable replacement interval will depend heavily on how you treat the line and your environment, but some rough windows are realistic.
- Light recreational (few pulls/year): With good maintenance and storage, 5–7 years is common, assuming you are inspecting it and not seeing any of the warning signs above.
- Frequent off-road or work use: On rigs that winch a lot, 2–4 years is typical. Inspect before and after big trips and any heavy winching sessions.
- Commercial or industrial winching: Follow formal inspection timetables and retirement rules. Annual or even quarterly replacement can be mandated depending on regulations and duty cycle.
If you are on the fence about a questionable cable, retire it early. The cost of a fresh line is small compared to the cost of a failed pull that damages a vehicle or injures someone.
FAQ: Winch Steel Cable Maintenance & Safety
Here are straight answers to common questions about winch steel cable lifespan, repair options, rust control, and costs.
How long does a winch steel cable last?
For most recreational wheelers running galvanized steel, a winch steel cable can last around 3–7 years if you clean, lubricate, and spool it properly.
Heavy commercial use, lots of salt, and poor maintenance can shrink that to 1–3 years, sometimes less.
Is it safe to repair a broken winch cable?
Field repairs with ferrule crimps are only safe as temporary fixes for light to moderate pulls.
If you want to trust the winch at full rating again, you need a professionally swaged termination or a brand-new cable. Do not use a home-made splice for serious recoveries.
What’s the best lubricant for a steel winch cable?
You want a dedicated wire rope lubricant or corrosion inhibitor like Fluid Film. It should be thin enough to penetrate, stick well enough to stay put, and be made for galvanized steel.
WD-40 is great as a cleaner and short-term protector, but it is not ideal as your only long-term lube.
How often should I lubricate my winch cable?
For typical off-road use, a 3–6 month interval works fine. In salty, wet, or coastal conditions, check the line monthly and lubricate every 1–3 months.
Always clean and inspect the cable before you lube it, then re-spool under tension.
How do I stop my winch cable from rusting?
Rinse off mud and salt, dry the cable whenever you can, keep a light coat of wire rope lube and corrosion inhibitor spray on it, and store the vehicle in a reasonably dry place.
Pull the line out far enough to inspect wraps near the drum, since that is where hidden rust likes to start.
Can I extend my winch cable with another cable or rope?
Yes, as long as you use properly rated extensions and shackles designed for recovery. Connect eye-to-eye with shackles or soft shackles, keep the pull straight, and never exceed the WLL of the lowest-rated piece in your rigging setup.
What’s better: galvanized vs stainless steel winch cable?
Galvanized steel cable is what you see most often. It is affordable, strong, and has decent corrosion resistance.
Stainless wire rope resists corrosion better, which is great around salt and marine environments, but it usually costs more and may give up some strength for the same diameter depending on the alloy and construction.
When should I switch to synthetic rope instead of steel cable?
Switch to synthetic rope, such as Dyneema or Master Pull rope, if you want a lighter front end, easier handling, and less violent recoil if something fails.
If you are weighing steel cable against straps and other synthetics, look at our steel cable vs synthetic strap and synthetic rope comparison guides.
Can I use WD-40 alone as my cable lube?
WD-40 is useful as a wash and short-term rust blocker, but it does not give the thicker, long-lasting film that purpose-made wire rope lubricants offer. Use it as the cleaning step, then apply a proper cable lube afterward.
How do I know if my crimp or swage is strong enough?
Start by confirming the ferrule matches the cable diameter and that every sleeve is fully and evenly compressed with the right tool. There should be no cracks or gaps in the ferrule.
Ideally, have the termination proof-tested below the cable’s WLL. If you are unsure, treat that crimp as suspect and avoid using the winch near its maximum rating.
Final Summary & Next Steps
A steel winch cable is one of the most useful pieces of gear on a rig, but it can also be one of the most unforgiving if you ignore it.
If you understand basic wire rope construction, keep a regular routine of cleaning, lubricating, and inspecting, manage how the line goes onto the drum, and stay honest about when to repair or replace, your winch will stay ready without putting anyone at unnecessary risk.
To round out your setup and learn how your cable interacts with other parts of the system, check out:
- Steel cable vs synthetic strap for a deeper look at different line materials.
- Cable routing through fairlead so you can dial in drum winding and reduce wear.
- Truck winch cable setup for help matching cable, winch, and truck in a real-world build.
If you are ever unsure whether your winch cable is still safe, do not overthink it. Retire it and install a new, correctly sized and properly terminated line. That fresh cable is cheap insurance for every recovery you will ask it to handle.
Part of the Winch Accessories guide. Explore more guides in this cluster for complete coverage.
🔧 How I Inspect Winch Cable
Annual cable inspection: unspool the entire line onto a clean tarp, run a cotton glove along the length (snags on broken wires), measure diameter with calipers (should be ±5% of nominal), flex-test sections to look for internal core damage. After six winters on my Warn XD9000 with 5/16″ galvanized 6×26, I retired the cable when I found four broken wires within a single lay near the hook eye. Bench-tested the old cable: 11,200 lb MBS vs factory 16,700 — 33% strength loss. Don’t trust cables that look worn. Test them.
