Using the right cable and crimping it securely are vital for ensuring the safe and reliable operation of any winching system.
Improperly crimped winch cable can come loose under load leading to dangerous situations.
In this guide, we will cover the entire process of selecting cable and fittings as well as the proper technique for crimping cable so you can feel confident in your rigging.
Choosing Cable and Crimp Fitting
Specifications to Look for in Winch Cable
When selecting a winch cable, consider its diameter, construction, and rating. The diameter affects the cable’s strength and flexibility, while the construction—whether braided or stranded—affects its durability and resistance to wear. The cable’s rating should exceed the maximum load you plan to lift or pull, ensuring a margin of safety.
Matching Crimp Fitting Size/Type to Cable
It’s crucial to select a crimp fitting that matches your cable’s diameter and construction. The fitting should snugly accommodate the cable without being too loose or tight. This match ensures a secure connection that can handle the load without slipping or breaking.
Considering Application Load and Conditions
The load your winch will handle and the conditions it will operate in—such as wet, muddy, or corrosive environments—should guide your choice of cable and fittings. Opt for materials and coatings that offer the best resistance to the conditions you anticipate.
Selecting the Right Crimping Tool
Compound Leverage Crimper Basics and Benefits
A compound leverage crimper multiplies your force, making it easier to achieve a tight, secure crimp. This tool is essential for ensuring the crimp fitting tightly encloses the cable, providing a reliable connection.
Die Types and Size for Cable Diameter
Choosing the correct die size for your cable’s diameter is crucial. The die must match the crimp fitting’s size to ensure a uniform crimp that fully compresses the fitting onto the cable without damaging it.
Ensuring Complete Circumferential Crimp
A complete circumferential crimp means the crimp fitting is uniformly compressed around the entire circumference of the cable. This uniformity is key to a strong, secure attachment.
Proper Crimping Technique

Executing a proper crimping technique is crucial for ensuring that winch cables are securely attached and capable of handling the intended loads safely.
Let’s delve into each step of this process in detail, emphasizing the importance of precision and care at every stage.
Correctly Placing Cable in Crimp Fitting

Before you even begin the crimping process, the correct placement of the cable within the crimp fitting is essential. This involves:
- Full Insertion: The cable must be fully inserted into the crimp fitting until it cannot go any further. This ensures that the maximum surface area of the cable is in contact with the fitting, providing a stronger grip once crimped.
- Proper Seating: Check that the cable is seated evenly within the fitting. Uneven placement can lead to an imbalanced crimp, which might compromise the connection’s strength and reliability.
Step-by-Step Crimping Process
The crimping process itself involves a series of precise actions:
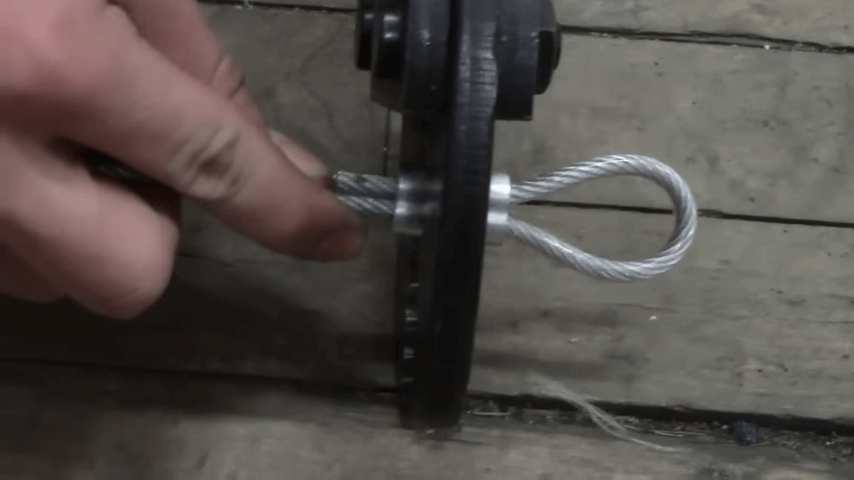
- Positioning: Carefully place the cable and crimp fitting within the jaws of the crimper, ensuring that the fitting is aligned with the crimper’s die. This alignment is crucial for achieving an even crimp along the entire circumference of the fitting.
- Applying Pressure: Once everything is in position, apply pressure to the crimper’s handles to close the die and compress the fitting onto the cable. This pressure must be firm and steady, ensuring the fitting is uniformly compressed.
- Repeating as Necessary: Depending on the length of the crimp fitting and the recommendations for the particular type of cable and fitting being used, you may need to repeat the crimping action at several points along the fitting’s length. This ensures a secure attachment across the entire connection.
Avoiding Imperfections
During the crimping process, it’s vital to avoid any imperfections that could weaken the connection:
- No Folded or Twisted Cables: Ensure that the cable is not folded or twisted within the fitting before crimping. Such imperfections can create weak points in the connection, potentially leading to failure under load.
- Even Compression: The crimp should be even and uniform around the entire circumference of the fitting. Uneven crimps can lead to areas of weakness, reducing the overall strength of the connection.
Testing Crimp for Tightness
After crimping, conducting a simple tightness test can verify the security of the crimp:
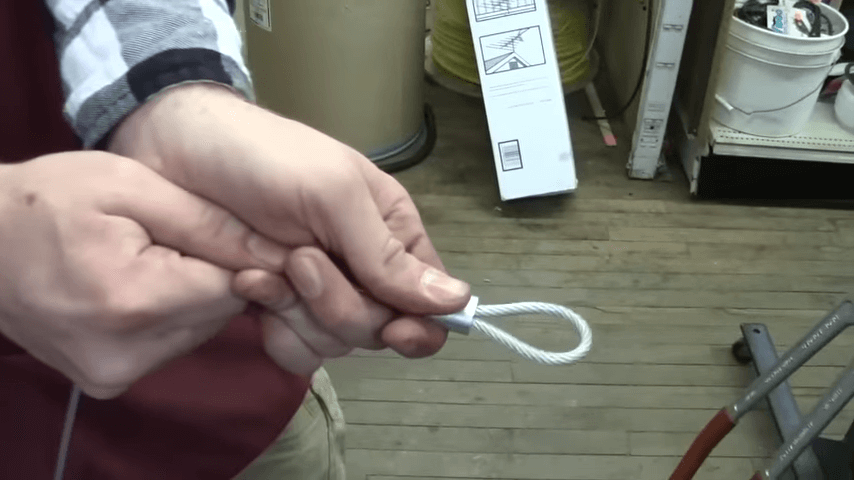
- Tug Test: Gently but firmly tug on the cable and fitting to test the crimp’s tightness. A properly crimped connection will not move or slip. If there is any movement, the crimp may not be secure enough to handle the intended loads.
- Visual Inspection: In addition to the tug test, visually inspect the crimp. Look for any signs of uneven compression or damage to the cable or fitting. Any imperfections could indicate that the crimping process needs to be adjusted or redone.
Verifying the Crimp Strength
Verifying the strength of a crimped connection on a winch cable is a critical step in ensuring the overall safety and reliability of the system.
Let’s delve into the importance of tensile and load testing, how these tests can be conducted even without sophisticated machinery, and what signs to look for that indicate a crimp may not be up to standard.
Tensile and Load Testing Explained
- Tensile Testing: This process involves applying a pulling force to the crimped connection, gradually increasing the force until the crimp either holds firm under the expected load or fails by pulling apart. Tensile testing is a direct way to measure the maximum strength of the crimped connection, ensuring it can withstand specific stress levels without failing.
- Load Testing: Unlike tensile testing, which tests the crimp’s strength to its failure point, load testing simulates the operational conditions the cable will face. This could involve applying a sustained load that replicates the weight the winch cable would typically carry or maneuver. Load testing helps in assessing the crimp’s performance under realistic conditions, ensuring it maintains its integrity and security during normal operations.
Methods to Test Without Machines
Not everyone has access to professional tensile or load testing equipment, but there are practical methods to assess a crimp’s integrity:
- Manual Load Application: For a basic assessment, you can manually apply a significant load to the cable, within its rated capacity, to ensure the crimp holds securely. This can be done by attaching a weight to the cable and observing whether the crimp maintains its grip without any slippage.
- Visual and Physical Inspection: After applying the load, inspect the crimped area for any signs of deformation, slippage, or damage. You can also perform a “tug test” by pulling on the cable and fitting to feel for any movement that shouldn’t be there if the crimp is properly done.
Signs of Poor Crimping to Check For
After testing, it’s essential to know what indicators might signal an inadequate crimp:
- Stretching: If the cable appears elongated or stretched near the crimped area, this can indicate that the crimp has not been sufficiently tight, allowing the cable to move under load.
- Slippage: Any evidence that the cable has slipped within the crimp fitting suggests that the crimp does not have enough grip. This is a clear sign that the connection is not secure.
- Visible Damage: Look for any visible damage to the cable or the crimp fitting itself, such as cracks, fraying, or crushing. Damage can compromise the connection’s integrity and is a strong indicator that the crimping process needs to be reviewed and likely redone.
Following Safety Best Practices
Following safety best practices when working with winch cables and crimps is paramount to ensure not just the longevity of the equipment but also the safety of all involved. Let’s delve deeper into each of these safety guidelines:
Warnings About Over-Torqueing and Load Limits
- Over-Torqueing: This refers to the application of force beyond what the winch, cable, and crimps are designed to handle. Over-torqueing can lead to several problems, including deformation of the crimp fitting, which compromises the integrity of the cable’s attachment. It can also cause internal damage to the cable, reducing its strength and leading to potential failure under load. To avoid over-torqueing, always adhere to the specifications provided by the equipment manufacturer for the maximum torque.
- Load Limits: Every winch and cable system is designed to handle a maximum load, beyond which the risk of equipment failure increases significantly. Exceeding these load limits can result in catastrophic failures, where the cable could snap, causing injury or damage. It’s crucial to understand the maximum load your system can safely handle and to never exceed this limit. This involves not only the weight of the load itself but also considering dynamic forces that might be introduced, such as shock loading when lifting or pulling starts.
Using Cable Protection and Ends Guides
- Cable Protection Sleeves: These are designed to protect the cable from external abrasions and cuts that can occur during use, especially where the cable might come into contact with sharp edges or rough surfaces. By reducing wear and tear, these sleeves extend the life of the cable and maintain its strength.
- End Guides: These components are used at the ends of cables to prevent fraying and to facilitate a smoother interaction with winch drums and load attachments. They help in maintaining the structural integrity of the cable end, ensuring that the load is distributed evenly across the cable’s structure, reducing the risk of failure at the attachment points.
Inspecting Cable and Crimps Over Time
- Regular Inspections: Over time, cables and crimps can suffer from wear, corrosion, or damage due to environmental conditions, usage patterns, and accidental impacts. Regularly inspecting the cable and its attachments allows for the early identification of potential issues that could lead to failure. Look for signs of wear, such as fraying cables, corrosion, especially in environments with moisture or chemicals, and any signs of deformation or damage to the crimps.
- Maintenance Routine: Incorporating cable and crimp inspection into your regular maintenance routine ensures that issues are not only identified but also addressed promptly. This may involve cleaning, lubricating, or replacing parts of the cable system that show signs of deterioration.
Conclusion
Crimping your winch cable correctly is crucial for safety and efficiency. By following this guide, you ensure a secure attachment capable of handling the loads you intend to lift or pull. Remember, the quality of your crimp directly impacts the reliability of your winch, making attention to detail and adherence to best practices non-negotiable. Keep your winch operating safely and effectively by choosing the right materials, employing the proper techniques, and conducting regular inspections.

