This guide covers physical hook stoppers — rubber donuts, aluminum rings, and soft shackles that sit between your winch hook and fairlead to prevent metal-on-metal damage during storage and spool-in. For closed-loop replacement systems that eliminate the hook entirely (Factor 55 ProLink, Warn Epic), see our separate hook isolator guide.
✅ Hook Stoppers: Fairlead & Rope Protection (Rubber, Aluminum, Soft-Shackle)
- Definition: a hook stopper is a buffer between your winch hook and the fairlead — usually a rubber donut, soft shackle, or aluminum closed-loop system.
- Three core jobs: protect the fairlead from chipping, protect the rope eye from abrasion, and keep the hook from rattling loose during travel.
- Without one, the hook eventually scores the hawse aluminum, and the burrs then begin chewing the rope on every spool-out.
- Modern best practice is replacing the hook entirely with a closed-loop system (Factor 55 ProLink, Bubba Gator-Jaw shackle) — no hook = nothing to slam.
- Pair with the right rope: rubber donuts work for both steel and synthetic. Aluminum closed systems require a rope eye loop, so synthetic only.
Key Takeaways
- A winch hook stopper is a hard limit on your winch line travel so the hook can’t slam into the fairlead or bumper when you’re distracted or in a hurry.
- Skip the stopper and you invite fairlead damage, chipped coatings, bent hook latches, and ugly shock loads that travel straight into your winch drum, gears, and mounting plate.
- The three common approaches are: a rubber hook stopper, a U-bolt cable clamp stop, and a rope stopper knot for synthetic winch rope.
- On steel cable, the most reliable DIY setup is a properly sized Crosby-style U-bolt cable clamp, installed with the “never-saddle-the-dead-horse” rule and torqued to spec.
- On synthetic rope, a correctly tied and set Dyneema stopper knot (double overhand or figure-eight) can work as a compact, hardware-free hook stop.
- Clamp spacing and how much line you engage matter. Use the 3d + 1 rule as a reality check and always keep enough good wraps on the drum to preserve strength.
- Place the stopper a few inches short of the fairlead opening. How far depends on rope diameter and fairlead depth, then fine-tune after a couple of pulls in real use.
- Hook stoppers are cheap insurance that improve fairlead protection, make line management cleaner, and boost overall hook safety on your rig.
Quick Definition: What is a Winch Hook Stopper?
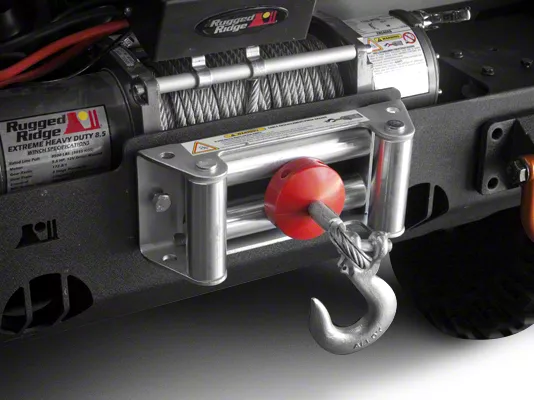
 What is a winch hook stopper? A winch hook stopper (also called a winch cable stopper or winch line stopper) is a rubber bumper, cable clamp, or rope knot installed close to the hook on your winch line. That “bump” becomes a physical stop so the hook can’t get pulled into the fairlead. It protects the fairlead, line, and bumper, and gives you a consistent place where your hook parks when you spool the line in.
What is a Winch Hook Stopper? (and What Happens Without One)
A winch hook stopper is anything you put on the line to define the end of travel before metal meets metal. That can be a dedicated rubber block, a U-bolt clamp on steel cable, or a stopper knot on synthetic winch rope. The job is simple but important. Stop the hook before it reaches the fairlead and give the winch a clear, predictable parking position. I see a lot of new winch owners run without a stopper. All it takes is one distracted moment holding the “in” button and the hook will drive right into the fairlead. That can:- Chew up or gouge your fairlead, especially soft aluminum hawse fairleads that mark easily.
- Bend or crack the hook latch, oval out the hook eye, or nick the hook throat.
- Send a nasty shock-load into the drum, gearbox, and mounting plate, which is how you loosen winch mounts and accelerate gear wear.
- Scar steel cable or synthetic rope right where it hits sharp fairlead edges, creating future failure points.
- Scratch paint, powder coat, and trim on your bumper or grille as the hook rattles around.
Types of Hook Stoppers (Rubber, Cable Clamp, Rope Stopper Knot)
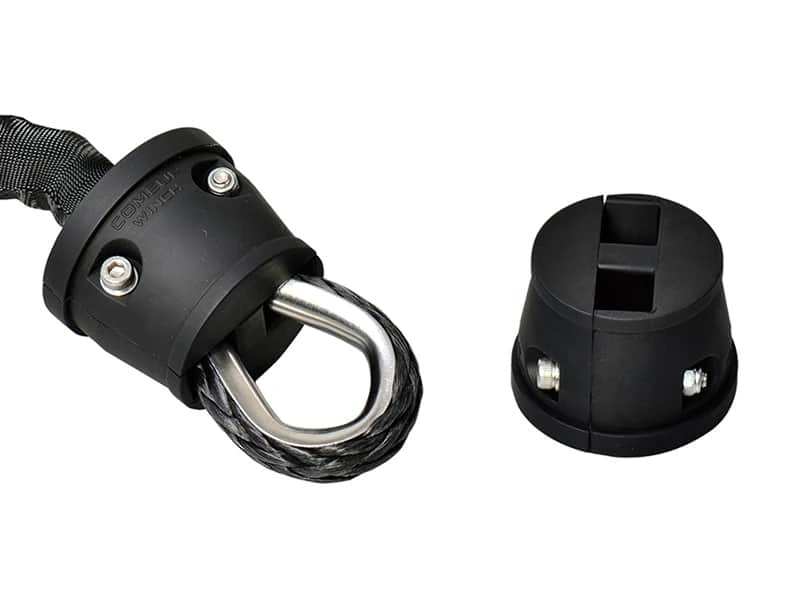
Rubber Hook Stopper
 A rubber hook stopper is the classic off-the-shelf solution. It’s usually a two-piece rubber puck that sandwiches around the line right behind the hook and bolts together with a center bolt and washers. Typical attributes (EAV):
- Stopper diameter: Usually in the 2.5–3.5 inch range, wide enough that it hits the fairlead face before the hook gets there.
- Mounting method: Center through-bolt with flat washers and a locknut to keep it from backing off.
- Cable diameter match: Molded channels or grooves sized for 1/4″, 5/16″, or 3/8″ lines so it grips instead of sliding.
- Cost: Typically around USD $10–$30 depending on brand, material, and whether it’s rubber or polyurethane.
- Simple bolt-on part. If you can run a wrench, you can install one.
- The softer material gives solid fairlead protection and absorbs some of the impact instead of transferring it to the winch.
- Compatible with both steel cable and synthetic rope as long as the internal groove matches the line size.
- Gives new winch users a big, obvious visual “do not pass” point when spooling in.
- Rubber and cheaper compounds dry out, harden, or crack under UV, mud, and road salt after a few seasons.
- The bigger diameter can snag rocks or hang up a bit on steep ledges if your bumper has a tight approach angle.
- If you buy the wrong size, it can slide along the line or deform instead of staying locked in position.
Cable Clamp Stop (Steel Cable)
 A cable clamp stop uses a U-bolt cable clamp locked onto the wire rope to act as a hard stop. These clamps are designed for terminations, but if you pick the correct size and torque them properly, they make a compact, tough stopper on steel cable that shrugs off repeated contact with the fairlead. Typical attributes (EAV):
- Cable diameter fit: Available to match common winch cable sizes like 1/4″, 5/16″, 3/8″, 7/16″ and up.
- Bolt size: U-bolt diameter usually matches the cable size, for example a 5/16″ U-bolt on 5/16″ cable.
- Torque spec: Roughly 15–45 ft-lbs depending on clamp size, always confirmed from the manufacturer.
- Clamp spacing: Around 3x cable diameter if you ever use multiple clamps for an actual termination.
- Very low profile. It barely sticks off the cable so it doesn’t interfere much with line stacking on the drum.
- Handles repeated taps against the fairlead face without chunking or deforming like rubber.
- Unaffected by UV, fuel, or most chemicals you’ll see off-road.
- Clamps are inexpensive, easy to swap, and you can carry a spare in the trail box.
- Intended for steel cable. On synthetic rope the U-bolt can pinch and cut fibers, so it’s not the right choice there.
- You’ve got to respect cable clamp sizing and torque. Sloppy installation defeats the purpose.
- If you ignore the never-saddle rule and flip it around, you can crush the working strands and weaken the line.
Rope Stopper Knot (Synthetic Rope)
 On synthetic winch rope, a stopper knot is often the cleanest option. You’re working with Dyneema or similar fibers that behave more like climbing rope than wire. A compact rope stopper knot close to the hook becomes your hook stop without adding metal hardware. Most folks use either a double overhand stopper or a figure-eight stopper knot. Both build enough bulk in the rope to catch the fairlead or a rubber cushion behind the hook. Typical attributes (EAV):
- Knot type: Commonly a double overhand stopper or figure-eight stopper. Both are easy to learn and repeat.
- Rope diameter fit: Works on typical winch rope sizes from about 3/16″ to 3/8″, with larger ropes building bigger stoppers by default.
- Slip resistance: Good, as long as the knot is dressed correctly and fully set under load.
- Tighten force: Start by hand, then use controlled winch load to fully seat and lock the fibers.
- No extra hardware to rust, rattle, or snag on obstacles.
- Very low profile, so it stacks neatly as it comes onto the drum.
- Appeals to folks who want an all-rope system with minimal metal in the line path.
- Needs to be tied right. A sloppy or half-set knot can creep toward the fairlead or jam tight when you least want it to.
- Once synthetic has been really loaded in a knot, adjusting that knot location can take patience or retying from scratch.
- The knot area is a wear spot. You’ve got to inspect for heat glazing, fuzzy fibers, or cuts around the knot on a regular basis.
How to Install a Winch Hook Stopper on Steel Cable
 On steel cable, the cleanest long-term solution is usually a U-bolt cable clamp acting as an inline stop. If you match the clamp size to the cable, follow the never-saddle rule, and torque it properly, you’ll end up with a compact hook stopper that will outlast most rubber pucks.
Required Tools
To install a steel cable stopper using a U-bolt clamp (Crosby or similar), gather this stuff before you start digging into the line:- A correctly sized U-bolt cable clamp that matches your cable diameter.
- A torque wrench that covers the required ft-lb range for your clamp size.
- A combination wrench or socket set to fit the clamp nuts.
- A measuring tape or small ruler for accurate placement.
- A marker, paint pen, or tape to mark where the stopper will sit.
- Gloves and eye protection, since steel strands can spike or fray and catch unprotected hands.
Step-By-Step: Hook Stopper Installation on Steel Cable
Here’s a practical way to set up a clamp-style hook stopper on a steel winch cable, assuming the hook is already installed on the end of the line.- Measure from the fairlead: With the winch in freespool, pull the line out, then re-engage the clutch and add slight tension. Park the hook where you’d like it to sit when fully spooled in, usually just shy of the fairlead face. Measure back from the fairlead by your planned stopper distance (see the placement section later) and mark that point on the cable.
- Select the correct clamp size: Confirm your cable diameter with a caliper or tape, then grab a clamp with the matching cable diameter fit (5/16″ clamp for 5/16″ cable, and so on). Too small and you crush strands. Too large and it bites unevenly and can slip.
- Disassemble the clamp: Spin the nuts off the U-bolt and separate the saddle so you can place each piece where it needs to go on the line.
- Position the clamp correctly: Decide which side of the cable is the live side relative to the hook. That live side is the portion that will see load if anything ever pushes on the stopper. Put the saddle on that live side and the U-bolt on the dead side. Remember the saying: never saddle a dead horse.
- Install nuts finger-tight: Slide the clamp to your mark and thread both nuts on by hand. Snug them just enough that the clamp doesn’t move but you can still tweak its position if needed.
- Torque in sequence: Hook up the torque wrench and work each nut in a gradual, alternating pattern:
- Tighten the first nut to about 50% of the final torque.
- Switch sides and bring the opposite nut to about 50% as well.
- Walk them both up in small steps until you hit full torque from the manufacturer’s cable clamp torque chart for your clamp size. As a rough idea, 1/4″ clamps land around 15–25 ft-lbs, and many 3/8″ clamps live around 30–45 ft-lbs, but always check your exact hardware.
- Test the stop: Power the winch in slowly while watching the hook and fairlead. Make sure the clamp hits its stop first and leaves your hook just short of the fairlead without any contact. If you misjudged the distance, back the line out, loosen the clamp, slide it, and re-torque.
- Re-torque after the first hard pull: After the first solid recovery or load, come back and check the nuts again. Steel strands can settle under that initial stress. Re-torque to spec if there’s any movement.
Torque Specs for U-Bolt Cable Clamps
Each manufacturer publishes its own torque numbers, so always treat these values as ballpark ranges. They’re handy for planning, but still confirm against the specific clamp’s documentation or stampings.| Cable Diameter | Clamp (U-Bolt) Size | Typical Torque Spec (ft-lbs) | Typical Clamp Spacing |
|---|---|---|---|
| 1/4″ (6 mm) | 1/4″ U-bolt | 15–20 ft-lbs | ~3/4″–1″ apart if multiple |
| 5/16″ (8 mm) | 5/16″ U-bolt | 20–30 ft-lbs | ~1″–1-1/4″ |
| 3/8″ (10 mm) | 3/8″ U-bolt | 30–45 ft-lbs | ~1-1/4″–1-1/2″ |
- Use a torque wrench instead of “feels tight enough.” Guessing is how clamps loosen or crush strands.
- Follow an alternating clamp torque sequence so the saddle seats evenly across the cable.
- If you ever run more than one clamp in series for redundancy or terminations, follow the clamp spacing formula and keep them around 3x cable diameter apart.
How to Install on Synthetic Rope (Stopper Knot Method)
On synthetic winch rope, many owners prefer a rope stopper knot to avoid having metal hardware on the soft fibers. That keeps the system lighter and reduces the chance of abrasion hot-spots at a clamp. The most common options are the double overhand stopper and the figure-eight stopper knot, both of which behave well on Dyneema-style rope when tied and set correctly. Always check your winch rope manufacturer’s instructions. Some competition-grade ropes have specific knot recommendations or areas they want you to avoid tying knots in.Choosing the Right Stopper Knot for Synthetic Rope
Both the double overhand and figure-eight build a lump in the rope that acts as a speed bump for the fairlead. The choice comes down to how big you need that bump and how easily you want to be able to re-tune it later.- Double Overhand Stopper Knot: Compact and quick to tie. Great when you want a smaller, dense stopper and you’re confident you won’t be moving it all the time.
- Figure-Eight Stopper Knot: Tends to be a bit bulkier and is usually easier to loosen after being loaded, which helps if you want to adjust placement later.
Step-By-Step: Synthetic Rope Stopper Knot Installation
- Determine placement: Under light tension, bring the hook up to where you’d like it to park short of the fairlead. Mark the rope just behind the hook with tape or a marker. That’s where you want the finished knot to live.
- Form the knot:
- Double Overhand: Near your mark, form a small loop. Pass the bitter end around the standing part and through the loop twice, building an extra wrap. Start to pull the knot together without letting it drift off your mark.
- Figure-Eight: Form a loop, wrap the bitter end around the standing part, then bring it back through the loop to create that classic “8” shape. Begin to snug it up near your mark.
- Dress the knot: Take your time here. Work the strands so the knot is tidy, with no crossed turns or twists. A well-dressed knot spreads load evenly and gives better slip resistance.
- Pre-tighten by hand: Pull the tail and standing part in opposite directions while holding the knot at your mark. Get it as tight as you reasonably can by hand so it doesn’t migrate when you put it under the first real pull.
- Set the knot under load: With everything clear of the line, slowly spool the winch in until the knot reaches the fairlead or any rubber cushion you’re using. Apply a controlled pull so the knot sees real tension and the fibers lock into place.
- Perform a slippage test: After you release tension, check where the knot ended up compared to your mark. If it walked forward, either retie it tighter or modify the knot (extra turn on a double overhand, for example) and repeat until it stays put.
Fitting Cable Clamps: Spacing, Saddle Rule &Amp; Load Rating
Cable clamps are one of the most abused pieces of hardware in a recovery kit. Even if you’re only using a clamp as a cable stopper for a winch, sloppy orientation or poor spacing can damage your line and cut into your margin of safety.Never-Saddle Rule Explained
The never-saddle rule is non-negotiable on U-bolt clamps. That old saying, “Never saddle a dead horse,” exists because people were crushing live strands and snapping cables long before off-road winching was a thing. In clamp language:- The live end is the side of the cable that actually carries load.
- The dead end is the trailing tail or non-working leg.
- The saddle always sits on the live end of the cable.
- The U-bolt always goes on the dead end.
Minimum Wraps and Spacing (3D + 1 Rule)
When clamps are used to build proper eyes and terminations, there are whole standards about how many clamps, how far apart, and how long the tail must be. A winch line stopper sits on a straight, continuous line instead, but the same thinking about stress concentration still helps. A handy guideline is the minimum 3-wrap formula, expressed as 3d + 1:- d = cable diameter in inches.
- 3d + 1 ≈ minimum length of cable you want in good health behind the stopper before it bends tightly or stacks against the drum.
Minimum Wraps Chart (Conceptual Load Rating)
For real terminations, the cable clamp load rating is usually calculated as a percentage of the cable’s Working Load Limit (WLL). Your stopper is not a full-strength connection, but it still involves the same hardware and the same wire rope.| Clamp Type | Minimum Wrap/Clamp Count (for terminations) | Approx. Load % of Cable WLL | Spacing Requirement |
|---|---|---|---|
| Saddle/U-bolt (standard) | 3–4 clamps on small diameters | About 80–90% if installed correctly | ≈ 3 × cable diameter between clamps |
| Heavy-duty forged clamps | 3–5 clamps depending on diameter | Up to around 90–95% with proper torque | ≈ 3–4 × cable diameter between clamps |
- Do not clip to the clamp and try to use it as a rigging point, lifting eye, or shackle location.
- Do not design any critical lifting or overhead system where that clamp is expected to hold full WLL on its own.
Where to Position the Stopper on the Line
Stopper placement is where people either get it dialed or end up annoyed. If you set it too close to the fairlead, the hook still kisses the fairlead or gets pinched. Too far back and the hook hangs out in the breeze, swinging and banging into everything on the trail.Fairlead Protection &Amp; Distance Formula
Think of fairlead protection as a simple geometry problem. You’re balancing three measurements:- Fairlead depth (F): The distance from the front face of the fairlead to roughly the winch drum plane, measured in inches.
- Cable or rope diameter (d): The actual thickness of your line, in inches.
- Desired clearance (C): The gap you want to see between the hook and fairlead at rest, usually somewhere around 0.5–1.0 inch.
- Fairlead depth: F = 3″
- Cable diameter: d = 3/8″ ≈ 0.375″
- Desired clearance: C = 0.75″
Measuring &Amp; Fine-Tuning Position
- Baseline measure: Lightly tension the line, bring the hook up close to the fairlead where you want it to live, then measure back along the line from the fairlead by your calculated distance. Mark that spot clearly.
- Install stopper: Put your rubber stopper, cable clamp, or stopper knot right on that mark using the proper install method for that style.
- Test under power: Slowly spool the winch in until the stopper meets the fairlead face or hits its hard stop. Watch clearances around the hook, the fairlead edges, and the bumper. You want zero metal-on-metal contact.
- Adjust as needed: Most people end up nudging the stopper a little closer or farther after the first test. Move it until the hook stops where you like it, then fully torque or set the stopper for long-term use.
Common Mistakes When Using a Winch Hook Stopper (and How to Fix Them)
- Mistake 1: Pulling the stopper into the fairlead under power. Issue: Some drivers hold the switch until the winch stalls against the stopper, smashing the rubber or clamp into the fairlead every time they park the hook. Fix: Ease off the control as soon as the stopper just makes contact and the line comes snug. Show every driver on your rig exactly where you want them to stop.
- Mistake 2: Wrong cable clamp orientation. Issue: People forget the never-saddle rule, stick the saddle on the dead end, and let the U-bolt crush the live side of the cable. Fix: Repeat “never saddle a dead horse” every time you pick up a clamp. Saddle on the live end, U-bolt on the dead end, no exceptions.
- Mistake 3: Undersized or oversized clamps. Issue: A too-small clamp digs in and flattens strands. A too-big clamp never really grips and can slide when hit. Fix: Match clamp to cable using stated cable diameter fit, not eyeballing. If you’re unsure, check a cable clamp sizing chart or the clamp manufacturer’s guide.
- Mistake 4: Stopper positioned too close to the fairlead. Issue: Even with a stopper, the hook still manages to rub or pinch against the fairlead when spooled in tight. Fix: Use the simple formula S ≈ F + d + C and build in at least 0.5–1 inch of clearance. After your first few pulls, bump the stopper a bit farther out if you see any contact.
- Mistake 5: Loose stopper knot on synthetic rope. Issue: A quick, half-set knot slides down toward the fairlead under its first big load, throwing off your carefully planned distance. Fix: Dress the knot carefully, set it hard by hand, then lock it in with a controlled winch pull. Re-check the mark after your first serious recovery and re-tie if it moved.
- Mistake 6: Treating the stopper as a recovery anchor. Issue: Someone clips a shackle or hook directly to the clamp or knot instead of the rated hook or eye and expects it to carry the load. Fix: A stopper is only a line positioner. It is not a load-rated attachment point. Always rig from the actual winch hook or the designed termination hardware.
FAQ: Winch Hook Stopper &Amp; Fairlead Protection
Do I Really Need a Winch Hook Stopper?
You can run without one, but you’re gambling with your fairlead and bumper every time you reel the line in. A winch hook stopper is cheap, simple, and makes it much harder to accidentally pull the hook into the fairlead. You also get a cleaner parked hook and better fairlead protection whether you run steel cable or synthetic rope.Is It Safe to Use a Cable Clamp as a Winch Line Stopper?
Yes, on steel wire rope it’s a solid option if you treat it with the same respect you’d give any load-handling hardware. Use a good U-bolt cable clamp, like a Crosby-pattern clamp, size it correctly, obey the never-saddle rule, torque it using the cable clamp torque chart, and don’t use the clamp itself as a lifting or rigging point.How Far from the Fairlead Should I Place My Hook Stopper?
A reliable starting point is the formula S ≈ F + d + C. Measure your fairlead depth (F), add your cable or rope diameter (d), then add around 0.5–1 inch of clearance (C). Install your stopper there, test it under power, and tweak the position until the hook consistently stops just shy of the fairlead without touching.Are Rope Stopper Knots Reliable on Synthetic Winch Rope?
They can be very reliable if you match the knot to the rope and tie it correctly. A well-dressed rope stopper knot like a double overhand or figure-eight on Dyneema-type synthetic rope will hold up just fine as a hook stop. The key is to set it firmly under load and keep an eye on fiber condition at inspection time.How Often Should I Replace My Rubber Winch Hook Stopper?
Include the stopper in your normal winch inspection routine. If it starts cracking, hardening, chunking, or deforming badly, swap it. On a rig that gets regular trail use, a quality stopper often lasts several seasons, but strong sun, chemicals, and repeated hard impacts will shorten that life.Will a Hook Stopper Affect How My Cable or Rope Spools on the Drum?
A clamp or knot has almost no impact on how the rest of the line stacks. A big rubber stopper may change the lay on the last wrap or two, but it’s minor and usually not a problem. Protecting your line and fairlead matters far more than a slight variation in those final coils.Can I Use the Same Stopper Setup If I Switch from Steel Cable to Synthetic Rope?
Sometimes, but not always. Most rubber hook stoppers will work with either, as long as the cable diameter match is close. A metal cable clamp that worked great on steel cable should not be clamped onto soft synthetic rope. If you change to rope, consider swapping to a rope-safe rubber stopper or a dedicated stopper knot instead.Final Summary &Amp; Next Steps
A well-thought-out winch hook stopper is one of those upgrades you forget about after install, but it quietly saves your fairlead, hook, and bumper every single time you reel the line in. Whether you go with a rubber hook stopper, a compact U-bolt cable clamp stop on steel cable, or a rope stopper knot on synthetic rope, the real wins come from getting the size, location, and installation right. Next steps:- Decide whether your setup calls for steel-specific hardware or a synthetic-friendly solution.
- Apply proper cable clamp fitting practices on wire rope or follow proven stopper knot methods on synthetic.
- Use the fairlead depth and clearance formula to set your stopper distance, then fine-tune it after a few real-world pulls.
Part of the Winch Accessories guide. Explore more guides in this cluster for complete coverage.
🔧 My Hook Stopper Adoption Curve
I resisted hook stoppers for years because “my winch came with a hook for a reason.” Then I replaced two fairleads in three years on my JK and finally bought a $28 rubber donut. After installing, zero fairlead damage in 5 more seasons. Eventually upgraded to a Factor 55 ProLink XTV for the closed-system safety bonus. The lesson: stoppers aren’t optional, they’re standard equipment for anyone running a winch they actually use.
