Installing a winch on your vehicle doesn’t have to be complicated—if you follow the right steps. This guide shows you exactly how to mount a winch plate, connect the battery and ground wires, align the control box, and test your winch safely. Whether you’re equipping an off-road 4×4, trailer, or ATV, we’ll help you do it right the first time.
Quick Answer: How to Install a Winch Step by Step
- Mount the Winch Plate – Align and bolt it to the vehicle’s frame using a model-specific mounting kit.
- Attach the Winch – Place the winch on the plate and secure it with the provided bolts.
- Connect the Wiring – Run the power cable to the battery’s positive terminal and the ground cable to the vehicle frame.
- Install the Control Box – Mount it where it’s accessible and wire the controls.
- Test the System – Perform a light load test to ensure proper operation.
Always wear gloves, use a fuse or circuit breaker, and keep cables away from heat and moving parts.
Understanding Winches
Before we get our hands dirty, it’s crucial to understand what a winch is and the types available. A winch is a mechanical device used for pulling or lifting, powered either by electricity or hydraulics.
The electric winch, popular for its ease of installation and use, is perfect for most off-road vehicles. Hydraulic winches, while more complex, offer unmatched power for heavier tasks.
While electric winches are ideal for ease of use and quick installation, hydraulic winches excel in heavy-duty applications due to their durability and pulling power.
If you’re looking for the easiest winches to install, explore our expert-tested recommendations tailored for smooth setup and quick deployment.
Choosing the right winch involves considering your vehicle’s weight and the winch’s cable type. A good rule of thumb is to select a winch with a weight capacity 1.5 times greater than your vehicle’s weight.
When it comes to cable, you have two choices: synthetic or steel. Synthetic cables are lighter and safer, while steel cables are more durable and resistant to abrasion.
For reliable options that are easy to install, check out our best winches list.
Tools and Materials Needed
When preparing to install a winch on your vehicle, having the correct tools and materials at hand is crucial for a smooth and safe installation process. Let’s break down the essentials you’ll need and why each is important.
Winch Mounting Kit

The winch mounting kit is perhaps the most critical component of your installation toolkit. This kit is designed to fit your specific vehicle model and make, ensuring that the winch can be securely attached to your vehicle without any modifications that could compromise safety or functionality.
The mounting kit typically includes a good mounting plate and hardware (bolts, nuts, and washers) that are engineered to withstand the forces the winch will exert during operation.
It’s essential to choose a mounting kit that matches your vehicle’s specifications to ensure a proper fit and to maintain the vehicle’s structural integrity.
Hand Tools
A basic set of hand tools is necessary for the mechanical aspects of the winch installation. Here’s a closer look at what you’ll need:
- Wrenches and Sockets: These are used to tighten and loosen bolts and nuts. A set that includes a variety of sizes will ensure you have the right tool for each piece of hardware in the mounting kit. Adjustable wrenches can be particularly useful for fittings that require specific torque settings.
- Screwdrivers: Some parts of the installation, such as securing the control box or making electrical connections, may require the use of screwdrivers. Having both flathead and Phillips head screwdrivers in various sizes will prepare you for any screws you might encounter.
- Winch plate alignment tool: Ensures precise positioning of the winch plate to avoid misalignment issues.
These tools are not only essential for attaching the winch and mounting plate to your vehicle but also for making adjustments and maintenance tasks down the line.
Safety Equipment
Safety should never be overlooked when installing a winch. Here’s what you need and why:
- Gloves: Protective gloves are necessary to prevent cuts and abrasions from handling the winch cable, especially if you’re working with a steel cable. Always wear heavy-duty gloves to prevent injuries while handling winch cables, especially when using steel cables prone to sharp edges. They also provide a better grip and protect your hands from sharp edges on the winch or vehicle.
- Goggles: Safety goggles protect your eyes from debris, dust, and any small particles that might be dislodged during the installation process. When drilling or tightening hardware, it’s not uncommon for metal shavings or dust to fly up, posing a risk to your eyes.
Wiring Accessories (for Electric Winches)
If you’re installing an electric winch, you’ll need various wiring accessories to connect the winch to your vehicle’s electrical system safely. These may include:
- Electrical Cables: Heavy-duty cables to connect the winch motor to the battery and ground.
- Connectors and Terminals: To secure the electrical connections, you’ll need appropriate connectors and terminals that can handle the current required by the winch.
- Circuit Breaker or Fuse: To protect the electrical system from overload or short circuits, a circuit breaker or fuse is essential. This component is installed inline with the power cable to the battery.
- Switches or Remote Control: For operating the winch, you’ll need a switch or remote control, which may require additional wiring.
Installing the Winch
Installing a winch on your vehicle involves several critical steps, each requiring careful attention to ensure the winch operates safely and effectively. Let’s delve into the details of each step in the installation process.
Mounting the Winch Plate
The winch plate serves as the foundation for your winch system. It must be robust enough to handle the extreme forces exerted during winching operations. Here’s how to mount it correctly:
Positioning the Winch Plate
Start by positioning the winch plate against your vehicle’s frame at the designated mounting area.
This area is typically at the front of the vehicle, but the exact location can vary depending on your vehicle’s design and the winch model.
Securing the Plate
Use the bolts provided in your mounting kit to secure the plate to the vehicle’s frame.
It’s essential to follow the manufacturer’s instructions regarding the placement and tightening of these bolts. The goal is to distribute the winch’s load evenly across the frame to avoid any structural weaknesses.
Ensure the winch plate is level and secured to distribute force evenly during operation, preventing frame stress.
Checking Alignment
Before tightening the bolts completely, check that the plate is perfectly aligned with the vehicle’s frame and that there are no obstructions that could interfere with the winch’s operation.
Misalignment can lead to uneven load distribution and potentially damage the winch or vehicle.
Attaching the Winch
Once the winch plate is securely mounted, you can attach the winch itself:
- Placing the Winch: Carefully place the winch onto the winch plate, aligning the mounting holes on the winch with those on the plate. The winch should sit squarely and securely on the plate.
- Bolting Down the Winch: Insert the bolts through the winch and into the winch plate, tightening them according to the manufacturer’s specifications. These bolts must be securely fastened to ensure the winch does not move or detach under load.
- Align the winch mounting holes with the plate carefully to avoid uneven load distribution, which can compromise safety.”
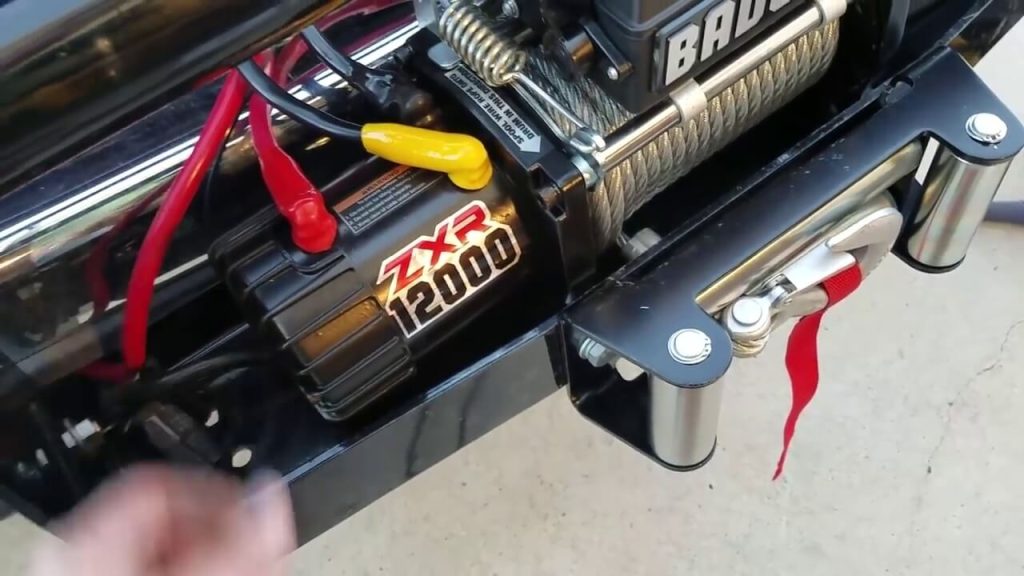
Making Electrical Connections (for Electric Winches)
Electric winches require a power connection to your vehicle’s battery and a grounding point. Here’s how to establish these connections safely:
Connecting Power and Ground Cables
Always connect the ground cable to an unpainted metal surface on the vehicle’s frame to ensure proper electrical flow.
Run the power cable from the winch to the positive terminal of your vehicle’s battery and the ground cable to the negative terminal or a suitable grounding point on the vehicle’s frame. Ensure the cables are routed away from any moving parts or heat sources to prevent damage.
Securing Connections
Use appropriate connectors to secure the cables to the battery terminals. The connections should be tight and secure to ensure reliable power delivery to the winch. It’s also a good practice to apply a corrosion-resistant coating to these connections to prevent degradation over time.
Use a multimeter to verify the continuity of connections and ensure no loose wires, which can cause power interruptions.
Installing the Control Box
The winch control box allows you to operate the winch. It should be installed within easy reach but protected from potential damage. Some prefer to mount the control box near the driver’s seat for easy access, while others may choose a location near the winch itself, depending on the length of the control cables and personal preference.
Testing the Setup
Once all connections are made, it’s crucial to test the winch to ensure it operates correctly. Perform a light pull test to verify that the winch and its controls are functioning as expected. This test will also help identify any issues with the electrical connections or mounting setup that need to be addressed.
Securing the Winch Cable
Spooling the cable onto the winch drum is a critical step. For safety and efficiency, ensure the cable is wound tightly and evenly. Begin by feeding the end of the cable through the fairlead and securing it to the drum. Then, using the winch’s power, slowly wind the cable onto the drum, keeping tension to avoid loose loops.
Testing and Maintenance
After installation, testing your winch is essential to ensure it operates correctly. Perform a test pull with a light load, checking for smooth operation and proper cable winding. Regular maintenance, such as inspecting the cable for wear and ensuring all connections remain tight, will keep your winch in top condition.
Troubleshooting Common Issues
Winch Not Operating
If your winch does not operate when you activate the control, there are several potential causes:
1. Check Electrical Connections:
Begin by inspecting all electrical connections from the winch to the battery and the ground. Loose or corroded connections can interrupt the power supply to the winch, preventing it from operating. Ensure that all connections are tight and clean off any corrosion with a wire brush or corrosion removal product. Also, check the condition of the cables themselves for any signs of wear, damage, or fraying that could impede electrical flow.
2. Inspect the Fuse or Circuit Breaker:
Electric winches are typically protected by a fuse or circuit breaker. If the winch is not operating, this protective device may have tripped or blown due to an overload or short circuit. Locate the fuse or circuit breaker, which is usually installed close to the battery, and check if it needs to be reset or replaced.
3. Test the Control Switch
A faulty control switch can also cause the winch not to operate. If possible, test the switch with a multimeter to ensure it is functioning correctly. In some cases, bypassing the switch temporarily with a direct connection can help diagnose the issue. If the winch operates with the direct connection, the switch is likely the problem and should be replaced.
Winch Pulling Unevenly
Uneven pulling, where the winch pulls more strongly to one side or seems to struggle, can be caused by several factors:
1. Inspect Cable Spooling
The winch cable must be evenly spooled on the drum, especially the first layer, as it forms the base for subsequent layers. If the cable is not evenly distributed, it can cause the winch to pull unevenly or jam. Unspool the cable under light tension and then carefully respool it, ensuring it lays evenly across the drum.
2. Check for Cable Damage
Damaged or kinked cables can also lead to uneven pulling. Inspect the entire length of the cable for any signs of wear, kinks, or fraying. If you find damage, replace the cable before using the winch again. Damaged cables are not only less efficient but can also be a safety hazard.
3. Lubricate Moving Parts
Lack of lubrication can cause the winch to operate unevenly or with difficulty. Ensure that all moving parts, including the cable, drum, and gears, are adequately lubricated according to the manufacturer’s recommendations. Proper lubrication reduces friction, allowing for smoother operation.
4. Verify Winch Alignment
Finally, ensure that the winch is correctly aligned with the vehicle and the anchor point. Misalignment can cause uneven pulling forces on the cable and winch, leading to poor performance. Adjust the mounting or the anchor point as necessary to ensure a straight line of pull.
Also Learn this specific vehicle type guides
FAQs
How do I install a winch safely?
Install a winch by securing the winch plate to your vehicle’s frame, attaching the winch, connecting power cables to the battery, and testing the setup for proper operation.
What tools are needed for winch installation?
You’ll need a mounting kit, wrenches, sockets, screwdrivers, and safety equipment like gloves and goggles.
How do I test my winch after installation?
Run a light load test by pulling a small object, ensuring smooth operation, even cable spooling, and proper alignment.
Can I install a winch by myself?
Yes, you can install a winch by yourself if you have the right tools, follow safety precautions, and adhere to the manufacturer’s instructions. However, professional help is recommended for complex installations or if you’re unsure about wiring.”
How do I choose the right winch for my vehicle?
Choose a winch with a weight capacity 1.5 times your vehicle’s gross weight. Consider factors like cable type (synthetic or steel), winch type (electric or hydraulic), and compatibility with your vehicle’s frame.
What maintenance does a winch require?
Inspect the winch regularly for cable wear, ensure the mounting bolts are tight, lubricate moving parts, and check electrical connections for corrosion or damage.
Conclusion
This guide provides a comprehensive overview of selecting and installing the right winch for your vehicle or trailer.
Remember, consulting the user manual for your specific winch model is crucial. Prioritize safety and proper installation to ensure your winch performs reliably and effectively.
With the right winch, your vehicle’s capability reaches new heights, ready to tackle any challenge.
