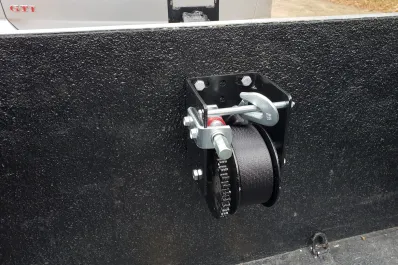
Installing a hand winch on your trailer can make tasks like loading ATVs, motorcycles, or bulky equipment a breeze.
In this guide, we’ll walk you through the step-by-step process of installing a hand winch on your trailer, ensuring a secure and functional setup.
Tools and Materials Needed
To install a hand winch on your trailer, you’ll need the following tools and materials:
- Best Hand winch (with appropriate capacity)
- Mounting hardware (bolts, nuts, washers)
- Wrench set (for tightening bolts)
- Drill (if mounting holes need to be drilled)
- Tape measure
- Marker or pencil
- Safety glasses
- Gloves
Preparing the Installation Area
When it comes to installing a hand winch on your trailer, one of the most critical steps is preparing the installation area.
This step is foundational because it ensures that the winch is mounted securely and operates efficiently.
Here’s a detailed breakdown of why each part of this process matters and how to do it correctly.
Choosing the Ideal Location:
- Accessibility: The location of the winch on your trailer should be easily accessible. This means you should be able to reach the winch comfortably for both operating it and performing any maintenance tasks. The ease of access is crucial for ensuring that you can use the winch safely and efficiently, without straining or putting yourself in a precarious position.
- Strength and Support: The area of the trailer where you plan to install the winch must be strong enough to handle the force exerted by the winch when it’s in use. This typically means choosing a part of the trailer frame or a section that can support heavy loads. The winch exerts a significant amount of pull when lifting or dragging a load, and the mounting location must be capable of withstanding this force without bending, breaking, or becoming deformed.
Cleaning and Preparing the Surface:
- Surface Cleaning: Once you’ve identified the perfect spot, the next step is to prepare the surface properly. This involves thoroughly cleaning the area to remove any dirt, grease, or rust. The cleanliness of the surface is critical because any debris or residue can compromise the integrity of the mount. For cleaning, you can use a degreaser or a rust remover, depending on the condition of the trailer’s surface. A clean surface ensures that the mounting hardware can make solid contact with the trailer, which is essential for a secure installation.
- Ensuring a Flat Surface: Besides being clean, the mounting surface needs to be flat. A flat surface ensures that the winch base sits evenly, which distributes the load across the entire base rather than concentrating it on any high points. This even distribution of force is essential for preventing damage to the winch base and the trailer. If the surface isn’t naturally flat, you may need to use additional tools or techniques to level it out, such as grinding down high spots or using a metal plate to create a flat mounting area.
Why This Step Is Crucial: The preparation of the installation area is not just about ensuring the winch is mounted securely; it’s also about safety and longevity.
A well-chosen and properly prepared installation spot will significantly reduce the risk of the winch becoming loose or failing during operation, which can prevent accidents and damage to your trailer and load.
Additionally, a secure installation helps ensure that your winch operates smoothly and efficiently, extending its lifespan and making your tasks easier and safer.
Step-by-Step Installation Process: Install a hand winch on a trailer

Installing a hand winch on a trailer involves a meticulous process to ensure the setup is secure, functional, and safe. Here’s a detailed walk-through of each step to help you get it right:
1. Mounting the Winch Base
- Positioning the Winch Base: The initial step involves carefully positioning the winch base on the predetermined spot on your trailer. This location should have been chosen based on its strength and accessibility. It’s crucial that the winch base is aligned properly to ensure the load is distributed evenly when the winch is in use. This alignment prevents undue stress on any part of the winch or trailer, contributing to a safer and more durable installation.
- Marking and Drilling: Once you’re satisfied with the placement of the winch base, mark the positions where the bolts will go through to secure the base to the trailer. These markings should be precise, as accurate drilling is crucial for a secure fit. Using a drill, carefully create holes at the marked spots, ensuring they are the correct size for the bolts. It’s important to drill with precision to avoid damage to the trailer and ensure the bolts fit snugly, providing a solid anchor for the winch base.
2. Attaching the Winch to the Base
- Aligning and Securing the Winch: With the base securely mounted to the trailer, the next step is to attach the winch itself. Place the winch on the base, aligning all mounting holes between the winch and the base. This alignment is key to a secure connection. Thread the bolts through the aligned holes, securing the winch to the base. Tighten the bolts using a wrench, ensuring that the winch is firmly attached. This step is critical for the stability of the winch, as a securely mounted winch will be able to handle the forces exerted during operation without shifting or becoming loose.
3. Routing and Securing the Winch Cable
- Threading the Cable: The winch cable is what actually does the work of pulling or lifting the load. Thread the cable through the winch drum, ensuring it is routed correctly towards the direction of pull. This directionality is important for the cable to wind correctly and for the winch to operate efficiently.
- Avoiding Cable Damage: Ensure that there are no kinks or twists in the cable as you route it. A smooth, straight cable is essential for safe and effective winch operation. Kinks or twists can weaken the cable and lead to premature wear or even failure under load.
- Securing the Cable’s End: Once the cable is correctly routed, secure its end to the load or a designated anchor point on the trailer. This connection must be strong and secure, as it will bear the brunt of the force when the winch is in use.
4. Testing the Winch Operation
- Performing a Safety Check: Before considering the installation complete, it’s essential to test the winch to ensure everything is working as it should. Gently crank the winch handle to take up any slack in the cable, then attempt to pull a light load. This initial test checks that the installation is secure and that the winch operates smoothly and effectively.
- Why Testing Matters: This step is crucial for safety and functionality. Testing confirms that the winch is securely installed, the cable is properly routed, and the system as a whole can handle the intended loads. It’s a final check to ensure that all parts of the installation are correct and safe.
Troubleshooting
If you encounter issues during the installation or operation of your hand winch, here are some common troubleshooting tips:
- Binding or Sticking: If the winch is binding or sticking, check for obstructions in the cable path or debris interfering with the winch’s moving parts. Clean and lubricate as necessary.
- Uneven Cable Spooling: If the cable is not spooling evenly onto the drum, check for any twists or kinks in the cable. Unspool and respool the cable carefully, ensuring it lays flat and even.
- Loose Mounting: If the winch feels loose or unstable, double-check that all mounting hardware is securely tightened and that the mounting surface is rigid enough to support the winch and its load.
Conclusion
Installing a hand winch on your trailer is a straightforward process that can greatly enhance your ability to load and secure heavy cargo safely and efficiently.
By following the steps outlined in this guide, selecting the appropriate winch for your needs, and adhering to crucial safety guidelines, you can ensure a secure and functional winch setup.
Remember to inspect and maintain your winch regularly, and don’t hesitate to seek professional assistance if you encounter any difficulties during the installation or operation process.
With the right preparation and care, your hand winch will be a valuable asset for years to come.
We encourage you to share your winch installation experiences, tips, or any additional questions in the comments below. Safe winching!

