To wire a winch rocker switch, first disconnect the battery. Mount the rocker switch securely, typically inside the dashboard or near the driver’s seat. Connect the switch terminals to the winch solenoid following the manufacturer’s wiring diagram, usually involving wires for power, ground, and in/out functions. Ensure all connections are tight and insulated. Reconnect the battery and test the switch. Proper installation ensures safe and reliable winch operation.
Quick Answer
How do I wire a winch rocker switch?
To wire a winch rocker switch, connect the power wire to the battery, the ground wire to the vehicle’s chassis or battery, and the control wires to the winch motor. Use a wiring diagram specific to your winch model to identify the terminals. Ensure all connections are secure, and test the switch for proper winch in/out operation before use.
Preparing for the Wiring & Installing Process
Before starting, gather all the necessary tools and materials. Here’s what you’ll need:
- Best Winch rocker switch
- Wiring kit
- Connectors (crimp connectors, ring terminals)
- Crimpers
- Wire strippers and cutters
- Electrical tape
- Multimeter (for testing)
- Screwdrivers and wrenches
- Drill with appropriate bits
- Socket set
- Protective gloves and safety glasses
Safety should always come first. Make sure to disconnect the battery to avoid any accidental short circuits.
Always wear protective gear, such as gloves and safety glasses, to prevent injuries.
Understanding Winch Rocker Switch Wiring
A basic understanding of the wiring diagram is crucial. Key elements include distinguishing between the power, ground, and control wires, which enable winch in/out functions.
For advanced setups, knowing how to reverse polarity with solenoid relays can be critical for effective winch operation. Typically, a winch rocker switch has three main connections: power, ground, and control wires.
Power Wire (Positive): This wire usually comes in red or another bright color, connecting the switch to the battery.
Ground Wire (Negative): Often black, this wire connects to the vehicle’s chassis or battery.
Control Wires: These are used to control the winch motor, usually in different colors like green or yellow.
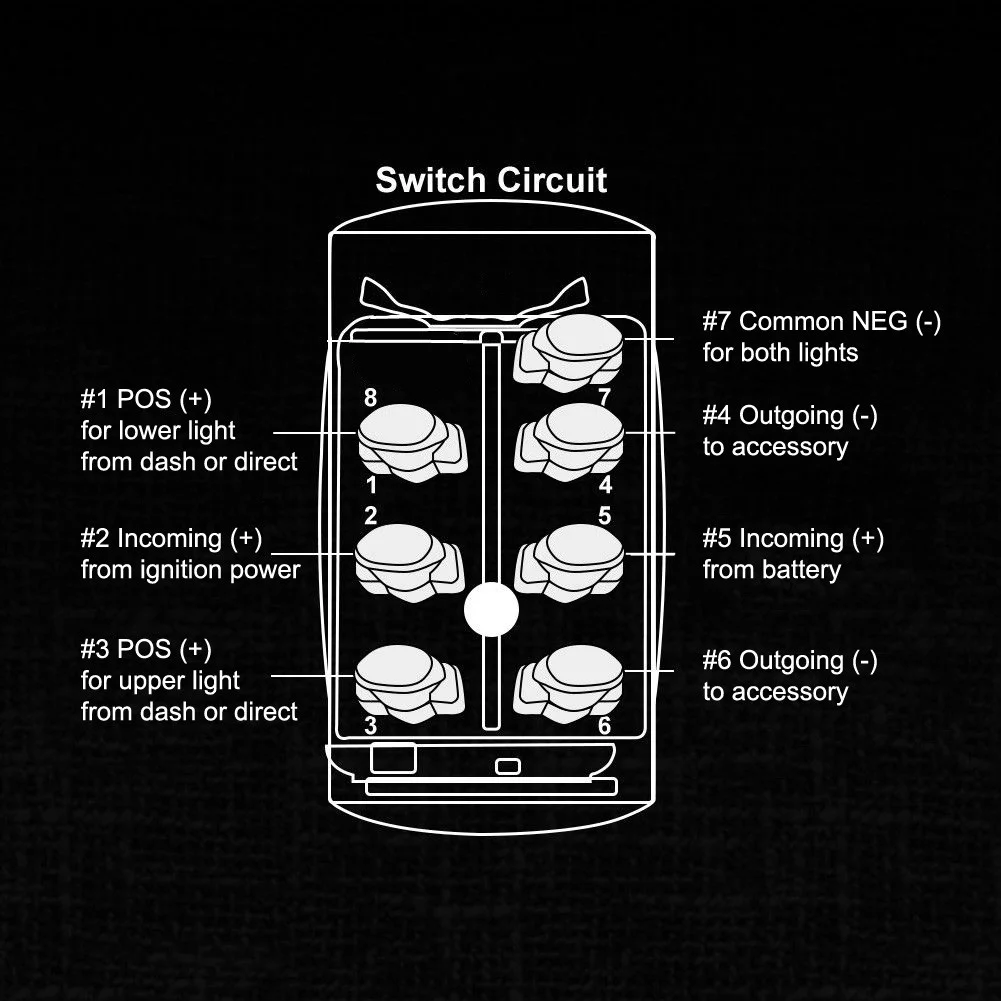
Step-by-Step Wiring Instructions for a 7-Pin Winch Rocker Switch
Wiring a winch rocker switch involves several detailed steps to ensure a secure and functional installation.
Let’s delve deeper into each part of the process.
Mounting the Winch Rocker Switch: Step-by-Step Instructions for Securely Installing the Switch
If you’re unsure whether to choose a toggle or rocker switch, consider that toggle switches often provide simpler functionality but rocker switches are more durable for off-road conditions.
Mounting the rocker switch is a crucial part of the installation process. A well-mounted switch not only looks professional but also ensures safe and reliable operation.
- Mark the Spot:
- Choose the Location: Before marking, ensure you’ve chosen a suitable location on the dashboard or control panel. The location should be within easy reach and visible while operating the vehicle.
- Measure Twice, Cut Once: Use a measuring tape to determine the exact spot where the switch will go. Double-check the measurements to avoid any mistakes.
- Mark with Precision: Use a fine-tip marker or pencil to mark the center point of where the hole will be drilled. A small indentation with a center punch can help keep the drill bit from wandering.
- Drill the Hole:
- Select the Right Drill Bit: Choose a drill bit that matches the diameter of the switch’s mounting hole. It’s better to start with a smaller bit and gradually increase the size to avoid making the hole too large.
- Prepare the Surface: If the mounting area is covered with a material that might tear or fray, apply masking tape over the mark to help prevent this.
- Drill Carefully: Hold the drill perpendicular to the surface and drill slowly to maintain control. Apply steady pressure and let the drill bit do the work. Avoid forcing the drill, as this can cause damage to the surrounding area.
- Clean the Edges: After drilling, use a file or sandpaper to smooth the edges of the hole. This will ensure the switch fits snugly and prevent any rough edges from damaging the wiring.
- Mount the Switch:
- Insert the Switch: Place the rocker switch into the drilled hole. Ensure it fits snugly without forcing it. If it’s too tight, gently enlarge the hole with the drill or a file.
- Secure the Switch: Depending on the switch design, secure it using the provided screws, clamps, or mounting hardware. Tighten the screws evenly to avoid warping the switch or panel.
- Check Alignment: Ensure that the switch is properly aligned and sits flush with the panel. An unevenly mounted switch can look unprofessional and may affect its operation.
- Finish Up:
- Secure the Wires: Make sure all the wires connected to the switch are properly routed and secured. Use zip ties to bundle the wires neatly, ensuring they are kept away from moving parts or sharp edges.
- Test the Fit: Gently pull on the switch to ensure it is firmly mounted and doesn’t wobble or move.
- Final Inspection: Double-check all connections to ensure they are tight and secure. Make sure there are no loose wires or exposed conductors that could cause a short circuit.
Connecting the Power Wire
- Prepare the Power Wire:
- Strip Insulation: Strip about half an inch of insulation off the end of a red wire using wire strippers. Ensure the wire strands are not damaged in the process. Before proceeding, check that your winch wiring harness is compatible with the type of switch you are using (e.g., toggle or rocker). Some harnesses may require additional connectors or spade terminals for a secure and reliable installation.
- Attach the Ring Terminal:
- Crimping: Slide the stripped end of the wire into a ring terminal. Use a crimping tool to secure the terminal to the wire. Ensure the connection is tight and the wire is not loose.
- Connect to the Battery:
- Attach to Battery: Loosen the nut on the battery’s positive terminal. Place the ring terminal over the battery post and tighten the nut securely. Make sure the connection is snug to prevent any loosening due to vibrations.
- Insulate: Use electrical tape to wrap the connection point for added insulation and protection against shorts.
Connecting the Ground Wire
- Prepare the Ground Wire:
- Strip Insulation: Strip about half an inch of insulation off the end of a black wire.
- Attach the Ring Terminal:
- Crimping: Crimp a ring terminal onto the stripped end of the ground wire, ensuring a secure connection.
- Connect to the Chassis or Battery:
- Chassis Connection: If connecting to the vehicle’s chassis, find a clean, unpainted metal surface. Use a self-tapping screw to secure the ring terminal.
- Battery Connection: If connecting to the battery, loosen the nut on the negative terminal, attach the ring terminal, and retighten the nut. Ensure the connection is tight and clean to avoid grounding issues.
Wiring the Control Wires
- Identify Control Wires:
- Consult Manual: Refer to the switch’s manual to identify the control wires, typically used for winch in and winch out functions.
- If using a solenoid relay, connect the control wires carefully to ensure the polarity is correctly reversed for winch in/out functions. This prevents accidental damage to the motor.
- Connect the Winch In Wire:
- Strip and Connect: Identify the wire for the winch in function, usually green. Strip the end, attach a spade connector, and connect it to the corresponding terminal on the winch motor. Ensure the connection is secure.
- Connect the Winch Out Wire:
- Strip and Connect: Identify the wire for the winch out function, usually yellow. Strip the end, attach a spade connector, and connect it to the corresponding terminal on the winch motor.
- Connect Additional Wires:
- LED Indicators or Auxiliary Functions: If there are additional wires for functions like LED indicators or auxiliary functions, connect these as specified in the manual. Ensure each connection is secure and correctly placed.
Securing and Protecting the Wires
- Bundle the Wires:
- Zip Ties: Use zip ties to bundle the wires neatly. This prevents them from getting tangled or damaged and helps maintain a tidy installation.
- Protect the Wires:
- Electrical Tape or Wire Loom: Wrap the bundled wires with electrical tape or use a wire loom to protect them from friction, sharp edges, and environmental factors.
- Route Safely:
- Avoid Hazards: Ensure the wires are routed away from moving parts, sharp edges, and high-heat areas. Secure them with additional zip ties if necessary to keep them in place and avoid any interference with vehicle components.
Benefits of Proper Wiring
Proper wiring of your 7-pin winch rocker switch ensures several key benefits:
- Safety: Proper wiring reduces the risk of electrical faults, shorts, and fires, protecting both the winch and your vehicle. Proper insulation and secure connections prevent accidents and ensure safe operation.
- Reliability: Ensures consistent and reliable operation of the winch, particularly in critical situations. Secure wiring prevents disconnections and malfunctions, making the winch dependable when you need it most.
- Efficiency: Minimizes electrical resistance, allowing the winch to operate at peak efficiency and performance. Properly connected and insulated wires ensure that the winch gets the full power it needs for optimal operation.
Wiring a 4-Pin Winch Rocker Switch
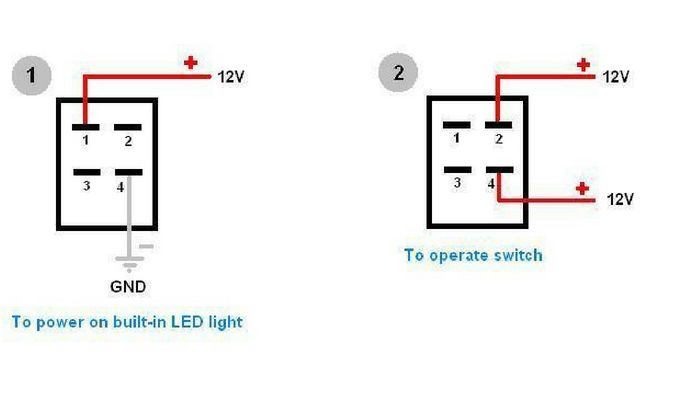
1. Identify the Wires
A 4-wire winch rocker switch typically includes the following wires:
- Power Input (Positive): Usually a red wire, this wire supplies power to the switch from the battery.
- Ground (Negative): Typically a black wire, this wire provides the necessary ground connection.
- Winch In: Often green, this wire controls the winch to pull in.
- Winch Out: Often yellow, this wire controls the winch to let out.
2. Prepare the Wires
Preparation is key to ensuring good electrical connections:
- Strip the Wires: Use a wire stripper to remove about half an inch of insulation from the end of each wire that will be connected to the switch. Be careful not to damage the wire strands.
3. Connect the Power Input
This step involves connecting the power wire to ensure the switch gets electricity:
- Select the Red Wire: This is your power input wire.
- Attach a Ring Terminal: Crimp a ring terminal onto one end of the red wire. This will allow for a secure connection to the battery.
- Connect to the Battery:
- Loosen the nut on the positive terminal of the battery.
- Place the ring terminal over the battery post.
- Tighten the nut to secure the connection.
- Connect to the Switch: The other end of the red wire should be fitted with a spade connector. Attach this to the power input terminal on the winch rocker switch.
4. Connect the Ground Wire
Grounding the switch is essential for completing the electrical circuit:
- Select the Black Wire: This is your ground wire.
- Attach a Ring Terminal: Crimp a ring terminal onto one end of the black wire.
- Connect to the Vehicle’s Chassis or Battery:
- Find a clean, unpainted metal surface on the vehicle’s chassis. Alternatively, you can use the battery’s negative terminal.
- Secure the ring terminal to this surface with a screw or attach it to the battery’s negative terminal.
- Connect to the Switch: Attach the other end of the black wire to the ground terminal on the winch rocker switch using a spade connector.
5. Connect the Winch In and Winch Out Wires
These wires control the direction of the winch:
- Identify the Wires:
- Green Wire: Typically used for the winch in function.
- Yellow Wire: Typically used for the winch out function.
- Connect to the Winch Motor:
- Strip the ends of both wires.
- Attach spade connectors to the stripped ends.
- Connect the green wire to the winch in terminal on the winch motor.
- Connect the yellow wire to the winch out terminal on the winch motor.
- Connect to the Switch:
- Attach the other end of the green wire to the winch in terminal on the switch.
- Attach the other end of the yellow wire to the winch out terminal on the switch.
6. Secure and Protect the Wires
Securing and protecting the wires ensures longevity and safety:
- Bundle the Wires:
- Use zip ties to bundle the wires together neatly. This helps keep the installation tidy and reduces the risk of wires snagging or getting damaged.
- Protect the Wires:
- Wrap the bundled wires with electrical tape or use a wire loom. This provides additional protection against friction, sharp edges, and environmental factors like moisture.
- Route the Wires Safely:
- Ensure the wires are routed away from moving parts, sharp edges, and high-heat areas. Use additional zip ties to secure them in place as needed.
Testing and Troubleshooting
Checking for Proper Connections
After completing the wiring, it’s crucial to ensure that all connections are secure and functioning correctly before using the winch. Here’s how to check for proper connections:
- Reconnect the Battery: Once all the wiring is complete, reconnect the battery terminals. Ensure the connections are tight and secure.
- Test the Switch: Turn on the winch rocker switch to see if it powers up. If the switch has an indicator light, it should illuminate when turned on.
- Use a Multimeter: To verify the connections, use a multimeter. Set the multimeter to measure voltage and check the following:
- Battery Voltage: Measure the voltage across the battery terminals to ensure it’s within the expected range (typically around 12.6 volts for a fully charged battery).
- Switch Voltage: Check the voltage at the switch terminals when it’s turned on. There should be a consistent reading that matches the battery voltage.
- Continuity Check: Set the multimeter to continuity mode and test the wires to ensure there are no breaks in the circuit. This helps confirm that the wires are correctly connected and unbroken.
Common Wiring Issues and Solutions
Even with careful wiring, issues may still arise. Here are some common problems and their solutions:
- No Power to the Switch:
- Check Battery Connections: Ensure the battery terminals are clean and securely connected. Corroded or loose connections can prevent power from reaching the switch.
- Inspect the Fuse: Many winch systems include an in-line fuse. Check if the fuse is blown and replace it if necessary.
- Winch Motor Not Responding:
- Verify Control Wire Connections: Double-check that the control wires are correctly connected to the winch motor. Ensure they are attached to the correct terminals. If your winch motor doesn’t respond, examine the wiring of the toggle switch, as it may require a double-pole, double-throw (DPDT) setup for proper in/out operation. This configuration allows for seamless polarity reversal and ensures proper motor functionality.
- Test the Switch: The winch rocker switch itself could be faulty. Use a multimeter to check for continuity within the switch when it’s activated.
- Intermittent Operation:
- Inspect for Loose Connections: Loose or corroded connections can cause intermittent power loss. Check all terminals and connections for tightness and cleanliness.
- Look for Wire Damage: Examine the wiring for any signs of wear or damage. Replace any frayed or damaged wires to ensure consistent operation.
Safety Checks Before Operating the Winch
Before using the winch, perform these safety checks to ensure everything is in order:
- Double-Check All Connections: Ensure all wiring connections are secure and there are no exposed wires that could cause shorts or shocks.
- Secure Mounting: Verify that the winch is securely mounted to the vehicle. Loose mounting can lead to instability and potential accidents.
- Stable Vehicle Position: Ensure the vehicle is on a stable surface and not at risk of moving during winch operation. This prevents accidents and ensures safe winching.
Maintenance and Best Practices
Periodic Inspection and Maintenance Tips
Regular maintenance is key to ensuring the longevity and reliability of your winch system. Here are some tips:
- Inspect Wiring Regularly: Check the wiring for any signs of wear, damage, or corrosion. Pay special attention to connections and terminals.
- Clean Connections: Corrosion can impede electrical flow. Clean the battery terminals and other connections periodically to maintain optimal performance.
- Check for Loose Components: Ensure all mounting bolts and screws are tight. Vibrations from vehicle movement can loosen these over time.
Proper Use and Precautions for Winch Operation
Using the winch correctly not only ensures safety but also prolongs its life:
- Follow Manufacturer’s Guidelines: Always adhere to the guidelines provided in the winch’s manual. This includes weight limits and recommended usage.
- Avoid Overloading: Do not exceed the winch’s weight capacity. Overloading can damage the winch and pose safety risks.
- Never Use for Lifting People: Winches are designed for pulling, not lifting. Using them to lift people is extremely dangerous and should be avoided.
Additional Accessories and Upgrades
Consider enhancing your winch setup with these accessories and upgrades:
- Wireless Remote: A wireless remote allows you to operate the winch from a distance, providing convenience and added safety.
- Solenoid: A solenoid switch can improve the reliability and power efficiency of your winch system.
- Protective Covers: Use protective covers for your winch and switch to shield them from dirt, debris, and weather elements.
Conclusion
Proper wiring of your winch rocker switch is essential for safe and efficient operation. Whether you’re using a toggle switch or a rocker switch, ensure the wiring is tested thoroughly.
Use a multimeter to verify correct voltage and polarity alignment for optimal winch performance. Regularly inspect connections for wear and tear to maintain reliability and safety during operation.
By following these steps and maintaining your equipment, you can ensure your winch is always ready when you need it.
Stay safe, and feel free to share your experiences or ask any questions you might have.
