✅ Running A Winch Without A Remote — Options
- Two bypass paths: direct-wire trigger (short across pendant pins) or auxiliary switch (dash-mounted toggle through relay).
- Safer option: aux switch. A dash-mounted Carling V1D11 rocker + 30A relay gives you remote-free control without dangling jumpers.
- Direct-wire test: short pin 2 (forward) to pin 1 (12V) on the pendant socket runs winch in. Pin 3 to pin 1 runs winch out. Reverse confirms wiring.
- Never bypass without killing the load first. If pendant shorted while under tension, runaway winch is a real risk. Use a disconnect switch at the battery.
- Emergency bypass on trail: Jumper cables with insulated clips can directly power motor terminals. Runs at full speed; watch for sparks.
If your winch remote stops working, you can still operate the winch manually by locating its manual override. Depending on the winch type—electric or hydraulic—you’ll typically use a clutch lever, crank handle, or override valve. Always follow safety steps, wear gloves, and check your winch model’s manual before proceeding.
Safety Precautions
Before attempting to manually operate a winch, it’s key to prioritize safety. Always wear proper protective gear, including gloves and steel-toed boots.
Clear the area of any obstacles or bystanders who may accidentally get in the way.
Verify that the load is properly secured and balanced before winching. Having a spotter to guide you through the process and watch for potential hazards is strongly recommended.
Locating the Manual Override
The manual override is a critical feature of a winch, allowing operators to maintain control over the winching process even if the remote control or other electronic components fail.
The location and operation of the manual override can vary significantly depending on the winch’s make and model, but it’s typically designed to be straightforward to access and use in emergency situations.
Variability Based on Winch Model and Brand
Each brand and model of winch has a unique design, meaning the manual override mechanism can be located in different places.
For instance:
- Electric Winches: Most electric winches will have a lever or a knob near the motor housing. This lever is sometimes labeled as “clutch” or “override” and is used to disengage the motor to allow manual operation.
- Hydraulic Winches: For hydraulic models, the override is often a valve or switch that, when activated, bypasses the hydraulic system to enable manual control.
Common Types of Manual Overrides
- Socket Type: This type involves a socket into which a handle (crank) can be inserted. Once the handle is in place, you can manually turn it to operate the winch. This type is common in smaller or portable winches where space constraints limit the size and type of override mechanisms.
- Lever Type: The lever type is straightforward and involves pulling or pushing a lever to switch from automatic to manual operation. This is often found in larger, industrial-grade winches where rapid switching between power sources is necessary.
- Crank Type: This type requires the operator to use a crank handle that directly turns the drum or the gear mechanism. It’s typical for hand-operated winches and some electric models designed for remote or rugged environments.
Benefits of Familiarity with Your Winch’s Manual Override
Knowing how to locate and operate your winch’s manual override can save time and prevent accidents, especially during critical lifting or pulling operations.
It ensures that even in the absence of power, you can still operate the winch, providing continuity in operations and enhancing safety on-site.
Tips for Familiarization
- Consult the User Manual: Always start with the manufacturer’s manual. This document will detail the location and operation of the manual override.
- Regular Checks: Regularly check the condition and operation of the manual override as part of routine maintenance. Ensure it’s free from rust, corrosion, or any blockages that could prevent its use.
- Practice: In a safe environment, practice switching from automatic to manual operation to become comfortable with the process before an actual emergency occurs.
Disengaging the Winch Clutch
Disengaging the winch clutch is a pivotal step in transitioning a winch from powered to manual operation.
This process involves manipulating the clutch to disengage the motor (in electric winches) or the hydraulic system (in hydraulic winches), allowing the drum to rotate freely so that the cable or rope can be manually pulled out without resistance.
Step 1: Locate the Clutch Lever
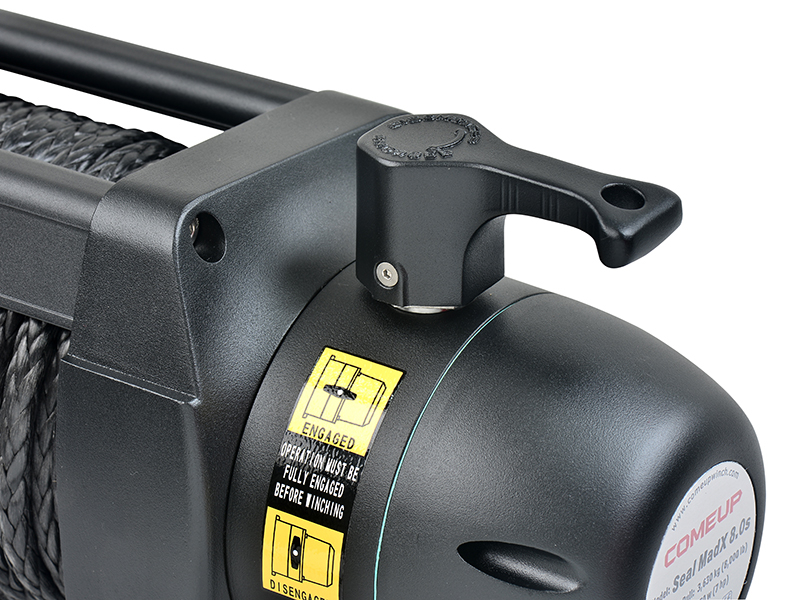
The clutch lever, sometimes called a clutch knob or switch, is typically located on the side of the winch near the motor housing or, in the case of manual winches, near the drum.
In some models, it can be protected under a cover to prevent accidental engagement or exposure to elements.
Identifying the exact location of this lever is central and can be found detailed in the winch’s user manual.
Step 2: Pull or Turn the Lever According to Your Winch Model’s Specifications
Once the clutch lever is located, the method of engagement can vary:
- Pulling Action: Some winches require a straightforward pull action to disengage the clutch. This action releases the locking mechanism that keeps the drum from turning independently of the motor.
- Turning Action: In other models, the lever must be turned in a specific direction (often marked on the lever or nearby with arrows). This turning action either screws or unscrews a mechanism internally that Best Winch Remote Controls of 2026 the engagement of the drum.
The action required depends on the winch’s design and should be performed according to the manufacturer’s instructions to avoid damaging the winch.
Step 3: Ensure the Lever is Fully Disengaged to Enable Free Spooling
This is perhaps the most critical step to ensure that the clutch is completely disengaged. If the clutch is not fully disengaged, attempting to pull out the cable can result in significant resistance or, worse, damage to the winch or cable.
Here are some key indicators to check:
- Visual Confirmation: Many winches have a visual indicator showing whether the clutch is engaged or disengaged. This can be a simple color coding or a position alignment.
- Manual Test: Before pulling out the cable, give a gentle tug to ensure that there is no resistance. This test confirms whether the clutch has been fully disengaged.
It’s also a good safety practice to keep your face and body away from the path of the cable during this test to protect against accidental release or failure.
Final Checks and Safety Precautions
- Regular Maintenance: Regularly lubricate and clean the clutch mechanism to ensure smooth operation. Corrosion or debris can impede the clutch’s ability to disengage properly.
- Wear Protective Gear: Always wear gloves and other protective gear when operating a winch, especially during manual operations, to protect against accidental injuries.
Manually Spooling Out the Cable
Once you’ve successfully disengaged the winch clutch, the next critical step in manual winch operation is spooling out the cable.
This task must be done with precision and care to ensure safety and prevent damage to the winch cable.
Step 1: Assess the Required Cable Length
Before you begin unspooling the cable, it’s important to determine how much cable is necessary for your specific task.
Measure or estimate the distance from the winch to the anchor point of the load.
Ensure you unspool enough cable to comfortably reach the load without stretching or straining the cable.
Step 2: Slowly and Carefully Unspool the Cable
- Controlled Release: Begin by slowly turning the winch drum by hand or using a manual crank if your winch is equipped with one. The key here is controlled movement to prevent the cable from slipping off the drum too quickly, which could lead to tangling or kinks.
- Avoid Twists and Kinks: As the cable unwinds, keep an eye out for any signs of twisting or kinking. If you notice a twist, pause the unspooling and correct it before continuing. Twists and kinks can weaken the cable and potentially lead to failures under load.
- Use Both Hands: If possible, use one hand to stabilize the unspooling cable and the other to operate the drum or handle. This dual-hand method helps maintain better control over the speed and smoothness of the cable release.
Step 3: Securely Attach the Cable to the Load
- Choose the Right Attachment Point: Attach the end of the cable to a secure point on the load. This can be a hook, a loop, or a specific attachment designed for this purpose. The attachment point should be structurally sound to withstand the tension of the winch without deforming or breaking.
- Use Proper Rigging Techniques: If necessary, employ rigging techniques such as using a shackle or a sling to properly and securely connect the cable to the load. Ensure that all connections are tight and secure before beginning any winching activity.
- Double Check All Connections: Once attached, double-check every connection point between the cable and the load. This includes checking the integrity of the cable near the hook or attachment point for any signs of wear or damage.
Step 4: Ensure Cable Tension
Before re-engaging the clutch and starting to winch the load, ensure that there is slight tension in the cable.
This preliminary tension helps prevent the cable from slipping or becoming tangled when you start pulling the load. If there is too much slack, gently pull the cable until it is taut.
For more details, check How to Free Spool A Winch
Re-engaging the Clutch
Re-engaging the winch clutch is a central step that allows you to transition from the manual spooling of the cable to the powered pulling or lifting of the load.
This step ensures that the winch is ready to operate under power, with the cable securely locked in place.
Step 1: Return to the Clutch Lever
After manually spooling out the cable and securing it to the load, return to the clutch lever that you previously disengaged.
This lever is usually located near the winch drum or motor, depending on the type of winch (electric or manual).
It’s important to remember exactly how the clutch was disengaged so that it can be properly re-engaged.
Step 2: Push or Turn the Lever to Its Original Position
- Engagement Action: Depending on the winch model, re-engaging the clutch may involve either pushing the lever back into place or turning it back to its original position. This action reverses the disengagement process and re-engages the gears or locking mechanism that connects the drum to the motor or manual crank.
- Visual and Tactile Feedback: As you engage the clutch, you might feel a click or a firm stop, indicating that the clutch is fully engaged. Some models provide a visual indicator (such as an alignment mark or a colored indicator) to show when the clutch is correctly positioned.
Step 3: Double-Check to Ensure the Clutch is Fully Engaged and Secure
- Manual Inspection: After adjusting the lever, manually check to ensure that it is fully locked in its engagement position. Try gently pulling on the cable or nudging the drum to see if there is any unwanted movement. There should be no free spooling of the cable when the clutch is engaged.
- Safety Check: Before starting the winching process, it’s key to ensure that everything is secure. This includes re-checking the cable attachment to the load, ensuring that the winch is stable and secure, and verifying that the area is clear of any obstacles or safety hazards.
- Operational Test: If possible, perform a light, controlled test pull to ensure that the clutch engages smoothly and the winch operates as expected. This test helps confirm that the system is ready for the actual pulling task.
Winching the Load
Once the winch clutch is re-engaged, the next critical phase involves the actual winching of the load.
This step requires careful handling to ensure the load is moved safely and efficiently. Whether you are pulling a vehicle from a ditch, lifting a heavy object at a construction site, or performing any other task involving a winch, here’s how to do it properly:
Step 1: Start with the Manual Crank or Handle
- Using the Manual Crank: If your winch is equipped with a manual crank or handle, begin by positioning yourself in a stable stance. Grip the handle firmly and start turning it in the direction that pulls the cable back onto the drum. It’s central to maintain a consistent speed that allows you to control the tension on the cable without jerking movements.
- Mechanical Advantage: Manual cranks often provide a mechanical advantage through gearing. Even though it might require significant physical effort, the gears are designed to make the task manageable. Ensure you use steady force to avoid sudden shifts that could destabilize the load.
Step 2: Maintain Control and Tension
- Control the Pace: The key to effective winching is controlling the pace at which the cable winds back onto the drum. Too fast might cause the cable to wind unevenly or slip, while too slow can result in loss of tension, increasing the risk of the load shifting unexpectedly.
- Monitor Cable Tension: Continuously monitor the tension in the cable as you winch. The cable should be tight enough to avoid slack, which can lead to tangling or snags, but not so tight that it stresses the cable or the winch mechanism.
Step 3: Utilize a Bridle Strap for Angled Pulls
- Understanding Bridle Straps: When pulling at an angle, the load’s force on the winch can be uneven, which may lead to cable wear or breakage. A bridle strap, which is a rigging accessory used to distribute the pulling force evenly, can mitigate this.
- Setting Up the Bridle Strap: Attach the bridle strap between the winch cable and the load. The strap should have multiple legs that evenly distribute the force across a broader area than the cable alone could handle. This setup is particularly useful in preventing the cable from bearing all the stress at a single point, which is central during angled pulls.
- Adjust as Necessary: As the load moves, the angle of the pull might change. Adjust the bridle strap or the positioning of the winch or the load accordingly to maintain even force distribution.
Step 4: Monitor and Adjust
- Visual Inspection: Keep a close eye on the winch, the cable, and the load throughout the operation. Look for any signs of wear or damage in real-time.
- Adjustments on the Go: Be prepared to stop winching and make adjustments if something seems off, such as the cable not winding properly, the load shifting unexpectedly, or the tension being incorrect.
Securing the Load
Securing the load properly after winching is key to ensure safety and prevent any accidental movement or slippage.
Whether you are working in a controlled environment or in the field, proper procedures must be followed to ensure that the load remains stable and secure once positioned.
Step 1: Use the Winch to Make Any Final Adjustments
- Positioning the Load: After the main winching activity, it’s often necessary to make slight adjustments to ensure the load is exactly where you need it. Use the winch control to finely adjust the position of the load. This might involve slight pulling or releasing of the cable to align the load precisely.
- Steady and Controlled Movements: Make these adjustments slowly and carefully. Rapid movements can destabilize the load or cause it to shift unexpectedly. Gentle handling is key to precision placement.
Step 2: Set the Winch Brake
- Engaging the Brake: Most winches are equipped with a braking system designed to hold the load securely once it’s in position. Once you have the load where you want it, engage the winch brake. This usually involves moving a lever or pressing a button on the winch.
- Testing the Brake: After engaging the brake, perform a quick test to ensure it is holding the load securely. This can be done by gently tugging on the cable to see if the drum remains stationary. If there’s any movement, re-engage the brake or adjust as necessary until it holds firm.
Step 3: Engage the Safety Latch
- Using the Safety Latch: The safety latch is an additional security feature on many winches, acting as a backup to the primary brake. Once the brake is set, engage the safety latch. This typically involves flipping a latch or locking a pin in place that prevents any mechanical backsliding or unwinding of the cable.
- Double-Check for Security: With the safety latch engaged, double-check the entire setup. Ensure that the load is not only secure but also that all safety measures are correctly in place to prevent accidental release or movement.
Step 4: Final Safety Inspection
- Inspect the Setup: Conduct a thorough inspection of the winch, the cable, and the attachments to the load. Look for any signs of wear, undue stress, or potential points of failure. This inspection should cover everything from the hook attachments to the condition of the cable near the drum.
- Clear the Area: Before leaving the secured load, make sure the area is clear of any tools, loose materials, or other items that could pose a safety hazard. Ensure that all bystanders and operators are aware that the winching process is complete and the load is secured.
Troubleshooting Tips
When operating a winch, encountering issues such as cable binding or overloading can pose significant safety risks and potentially damage your equipment.
Understanding how to troubleshoot these common problems efficiently can save both time and resources while ensuring safety.
Recognizing and Addressing Cable Binding
Cable binding occurs when the cable becomes tangled or kinked on the drum, preventing it from unspooling or spooling smoothly. This can lead to uneven load distribution and increased wear on the cable.
- Immediate Action: If you notice cable binding, stop winching immediately. Continuing to winch with a bound cable can cause further entanglement and potentially break the cable.
- Inspect the Drum: Safely release any tension on the cable and inspect the drum. Look for overlaps, kinks, or loops in the cable that could cause binding.
- Resolve the Binding: Gently unravel any tangled sections of the cable. This may involve manually turning the drum or carefully pulling the cable straight to eliminate kinks and overlaps. Use gloves to protect your hands from sharp strands or burrs.
- Prevent Future Binding: Ensure that the cable is neatly wound on the drum before starting the winch again. Proper layering and tension during winding can prevent most cases of binding.
Troubleshooting Overloading
Overloading occurs when the weight of the load exceeds the winching capacity of the equipment. This can lead to motor strain, cable failure, and unsafe operating conditions.
- Recognize the Signs of Overloading: Common signs include the winch struggling to pull the load, the motor overheating, or the cable appearing strained or stretched.
- Stop Operation: Similar to binding, if you suspect overloading, stop all operations immediately to assess the situation.
- Check Load Weight: Verify the weight of the load against the winch’s rated capacity, which can be found in the winch’s specification documents.
- Reduce Load or Upgrade Equipment: If the load is indeed too heavy, consider reducing the load to fit within the winch’s capacity or using a winch with a higher capacity suitable for the weight.
- Inspect the Winch and Cable: Look for any signs of damage or wear, such as frayed cables, bent parts, or signs of heat on the motor. Address these issues before resuming operation.
General Maintenance and Inspection
Regular maintenance and inspection are central in preventing issues like cable binding and overloading. Here are some tips:
- Routine Checks: Regularly inspect your winch and cable for any signs of wear, corrosion, or damage. Replace worn-out parts and cables as needed.
- Lubricate Moving Parts: Keep the winch’s moving parts lubricated according to the manufacturer’s recommendations to ensure smooth operation and prevent overheating.
- Load Testing: Periodically test the winch with various loads to ensure it operates smoothly across its entire capacity range.
Bottom Line
Regular maintenance on your winch extends its lifespan and ensures it’s ready when you need it. If issues persist or you’re unsure about a procedure, consult a certified technician or the winch manufacturer for professional assistance.
Always remember the safety precautions and operational steps discussed here to confidently and safely handle winch operations, even without the convenience of a remote control.
🔧 Building A Dash-Switch Backup On My JK
My primary Warn VR EVO 10 remote socket corroded after a muddy season. Rather than nurse a bad connection, installed a dash-mounted Carling V1D11 rocker + Bosch 30A relay + inline 20A fuse wired parallel to the existing pendant socket. Tested against both bench and trail. The dash switch runs the winch independently of the remote, so if the pendant fails again, I just flip the switch. Also tested the 'jumper cables direct to motor terminals' emergency path — works, but the contactor doesn't engage, so brake bypass is risky. Stick with the dash-switch path for anything beyond a one-time emergency.
