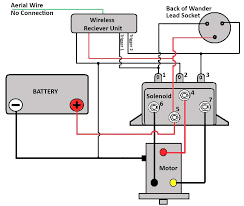
Wiring a winch remote control might seem like a daunting task, but it’s actually quite straightforward when you have the right guidance.
A properly wired remote control not only adds convenience to your winch operations but also enhances safety by allowing you to control the winch from a distance.
In this article, we’ll walk you through the entire process of wiring a winch remote control, covering everything from gathering the necessary tools to testing and troubleshooting.
Tools and Materials Required
Before we dive into the wiring process, make sure you have the following tools and materials on hand:
Tools:
- Wire strippers
- Crimpers
- Pliers
- Electrical tape (optional)
Materials:
- Winch remote control unit
- Wiring harness (typically included with the winch or remote control)
- Connectors (butt connectors, crimp connectors, etc.)
- Heat shrink tubing (optional)
It’s crucial to follow the manufacturer’s instructions for your specific winch and remote control model. Consulting the provided manuals will ensure you have all the necessary components and understand any unique requirements.
Preparing the Wiring

Step 1: Disconnect the Battery
Safety is paramount when working with electrical systems, particularly in automotive or heavy machinery contexts.
Disconnecting the battery is the first step in any electrical installation to prevent accidental shocks or sparks. For this task, you typically locate the battery terminals and remove the negative terminal first.
This disruption in the circuit minimizes the risk of completing an electrical circuit accidentally while working on the wiring.
Step 2: Identify the Wiring Harness and Connectors
A wiring harness is an organized set of wires, terminals, and connectors that run throughout the vehicle or machinery.
For installing a winch remote control, the harness will specifically facilitate connections from the remote to the winch itself.
- Locating the Harness: Begin by locating the wiring harness that was included with your remote control kit. This harness usually consists of several colored wires and ends with various connectors.
- Identifying Connectors and Terminals: Examine the connectors at the ends of the harness. These should match the input terminals on your winch and possibly the power terminals (battery). Matching the connectors correctly is crucial for ensuring that the remote control communicates effectively with the winch motor.
- Compatibility Check: Ensure that the harness fits properly with your winch model. Mismatches in connector types or sizes can lead to ineffective connections or damage to the electrical components.
Step 3: Strip the Wire Ends and Prepare for Connection
Once you have your harness ready and laid out, the next step involves preparing the wire ends for connection. This step is vital for a solid electrical connection.
- Stripping the Wires: Using a pair of wire strippers, strip about a quarter inch (about 6 mm) off the insulation from the ends of each wire. This exposed area is where the metal wire is visible, which will be used to make electrical connections.
- Clean Stripping: Ensure that the stripping is clean and that no strands are damaged. Damaged or frayed wires can lead to poor connections and potential electrical hazards.
- Preparing for Secure Connection: Once stripped, the wires can be inserted into the terminal connectors or directly onto the terminal posts, depending on the design of your wiring setup. It’s essential to ensure that the bare wire does not touch any other wires or metal surfaces to avoid short circuits.
Connecting the Winch Remote Control
Connecting the winch remote control involves carefully linking the control unit to the winch and power source through proper wiring.
Step 1: Connect the Positive (+) Wire to the Winch Motor
This step is crucial as it establishes the power supply from the battery to the winch motor through the remote control.
- Locating the Positive Terminal: Identify the positive terminal on the winch motor. This terminal is typically marked with a plus (+) sign or might be color-coded in red.
- Attaching the Wire: Take the positive wire from the remote control kit (also usually red) and securely attach it to the positive terminal of the winch motor. Make sure the connection is tight and the wire is not loose, as a loose connection can lead to a drop in power efficiency and potential electrical hazards.
- Securing the Connection: Use a wrench or a suitable tool to tighten the terminal bolt, ensuring that the wire is firmly held in place and has good contact with the terminal.
Step 2: Connect the Negative (-) Wire to the Grounding Point
Establishing a ground connection is essential for completing the electrical circuit and for safety.
- Choosing a Grounding Point: Select a grounding point on your vehicle or machinery. This point should be a metal part of the frame or engine that is clean and free of paint or rust.
- Securing the Wire: Attach the negative wire (usually black) from the remote control kit to the grounding point. Ensure that it is as short as possible to minimize resistance and potential voltage drop.
- Bolting the Connection: Bolt down the connection if possible. A bolted connection is more secure and reliable than a simple wrap-around, especially in a vibrating environment like that of a winch.
Step 3: Connect the Control Wires
Control wires are what allow the remote to command the winch to wind in, wind out, or stop.
- Identifying Control Wires: Identify the wires for different functions such as “in,” “out,” and “stop.” These wires are often color-coded or labeled for ease of identification.
- Connecting to Corresponding Terminals: Connect these wires to the corresponding terminals on the winch control box. Each terminal should be clearly labeled, but consult your winch’s manual to ensure correct connections.
- Testing Each Function: As you connect each wire, it’s a good practice to test each function to ensure the wire is properly connected and the function operates as expected.
Step 4: Secure the Connections
Once all wires are connected, securing them is vital to ensure they remain intact and functional over time.
- Using Connectors: Where applicable, use the provided electrical connectors to join wires to the terminals. These connectors ensure a more stable and secure connection than twisting wires together.
- Applying Heat Shrink Tubing: For an extra layer of security and to protect the connections from the elements, slide heat shrink tubing over the connections before heating it to a snug fit. This tubing provides insulation and helps prevent corrosion and wear due to moisture and dirt.
- Final Inspection: Conduct a final inspection to make sure all wires are properly routed away from any moving parts and heat sources, and that they are securely fastened to prevent chafing.
Testing and Troubleshooting
Step 1: Reconnect the battery
After ensuring all connections are properly made, reconnect the negative (-) battery terminal.
Step 2: Test the winch remote control operation
With the battery reconnected, test the winch remote control by pressing the respective buttons (in, out, stop, etc.). The winch should respond accordingly, confirming that the wiring is correct.
If the winch does not respond as expected, here are some troubleshooting tips:
- Double-check all wire connections for proper tightness and correct polarity.
- Verify that the control wires are connected to the correct terminals.
- Use a multimeter to test for proper voltage at the winch motor terminals.
- Consult the winch and remote control manuals for any specific troubleshooting guidelines.
Safety Precautions:
While wiring a winch remote control, it’s crucial to prioritize safety. Here are some important precautions to keep in mind:
- Always disconnect the battery before working on electrical components to prevent short circuits or electrical shocks.
- Ensure that the winch is rated for the intended load capacity and is properly anchored to a secure mounting point.
- Never operate the winch with people or objects in the potential path of the cable or load.
- Inspect the winch, cable, and all components regularly for signs of wear or damage.
- Consult the winch and vehicle manuals for specific safety guidelines and weight ratings.
FAQs
What gauge of wire should I use?
Select a wire gauge that can handle the current requirements of your winch without overheating or losing efficiency.
Do I need a fuse for the winch remote control?
Yes, installing a fuse in the power line to the winch can prevent potential electrical hazards and equipment damage.
How do I ensure compatibility between my winch and the remote control?
Check the manufacturer’s specifications for both the winch and the remote control to ensure compatibility. If unsure, consult with a professional or contact customer support.
Conclusion
Properly wiring your winch remote control is crucial for safe and efficient winch operation. By following this detailed guide, you can ensure that your remote control is correctly installed and fully functional.
Always prioritize safety and consult your equipment manuals for any specific instructions or troubleshooting needs. With these steps, you’re set for a successful and safe winching experience.

