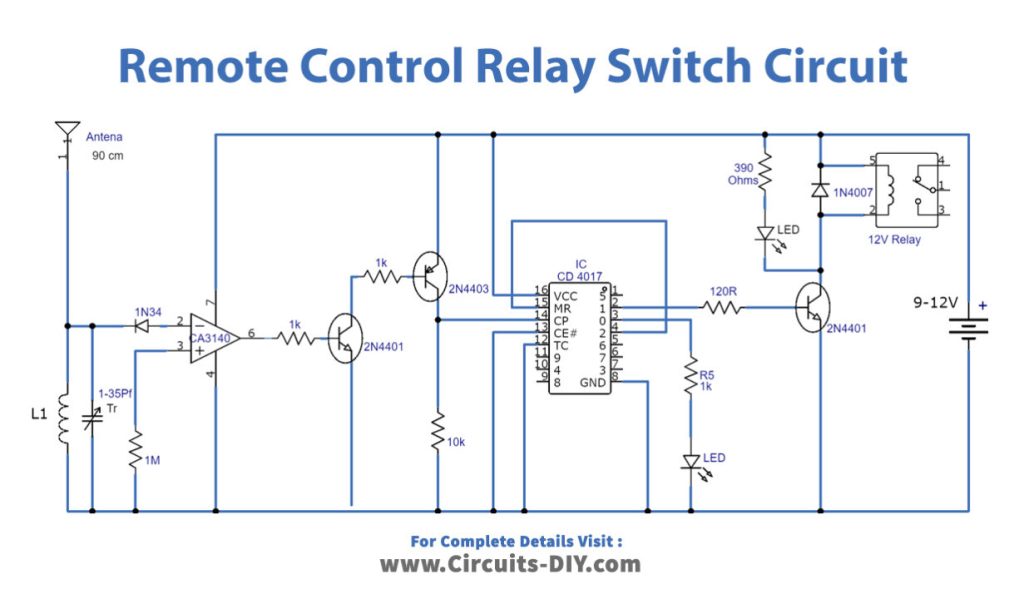
Integrating a remote relay into a winch system enhances its functionality by allowing wireless control.
This addition is particularly beneficial in scenarios where physical access to the winch’s control might be hazardous or inconvenient.
By employing a remote relay, users gain the flexibility to operate their winch systems from a distance, increasing safety and efficiency.
This guide will detail the benefits and processes of wiring a remote relay into a winch relay, ensuring even beginners can achieve professional results.
Prerequisites and Tools
Before you begin, make sure you have the following tools and materials on hand:
- Remote relay (compatible with your winch system)
- Wiring (gauge and length appropriate for your setup)
- Connectors and crimp tools
- Wire strippers
- Multimeter
- Basic hand tools (pliers, screwdrivers, etc.)
It’s essential to follow all safety guidelines and procedures when working with electrical systems. Consult your vehicle’s manual and the winch manufacturer’s instructions for specific precautions.
Understanding the Winch Relay System
A winch relay is an electrical component that acts as a switch, controlling the power supply to the winch motor.
When you engage the winch, the relay receives a signal from the control switch and completes the circuit, allowing the winch motor to operate.
The remote relay you’ll be installing acts as an intermediary between the winch relay and the remote control.
It receives the signal from the remote and then sends the corresponding signal to the winch relay, allowing you to control the winch from a distance.
Step-by-Step Guide: Wiring the Remote Relay
- Locate the winch relay in your vehicle. It’s typically mounted near the battery or in the engine compartment.
- Disconnect the negative (-) battery cable to ensure no power is flowing to the system.
- Identify the control wires leading to the winch relay. These are typically a positive (+) and negative (-) wire.
- Connect the positive (+) wire from the remote relay to the positive (+) control wire of the winch relay.
- Connect the negative (-) wire from the remote relay to the negative (-) control wire of the winch relay.
- Run the wiring from the remote relay to the desired location for the remote control, ensuring a secure and tidy installation.
- Connect the positive (+) wire from the remote control to the positive (+) terminal of the remote relay.
- Connect the negative (-) wire from the remote control to the negative (-) terminal of the remote relay.
- Reconnect the negative (-) battery cable.
- Test the remote control by engaging the winch. The winch should respond to the remote commands.

Testing and Troubleshooting:
After completing the wiring, test the remote relay connection by operating the winch from the remote control. If the winch doesn’t respond, check the following:
- Ensure all connections are secure and properly crimped.
- Check for any loose or damaged wiring.
- Verify the battery voltage and connections.
- Consult the manufacturer’s instructions for specific troubleshooting steps.
Safety Considerations
Working with electrical systems carries inherent risks, so it’s crucial to prioritize safety throughout the installation process. Always:
- Disconnect the battery before working on the electrical system.
- Use appropriate personal protective equipment (PPE), such as gloves and safety glasses.
- Avoid working in damp or wet conditions.
- Keep the work area clean and free of clutter.
- Follow the manufacturer’s safety guidelines for your specific winch and vehicle.
Once installed, be mindful of potential hazards when operating the winch remotely, such as bystanders or obstacles in the winch line’s path.
Additional Resources and Tips:
If you need further assistance or want to learn more about winch systems and remote control setups, consider exploring the following resources:
- Manufacturer’s installation guides and user manuals
- Online forums and communities dedicated to off-roading and vehicle modifications
- Instructional videos on popular platforms like YouTube
To extend the lifespan of your remote relay setup, consider these tips:
- Periodically inspect the wiring for any signs of wear or damage.
- Protect the wiring from exposure to the elements by using appropriate sheathing or conduits.
- Keep the remote control stored in a safe, dry place when not in use.
- Maintain the battery and electrical system according to the manufacturer’s recommendations.
Conclusion:
By following this guide, you should now have the knowledge and skills to wire a remote relay into your winch relay system successfully.
Remember, safety should always be the top priority when working with electrical systems and operating winches.
With a remote relay installed, you’ll enjoy greater convenience and improved control over your winch, making it easier to tackle tough jobs and navigate challenging terrain.
If you have any questions or encounter issues during the installation process, don’t hesitate to consult professionals or seek guidance from experienced enthusiasts in online communities.

