Standard US pattern: 10″ × 4.5″ bolt spacing (horizontal × vertical). Fits most 8k–12k winches from Warn, Smittybilt, Badland.
Plate thickness: 1/4″ steel minimum for bumper-mount, 3/8″ for frame-mount or high-load applications.
Universal mounting plates ($50–$150) work for DIY installs. OEM-specific plates ($200–$400) include exact fitment.
Material: hot-rolled steel is standard. Cold-rolled is smoother but more expensive. Powder-coated or zinc-plated finishes resist corrosion.
Install hardware: use grade 8 bolts with lock washers. Torque to 90 ft-lb minimum for 1/2″ hardware.
TL;DR: For most rigs, a safe winch mounting plate is A36 steel in the 1/4–3/8 inch range, sized to match winch capacity and supported with gussets. Design for at least a 2:1 safety factor, use the correct bolt pattern template, and torque the mounting bolts to spec. Building a DIY plate is absolutely doable if you can cut, drill, and weld cleanly and understand where the loads are going.
Key Takeaways
Winch plate thickness depends on winch capacity, steel grade, and gusseting – there is no single “one size fits all” thickness that works for every setup.
A36 steel plate with a 36,000 PSI minimum yield strength is the standard material choice for DIY winch plates because it’s strong, easy to weld, and affordable.
Design for at least a 2:1 safety factor between the winch’s rated pull and what your plate, bolts, and frame tie-ins can safely carry without permanent bending.
Light-duty ATV winches in the 2,500–5,000 lb range usually work well on 1/4 inch plate, while full-size truck winches at 12,000 lb and above often call for 3/8 inch plate plus gussets or boxed sections.
An accurate bolt pattern template, the right bolt size and grade, and proper torque are just as critical to safety and stiffness as the plate thickness itself.
Receiver hitch plates give you flexibility and portability, while bumper mounts that tie into the frame are better if you winch hard and often.
Use a tough powder coat or epoxy paint system with decent film thickness and good salt-fog resistance so the plate doesn’t rot out around welds and bolt holes.
Well-engineered pre-made plates from brands like Smittybilt and Warn are often cheaper than redoing a DIY design that bent or tore on its first real pull.
What is a Winch Mounting Plate?
1/4″ is bumper-mount minimum. 3/8″ for heavy or competition use.Quick definition: A winch mounting plate is the chunk of structural steel that your winch actually bolts to. It spreads the pull load into the vehicle frame, bumper structure, or receiver hitch so you’re not just yanking on thin sheet metal. You’ll see them as bumper-mounted plates, receiver-hitch plates, and removable winch cradles. A safe plate is built around at least a 2:1 safety factor, so the plate, bolts, and mount points can all carry roughly double the winch’s rated pull without permanent deformation.
What is a Winch Mounting Plate? (Types Overview)
A winch mounting plate is usually a flat or formed section of structural steel that links your winch to the chassis, bumper structure, or hitch receiver. Its job is to take that concentrated load on the winch feet and spread it into a wide footprint so you do not rip bumper skins, twist frame horns, or pull bolt holes into ovals. That “flat plate” idea is only the starting point. Thickness, steel grade, bracing, and how far the plate spans between supports all matter. A good plate is designed to keep deflection under load small enough that the fairlead, drum, and line stay in proper alignment, while maintaining a safety factor of around 2:1 or better between the winch’s rated line pull and the structural capacity of the plate and mount system.
Main Types of Winch Mounting Plates
In the real world most setups land in one of three camps:
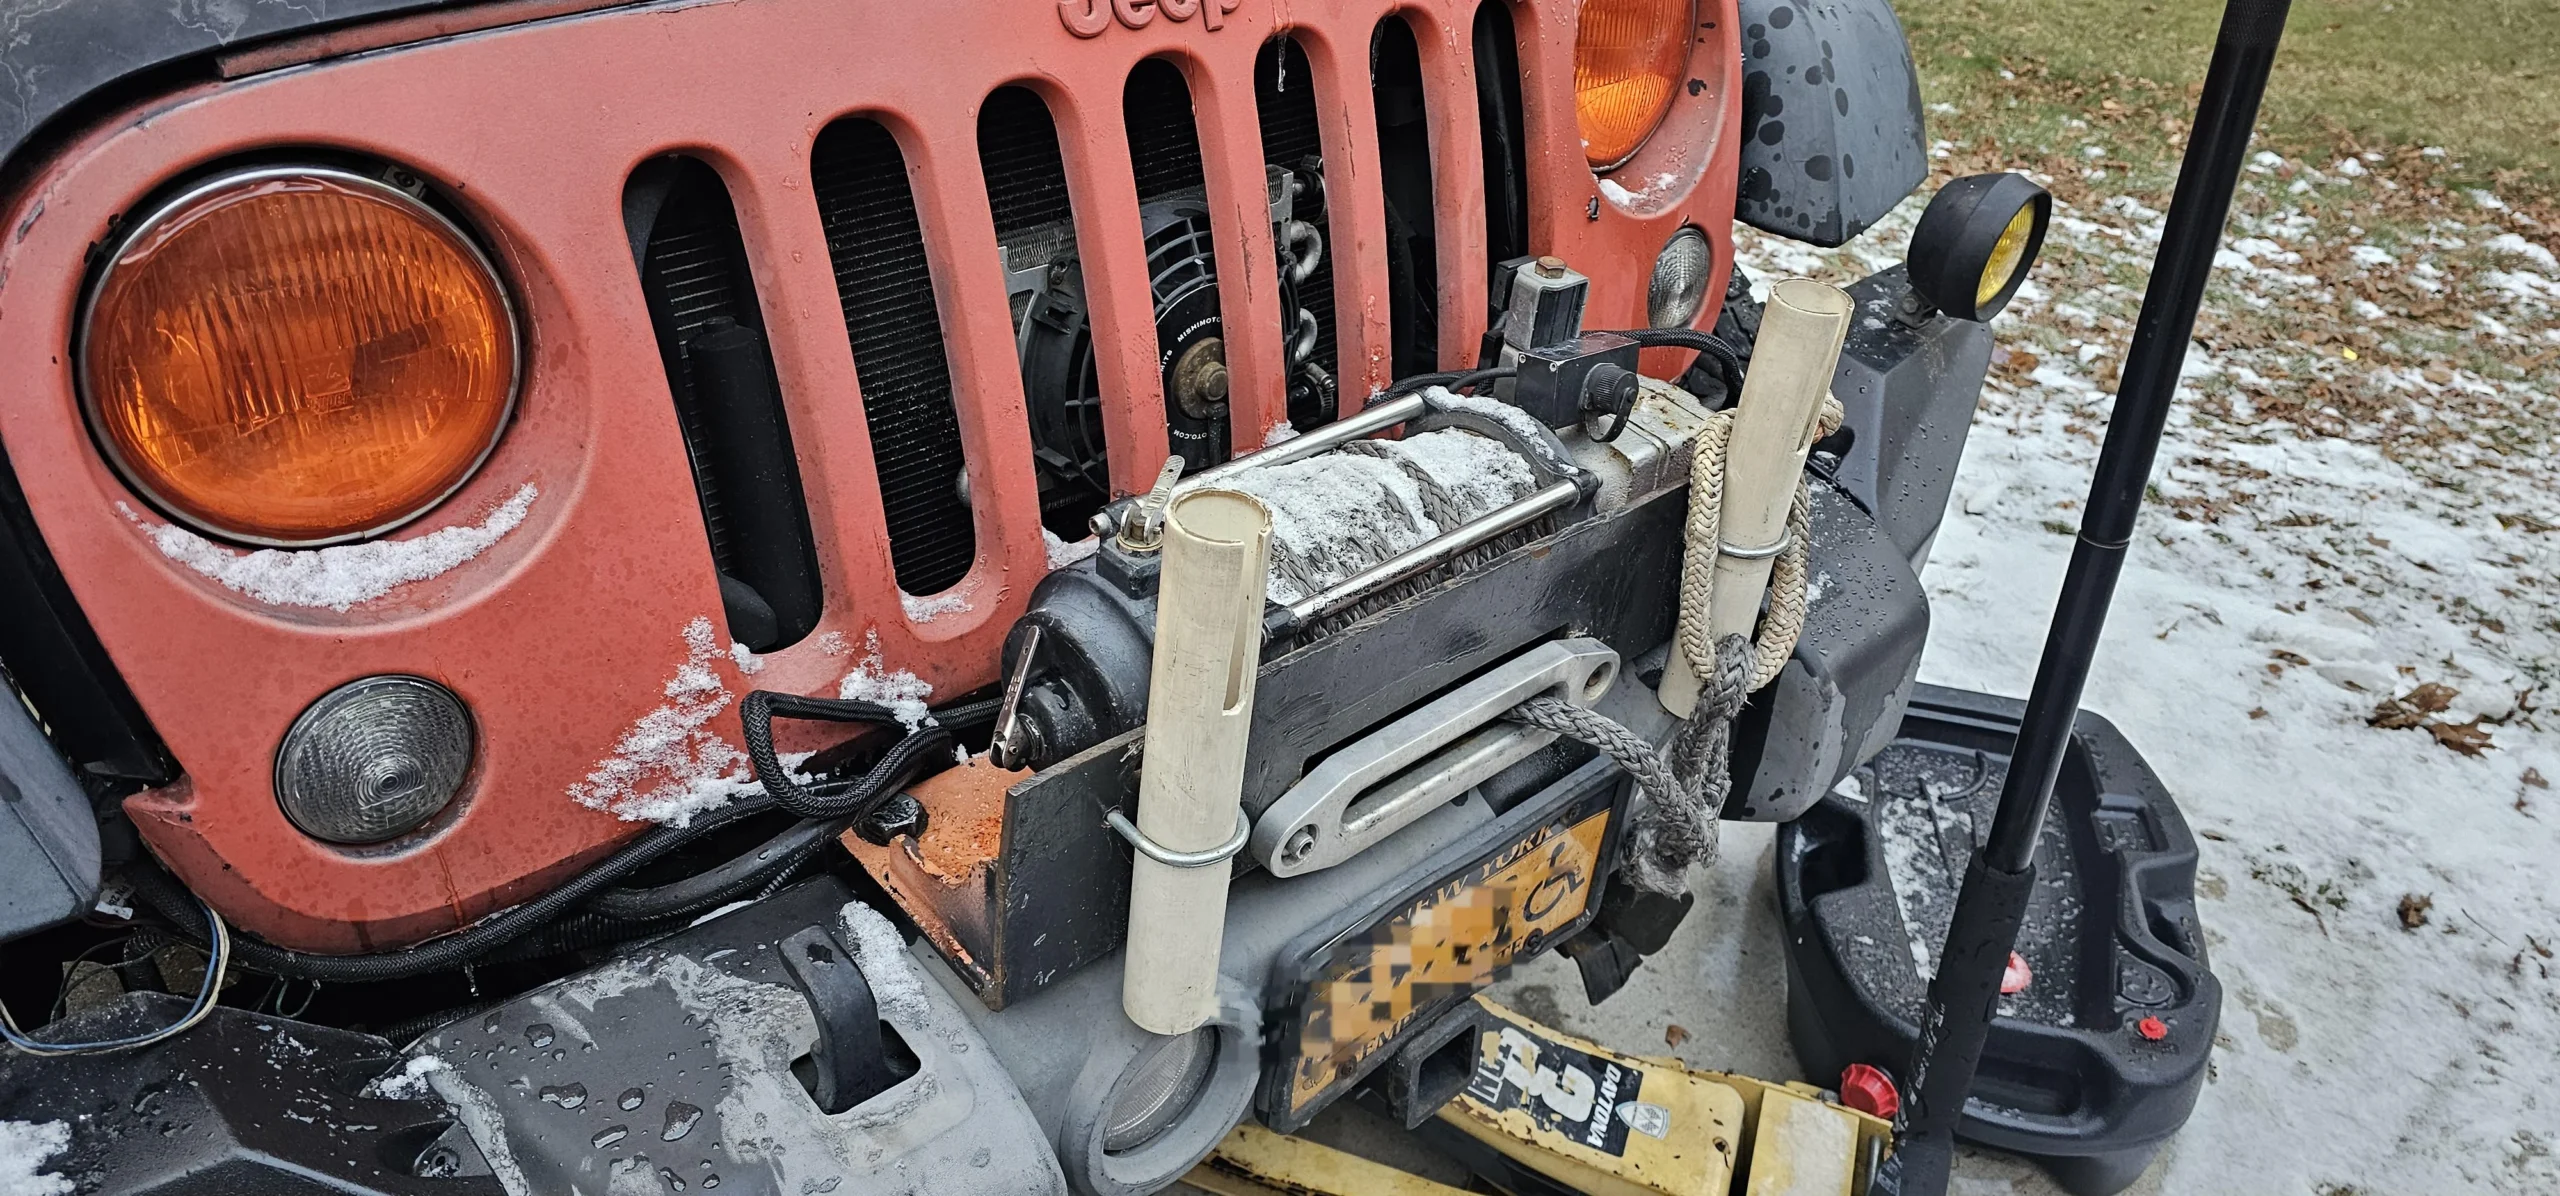
Bumper-mounted winch plates These mount directly to a steel bumper or, better, to the frame horns behind the bumper. Sometimes they are welded or bolted into aftermarket off-road bumpers, and other times they slip between a stock bumper and the frame as a separate plate. Done right, they offer:
Very high rigidity once tied directly into the frame
Best choice for repeated, high-load winching and serious trail work
More complicated installs on newer vehicles with airbag sensors, adaptive cruise, and plastic bumper covers
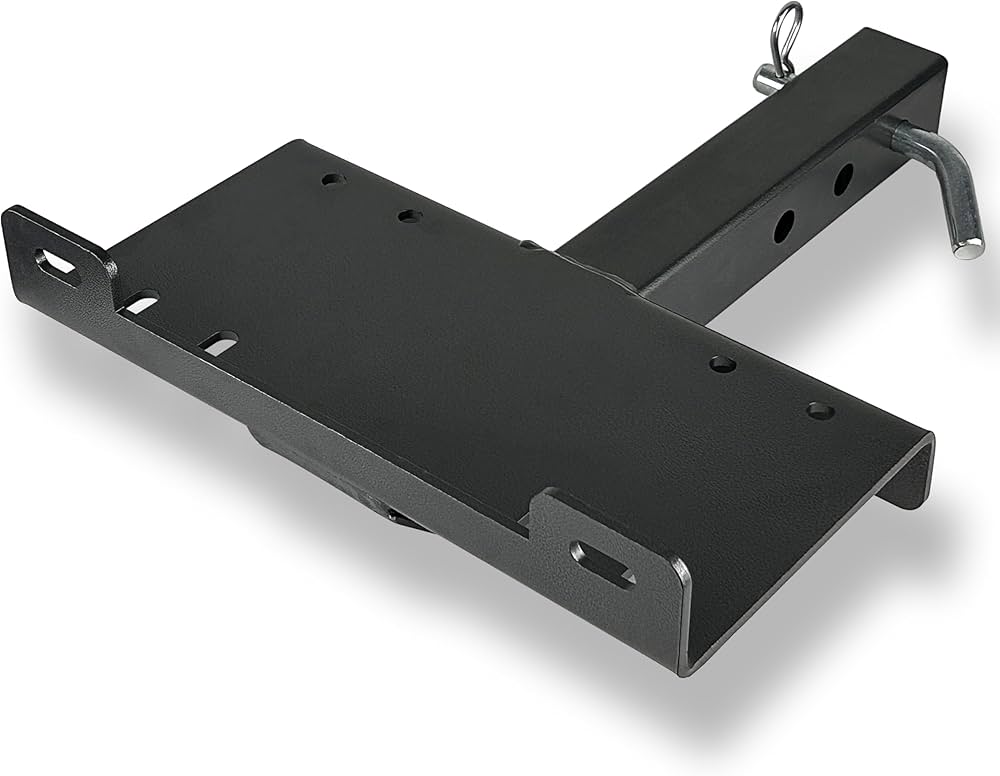
Receiver hitch plates These are flat plates or small frames that plug into a 2 inch or 2.5 inch receiver. You slide the winch in and pin it just like a drawbar. That lets you move the winch between the front and rear hitches, or even share it across multiple rigs:
Very flexible and removable for storage or theft prevention
Overall capacity limited by the hitch rating and how it ties into the frame
Hitch height and location can hurt approach or departure angle and can drag in steep terrain
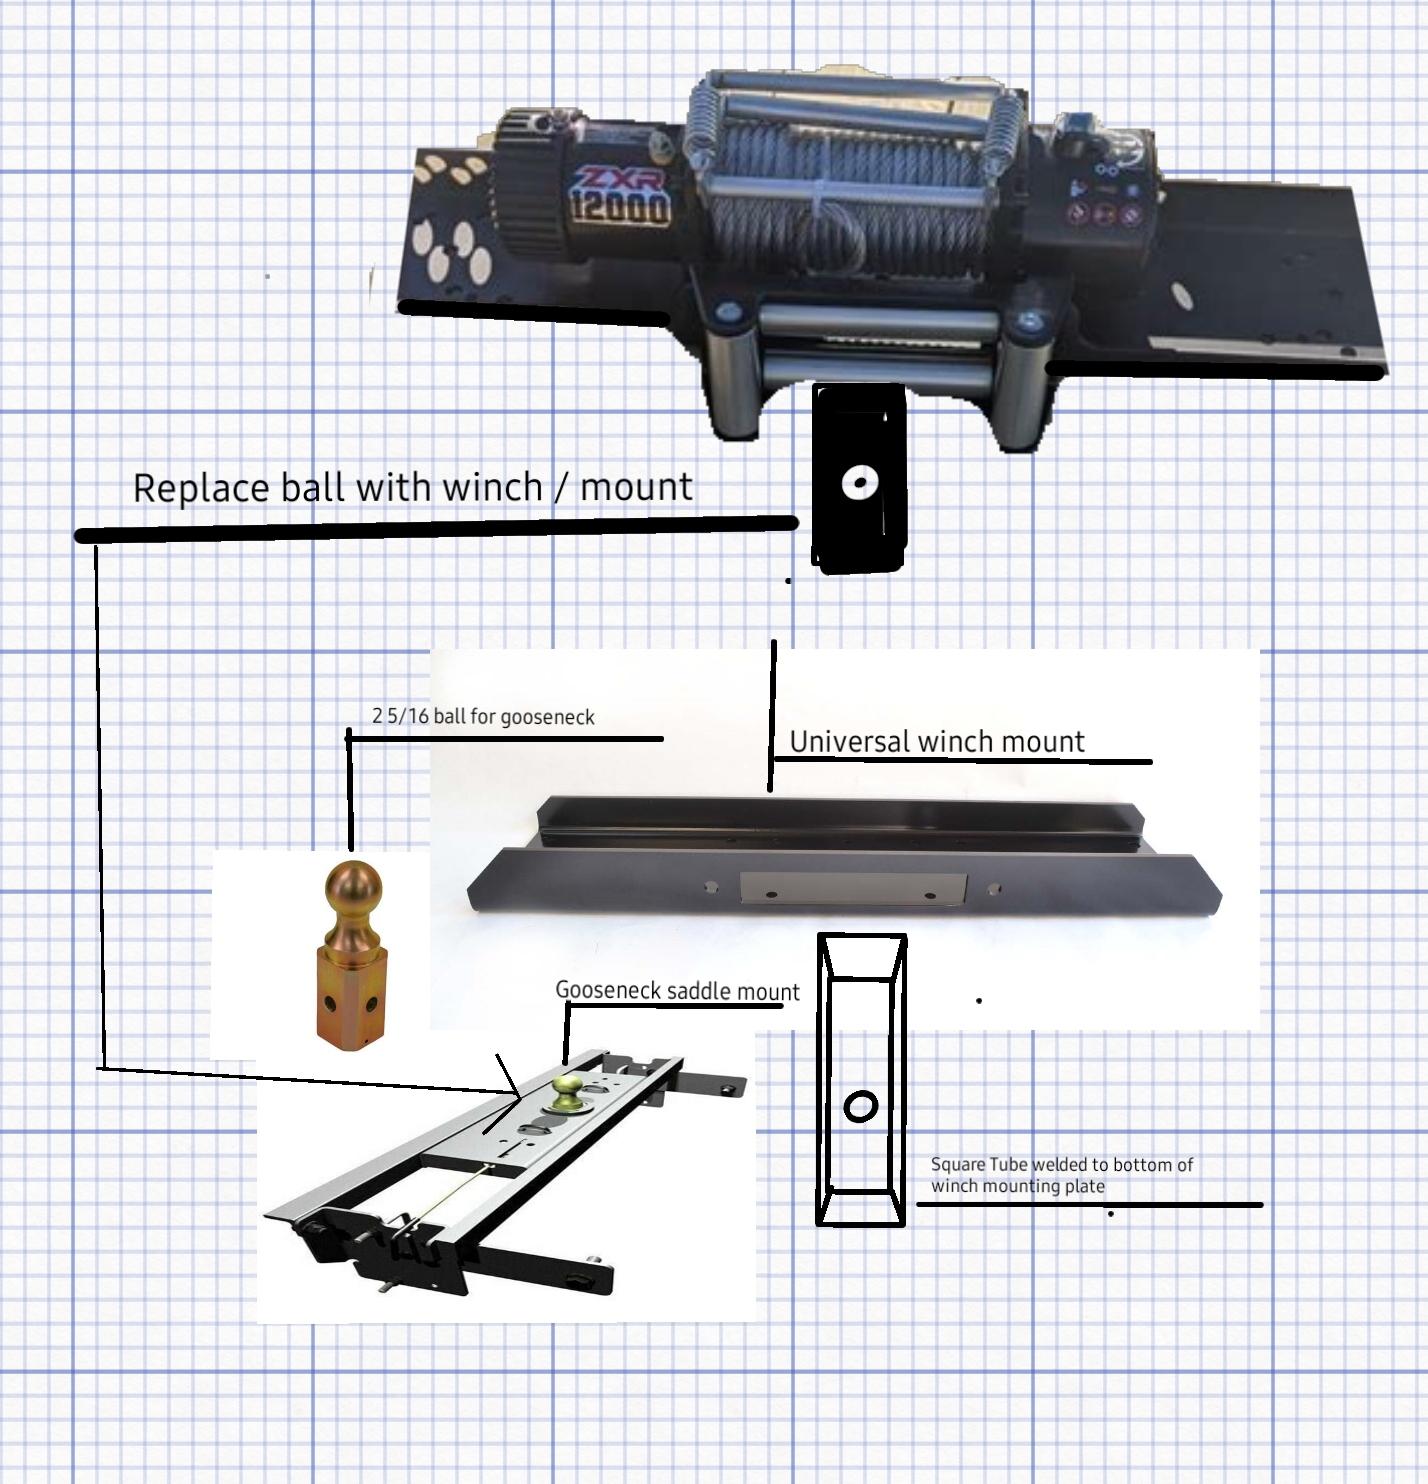
Winch cradles A winch cradle is a reinforced receiver-hitch style frame that includes a plate plus side ears, handles, and usually a fairlead mount. It’s basically a self-contained carrier that slides into any suitable receiver:
Portable, often with grab handles that actually make the weight manageable
More complex weldment, but spreads load into the receiver tube and side plates nicely
Very popular for 8,000–12,000 lb winches used on several trucks, trailers, or farm equipment
What Thickness Mounting Plate Do You Need? (Capacity Chart)
Match the plate to your install scenario. Don’t force a universal where OEM is available. People always want a single answer to “how thick should a winch mounting plate be?” In the shop, we never answer that without asking a few questions. Capacity, plate span, steel grade, and bracing all change the answer. Use the winch plate thickness guide below as a starting point for A36 steel with a 2:1 minimum safety factor and controlled deflection so the fairlead stays where it belongs. These ranges assume:
Steel grade: A36 structural steel plate
Yield strength around 36,000 PSI minimum
The main load is roughly centered between supports
The plate is tied into a solid bumper structure or a frame crossmember, not just thin sheet metal
Reasonable gusseting and bracing around the fairlead and main load areas on higher-capacity setups
Notice how the chart steps from 1/4 inch vs 3/8 inch plate as winch capacity and expected abuse increase. I’ve seen plenty of 3/8 inch plates bow because they were unsupported in the middle, while a welded 1/4 inch plate with good gusset plate reinforcement stayed straight. Stiffness is about the whole structure and load distribution, not just raw thickness. If you want thickness recommendations tied to specific frames, crossmembers, and weight classes, take a look at our truck-focused guide on mounting plate thickness for different platforms.
2500–5000 Lb Winches: ATV, UTV, Small Trailer
On the small stuff, the forces are lower and the plate spans are short, but that doesn’t mean you can get sloppy. Bending an ATV winch mount mid-recovery still ruins your day.
Recommended steel: A36 steel plate
Typical thickness: 3/16″ on 2,500–3,500 lb winches; 1/4″ once you’re in the 4,000–5,000 lb range or if the span is long
Mount style: Often proprietary ATV brackets or compact plates that bolt to frame tabs or the front rack structure
Deflection goal: Keep visible bending at full load down to only a couple millimeters so the fairlead and drum stay nicely aligned
Because these plates are typically narrow and close to their supports, 3/16 inch A36 with a bit of bracing can still give you a solid 2:1 safety factor. The weak link is often the ATV frame or thin tube it bolts to. Make sure your bolt pattern drilling is dead on, then back it with decent washers or small backing plates so you are not crushing into soft tubing or a thin trailer tongue.
This is the range where people start bending “universal” mounts and factory bumpers because they trusted looks instead of numbers. Here, the winch plate thickness guide really matters.
Recommended steel: A36 as a baseline, or higher-yield plate in tighter, weight-sensitive designs
Thickness target:
6,000–8,000 lb: 1/4″ A36 with properly placed gusset plate reinforcement or boxed sections
9,000–10,000 lb: 5/16″ or 3/8″, depending on how far it spans between frame tie-ins and how aggressively you brace it
Support: The plate should tie into frame rails or a heavy crossmember, not just to the front bumper shell
Receiver setups: Use a winch cradle that is clearly rated for your winch capacity and hitch class
Many off-the-shelf universal plates in this window run 1/4 inch A36 steel with bent flanges and gussets to cut deflection way down while keeping weight manageable. That’s usually enough for a clean 2:1 safety factor, assuming you bolt it to something more substantial than a chrome bumper shell.
12000 Lb+ Winches: Heavy Truck & Recovery Use
Once you step into 12,000–17,500 lb winches, you’re dealing with forces big enough to move or twist the whole rig. At that point your plate is basically a structural crossmember, not just a mounting bracket.
Recommended steel: A36 as a minimum, with thicker plate or higher-yield material in critical areas
Thickness target: 3/8″ minimum plate for 12,000–13,500 lb, and often up to 1/2″ if you have long, unsupported spans or minimal gusseting on 15,000+ lb winches
Structure: Boxed sections, vertical webs, ribs, and serious gussets at the fairlead opening and frame tie-in points
Mounting: Multiple frame attachments using properly sized Grade 8 or 10.9 bolts torqued correctly
For these big winches, deflection under load needs to stay very low, often just a few millimeters at the fairlead. If the plate twists or sags, roller fairleads can bind and synthetic line can get pinched or chafed. On heavy trucks and recovery trailers, think of the entire structure, including frame rails, crossmembers, and the hitch or tow eyes, as part of your mounting plate thickness chart decision, not just the plate alone.
A good DIY winch mounting plate can fit your rig better than most store-bought parts and save you some money, but only if you respect the loads involved. People get into trouble when they treat it like a cosmetic bracket instead of a structural part. Use the right steel, lock in your dimensions before you cut, and weld like it actually matters, because it does.
Materials & Tools
Start with the right material, not whatever scrap looks close enough. For most 6,000–12,000 lb winches, A36 plate is the workhorse choice.
A36 Steel Plate – Key Properties
Attribute
Typical Value
Yield strength (PSI)
~36,000 PSI minimum
Tensile strength (PSI)
~58,000 – 80,000 PSI
Weldability rating
Good, easy to cut and weld with common shop equipment
Thickness range for winch plates
3/16″ – 1/2″ depending on winch size and bracing
Recommended materials:
A36 steel plate cut to the thickness that matches your winch capacity and span (refer back to the chart above)
A36 steel for gusset plate reinforcement, usually 3/16″ – 1/4″ for ribs and vertical braces
Grade 8 or 10.9 hardware for mounting, including bolts, flat washers, anti-vibration washers or lock washers, and high-quality lock nuts
A fairlead mount, either integrated into the plate opening or built as a separate welded bracket
Corrosion protection such as powder coat, or an epoxy primer with a durable topcoat
Basic tools:
Angle grinder, plasma cutter, or band saw for fitting and cutting the plate
Drill press with sharp bits for precise bolt pattern drilling and fairlead fasteners
A welder you’re comfortable with. MIG is common for A36, though stick or TIG will work with proper technique
Clamps, magnets, and squares to hold things solid and true while tacking and welding
Cardboard or thin plywood for mockups, to check clearance and bolt locations before you go at the steel
If your project includes frame modifications or complex bumper work, have a look at our more detailed DIY plate fabrication guide. Here we’ll stay focused on the plate design, fit, and structure.
Cutting & Drilling the Plate
This is where a lot of DIY builds go sideways. Crooked cuts and sloppy holes turn into misalignment, stressed housings, and cracked plates. Take your time here. 1. Size the plate footprint
Measure your winch base length and width, and pay attention to whether it’s a feet-down or feet-forward design.
Add 1–2 inches around that footprint so you have room for bolt heads, the fairlead mount, and welds, but don’t go so big that you hit the grill or frame horns.
Lay the blank on the bumper or frame rails and check that it can sit fully flat without rocking on weld seams or brackets.
2. Use a bolt pattern template
Most quality winch brands provide a bolt pattern template in the manual or online. Use it. Guessing from the base casting is how bolt holes end up off by a few millimeters.
Common truck winch patterns are 10″ x 4.5″, while smaller ATV units use tighter bolt spacing. Check your specific model.
Print the template or trace it onto cardboard and actually set the winch on top to confirm everything lands where it should.
Only after that should you transfer the pattern onto the steel and mark each hole center with a solid center punch.
Bolt pattern attributes match:
Bolt Pattern Basics
Attribute
Typical Range
Hole spacing (inches)
3.0″ – 10.0″ depending on winch size and style
Bolt diameter
3/8″ – 1/2″ SAE, or metric M10–M12 on many modern winches
Thread pitch (TPI/metric)
Common examples include 3/8″-16 UNC, 1/2″-13 UNC, and M10x1.5
Torque specification (ft-lbs)
Roughly 30–50 ft-lbs for 3/8″ and 70–90 ft-lbs for 1/2″ Grade 8 hardware, but always check the winch manual
3. Drill the holes
Use a drill press if you can. It keeps holes straight and keeps bits from wandering across hardened mill scale.
Start with a small pilot hole, usually around 1/8″, then step up in two or three sizes to reach your final bolt diameter.
Deburr both faces with a countersink or a flap wheel so your winch feet and washers sit flush and don’t dig into burrs.
4. Cut fairlead openings and gusset slots
For roller fairleads, you’ll need a horizontal opening big enough for the rollers to operate plus the bolt holes for the fairlead itself.
For hawse fairleads, usually two correctly spaced mounting holes and a smooth, rounded edge where the rope exits is enough, but many builders add a small relief cutout to give the rope a cleaner path.
Before cutting everything out, think through where gussets and support plates will land so you do not block bolts or wiring access with a perfectly placed brace that later becomes a headache.
Welding Gussets & Load Distribution
I see a lot of builders jump straight to thicker plate because it feels stronger. That works up to a point, but gusset plate reinforcement is usually a smarter way to gain stiffness without adding 40 pounds to the nose of the truck.
Gusset material: A36 steel in the 3/16″–1/4″ range for most truck plates, thicker on extreme builds
Gusset angle: Typically mounted at 45–90 degrees between the horizontal plate and vertical webs or frame tie-ins
Weld size: Fillet welds sized to your material, often 3/16″ – 1/4″, with good penetration and no undercut
Load distribution: Properly placed gussets can offload 30–50% of the peak bending from the center span into additional mount zones
Some practical gusset tips that a lot of catalogs never mention:
Run gussets from right around the fairlead area back into the strongest structure, like the frame horns or a dedicated crossmember. That controls twisting and nosedive when the line is pulling hard.
Don’t pile all your bracing in one spot. Spread several smaller gussets out so they feed the load into multiple bolts and frame areas instead of creating a single stiff point.
Weld opposite sides in stages and let the plate cool between passes. That limits heat warping so your once-flat plate doesn’t turn into a potato chip.
Corrosion Coating: Powder Coat vs Paint
I’ve pulled plenty of older winch plates off trucks where the steel was fine but the rust around bolt holes and weld toes was getting ugly. A good coating is cheap insurance compared with replacing the whole mount.
Corrosion Coating Options for Winch Plates
Attribute
Powder Coat
Liquid Paint (Epoxy + Topcoat)
Coating type
Polyester or epoxy-based powder coat baked on
Epoxy primer followed by urethane or high-quality acrylic topcoat
Typical thickness (mils)
Roughly 2–4 mils per coat, often 3–6 mils total
Around 2–3 mils of primer and 2–3 mils of topcoat
Salt-fog rating (hours)
About 500–1,000+ hours with proper blasting and prep
Anywhere from 300–1,000+ hours depending on the exact system
UV resistance (years)
Roughly 3–10+ years if you choose an outdoor-rated powder
Often 5–10+ years with quality automotive-grade urethanes
Preparation is more important than product:
Degrease the steel thoroughly, then remove mill scale and rust by sandblasting or aggressive sanding before coating.
Break sharp edges slightly with a file or flap disc, since coatings tend to pull thin over sharp corners and chip easily there.
Pay attention to bolt holes, weld toes, and corners. These are where rust usually starts, so make sure they get full coverage and touch them up after final assembly if needed.
If you like to tinker, drill extra holes, or change accessories, a good epoxy primer and paint system is easier to repair or modify than powder coat. Powder looks great and is tough, but once it chips, touchups never blend quite as clean.
How to Install a Winch Mounting Plate: Torque Specs & Alignment
Design can be perfect on paper, but loose bolts and crooked installs still ruin it. I’ve seen winches “walk” on plates after a couple of pulls just because the hardware wasn’t torqued or the plate was pulling on one side first. For vehicle-specific layouts and frame drilling details, check our expanded mounting plate installation steps. Below is the general process and the things you absolutely cannot skip.
Bumper Mount Installation
A properly installed bumper-mounted plate keeps the pull forces right near the frame rails, which is where you want them for heavy use. The trick is getting the structure and bolt work right from the beginning. 1. Verify bumper and frame strength
Most factory bumpers on modern trucks are mainly thin steel or plastic. They’re built for crash energy management, not for winching 10,000 lb uphill.
When you can, reuse factory tow-hook or recovery point locations. Those usually go through reinforced sections of the frame and are a good clue where the structure is.
If you’re not sure about the front structure, adding a dedicated crossmember or getting a fabricator to look over the design is money well spent.
2. Dry-fit the plate
Place the plate where it will live, without the winch installed yet. This lets you see every interference before you’re wrestling full weight.
Check clearances to grill slats, radiators, intercoolers, horns, and sensors. Remember most winches sit higher than just the plate.
Look at the fairlead-to-bumper distance. You want the line to exit cleanly without scraping on bumper edges or plastic trim throughout the suspension travel range.
3. Bolt selection and torque
Use SAE Grade 8 or metric Grade 10.9 hardware unless the winch or bumper manufacturer specifies otherwise. Softer bolts stretch and loosen under repeated pulls.
Common mounting bolt torque spec ranges:
3/8″ Grade 8: roughly 30–50 ft-lbs
7/16″ Grade 8: often 45–75 ft-lbs
1/2″ Grade 8: typically 70–90 ft-lbs
Always cross-check these numbers with the manufacturer’s charts and your winch documentation.
Use anti-vibration washers or lock washers along with a medium threadlocker so the bolts stay tight through vibration and heat cycles.
4. Torque sequence
Snug everything by hand first so the plate can self-center and settle flat on its mounting surface.
Torque in a crisscross pattern or from the middle outward, depending on bolt layout, to avoid pulling one corner down and leaving a gap elsewhere.
After your first heavy winch use, re-check the torque on the plate and winch mounting bolts. Re-check again after a few trips or seasons of use.
5. Vibration isolation
If the bumper and frame transmit a ton of vibration and noise into the cab, some builders slip thin rubber or polyurethane pads between the plate and its mounting surface.
Those isolators are mainly there to tame noise. They should be thin and firm enough that the plate cannot slide, squirm, or compress noticeably during a hard pull.
Receiver Hitch Mount Installation
Receiver hitch plates and cradles are handy, but they shift some responsibility onto the hitch and frame build. A 12,000 lb winch on a tired Class III hitch with rusty hardware is asking for trouble. 1. Confirm receiver rating
Look up the hitch’s tongue weight and tow rating. Most Class III and IV hitches start around 5,000 lb tow with 500+ lb tongue weight, but that doesn’t automatically mean they’re ideal for 12,000 lb recovery pulls.
For 8,000–12,000 lb winches, use a hitch that’s actually rated or tested for recovery loads when possible, not just light towing.
Check that the hitch itself is secured to the frame with the correct grade and number of bolts, and that the mounting points are not rusted out.
2. Fit the winch receiver hitch plate
Insert the cradle’s shank all the way into the receiver until the pin holes line up perfectly. Partial engagement is a common mistake.
Use a tight, properly sized hitch pin. An anti-rattle clamp or wedge can help remove play between the shank and the receiver tube.
Check the cradle’s attitude. It should sit level side to side and fairly flat so the line feeds squarely through the fairlead.
3. Alignment and cable path
Check your fairlead-to-bumper distance or any bodywork near the line. As the suspension cycles and the truck flexes, the line shouldn’t drag over sharp edges.
On rear-mounted winches, make sure the rope clears the tailgate, spare tire, trailer tongue, and any accessories you tow with.
4. Corrosion and hardware care
Keep the hitch shank and pin lightly greased or coated to slow rust, especially if you run in winter salt or near the coast.
Inspect the receiver tube welds and the hitch-to-frame hardware a few times a year. Look for cracks, deformed pin holes, and flaking rust.
If you’re moving winches between a tow rig and a trailer regularly, a dedicated receiver hitch plate on the trailer is a clean way to keep both setups consistent.
Receiver Hitch Plate vs Bumper Mount: Which is Right for Your Use?
Both receiver hitch plates and bumper-mounted plates have their place. The “right” choice depends more on how you use your rig than which style looks cooler. Ask yourself how often you winch, from which direction, and whether you want a permanent or portable solution.
Receiver Hitch Plate vs Bumper Mount
Factor
Receiver Hitch Plate / Winch Cradle
Bumper-Mounted Plate
Strength (assuming quality hardware)
Limited by hitch class and attachment. Many Class III/IV hitches handle 8k–12k static pulls if the cradle and frame are up to it.
Can tie directly into frame rails and crossmembers for maximum stiffness. Best option for frequent heavy winching.
Installation complexity
Low. Slides into an existing 2″ or 2.5″ receiver with minimal or no fabrication required.
Medium to high. May involve trimming, drilling, or a new bumper mount design and sometimes cutting bodywork.
Cost
Moderate. You’ll need a sturdy cradle plus wiring to whichever ends of the vehicle you plan to use.
Varies widely. Can be a relatively cheap DIY plate or a high-dollar integrated off-road bumper system.
Vehicle compatibility
Works with nearly any vehicle or trailer that has a properly rated receiver hitch.
Vehicle-specific. Often requires custom brackets or an aftermarket bumper built for your exact model.
Flexibility
Very high. You can move the winch between several vehicles or from front to rear in a few minutes.
Fixed in place. Not flexible, but always there and always connected to the same wiring and controls.
Approach/departure angle
Receiver location can hang low and reduce off-road angles, especially in deep ruts or ledges.
Usually better when the plate is integrated into a high-clearance bumper design.
Rule of thumb: If you’re doing a lot of heavy, front-facing pulls like rock crawling or deep mud extractions, a bumper-mounted plate that ties straight into the frame is usually the better long-term setup. If you only winch once in a while, want to share the winch between rigs, or need the option of front and rear pulls, a receiver hitch plate or cradle is hard to beat.
Common Mistakes When Selecting or Building a Winch Plate (and How to Fix Them)
I see the same handful of problems over and over in the shop. Fix these on paper and in the build, and your winch system will last a lot longer and be safer to use.
Mistake 1: Assuming thicker is always betterProblem: People jump straight to 1/2″ plate thinking it solves everything. It adds a lot of weight and can still flex badly if it spans too far without gussets or ties into weak sheet metal. Fix: Start with the winch capacity vs plate thickness table, then add gussets and boxed sections where needed to increase stiffness and better share the load instead of piling on thickness alone.
Mistake 2: Relying on a thin factory bumperProblem: Bolting a stout plate to a flimsy bumper shell means the bumper deforms or tears long before the plate yields. Fix: Tie the plate directly into frame horns, tow hook points, or another reinforced structure. The bumper skin is just along for the ride, not part of the main load path.
Mistake 3: Sloppy bolt pattern drillingProblem: Misaligned bolt holes force the winch to sit skewed or force bolts to pull at an angle, loading the housing and one or two bolts more than the others. Fix: Use a proper bolt pattern template, pilot drill, and a drill press if available. If you absolutely need to elongate a hole to fit, make sure the slot is minor and keep within generally accepted standards for hole oversizing.
Mistake 4: Ignoring bolt torque specsProblem: Under-torqued bolts back off with vibration. Over-torqued bolts stretch, strip threads, or crack the plate around the holes. Fix: Follow the winch manufacturer’s torque specification (ft-lbs) for your bolt size and grade. Use a torque wrench and mark the bolt heads or nuts after tightening so you can see if anything moves.
Mistake 5: Poor corrosion preparationProblem: Shooting paint over oily or rusty steel causes early chipping, and rust creeps under the coating, especially around welds and fasteners. Fix: Clean and prep the steel properly, then use a good primer and a coating with a solid salt-fog rating and UV resistance. Pay special attention to bolt areas and weld toes.
Mistake 6: No thought to load directionProblem: Designing everything for a perfect straight pull, when real recoveries often involve side angles, snatch blocks, and twisting loads. Fix: Place gussets and mounting points to resist torsion and prying from multiple angles. Keep the fairlead as close to the main structural support as practical to shorten the lever arm that tries to twist the plate.
FAQ
Here are straightforward answers to common winch mounting plate questions that come up in the shop and on the trail.
How Thick Should a Winch Mounting Plate Be?
For most 8,000–10,000 lb truck winches, a 1/4–3/8 inch A36 steel plate with decent gusseting and direct frame tie-ins works well, assuming you’re targeting a 2:1 safety factor. Smaller ATV and UTV winches usually live on 3/16–1/4 inch plate, while heavy 12,000+ lb setups often need 3/8–1/2 inch plate plus serious bracing or boxed structures.
Can I Build My Own DIY Winch Mounting Plate?
Yes, a DIY winch mounting plate is very realistic if you can cut, drill, and weld A36 steel accurately and you think through the load paths. Match the plate thickness to your winch capacity, follow the published bolt patterns, brace the plate with gussets, and test-fit everything before coating. If the structural side of this is new to you, having an experienced fabricator review your design is a smart move.
Is Plate Thickness More Important Than Gusseting?
They support each other. The plate thickness gives you base strength and resistance to local deformation around bolt holes. Gussets and ribs control flex over larger spans and keep deflection under load in check. On many builds, a thoughtfully gusseted 1/4 inch plate outperforms a plain 3/8 inch plate that’s left unsupported across the middle.
Do I Need a Special Grade of Steel for a Winch Plate?
For most builds, A36 steel is exactly what you want. It has a minimum 36,000 PSI yield strength, welds easily, and is available in the 3/16–1/2 inch range at nearly any steel yard. Higher-yield steels can let you slim the thickness, but they require more care in cutting, welding, and heat control, and usually are not necessary on typical off-road builds.
Will Adding a Winch Plate Void My Vehicle Warranty?
It might impact warranty coverage on any parts affected by your modification, especially if you cut crash structure or interfere with sensors. Many manufacturers allow accessories and winches installed to their guidelines. Using vehicle-specific plates or reputable designs, avoiding unnecessary cuts to key structural members, and documenting the installation all help if a warranty question ever comes up.
Is a Receiver Hitch Plate Strong Enough for a 12,000 Lb Winch?
It can be, but only if the receiver hitch, winch cradle, and frame are all built and rated for that type of load with a reasonable safety factor. Always check the hitch class, read the manufacturer’s recommendations, and consider how often you plan to max the winch out. For regular heavy recoveries, a frame-tied bumper mount usually has a better safety margin.
How Tight Should I Torque My Winch Mounting Bolts?
On typical truck winches, 3/8 inch Grade 8 mounting bolts usually land in the 30–50 ft-lb range, and 1/2 inch Grade 8 bolts often fall around 70–90 ft-lbs. Those are ballpark numbers. The correct answer is in your winch and hardware specs, so always use those values and a decent torque wrench, then recheck after your first serious pull.
Can I Mount a Winch Directly to a Factory Bumper?
On most modern trucks and SUVs, no, not safely. The bumper face is usually thin steel or composite, with only a few reinforced spots. Hanging a heavy winch off that sheet metal is a good way to fold the bumper under stress. Use a dedicated winch plate that ties into frame rails, tow hook mounts, or an off-road bumper that has an integrated winch mount.
What’s the Difference Between a Winch Plate and a Winch Cradle?
A winch plate is usually a flat or formed plate that bolts to your bumper or frame and stays on the vehicle full-time. A winch cradle is a portable frame that includes the plate, side supports, and a receiver shank so you can slide the whole winch assembly into any compatible hitch.
Does Winch Plate Flex Really Matter?
Yes, it matters more than most people think. Excess flex can pull the fairlead out of alignment, pinch the rope, and put weird side loads into the winch housing and bolts. As a guideline, keep visible deflection at rated load under about 1/4 inch, and much less on bigger, heavier winches. Proper plate thickness, good gusseting, and strong frame tie-ins are how you get there.
Final Summary & Next Steps
A solid winch mounting plate is not just a flat piece of steel bolted across the front of your rig. It is a small structural system that has to handle heavy, sometimes angled loads without bending so far that the winch or line suffers. Using A36 steel in the right thickness, adding smart gusseting, following the correct bolt pattern template, and actually torquing the hardware to spec will give you a mount that works every time you hit the switch. If you’re ready to move ahead:
Match your winch rating to the mounting plate thickness chart and pick a plate thickness that makes sense for your span and support.
Decide whether a receiver hitch plate suits your needs or if a frame-tied bumper mount is a better fit for how and where you wheel.
Pick a proven universal or vehicle-specific plate, or use the DIY guidelines here to design and build your own if you’re comfortable with fabrication and welding.
Part of the Winch Accessories guide. Explore more guides in this cluster for complete coverage.
🔧 My Bent Plate Story
Installed a 9,500 lb winch on a 3/16″ generic Chinese plate years ago (before I knew better). First hard recovery: plate deflected 0.4″ and stayed bowed — geometry shifted, winch canted, rope started fraying from poor fairlead alignment.
Pulled it, installed a 1/4″ Smittybilt Universal Gen3 plate ($85). Five years later, still dead-flat under full winch load.
The $50 upgrade saved the winch and the rope. Plate thickness is not where to save money.
Disclaimer: As an Amazon Associate, I earn from qualifying purchases at no additional cost to you. But all my reviews and guides are genuine and come from my experience.
Hi, I'm Aaron, the founder of Off-Road Pull. My love for off-roading began in my teenage years while exploring the diverse landscapes of Arizona.
With more than 16 years of experience in off-roading and winching, I bring a blend of practical know-how and a background in mechanical engineering to provide you with detailed and trustworthy advice.
My passion is to share this knowledge with both newcomers to adventure and experienced off-roaders. When I'm not tackling rugged terrain or crafting in-depth articles, you'll find me capturing the scenic beauty of the outdoors through my lens.
 Quick definition: A winch mounting plate is the chunk of structural steel that your winch actually bolts to. It spreads the pull load into the vehicle frame, bumper structure, or receiver hitch so you’re not just yanking on thin sheet metal. You’ll see them as bumper-mounted plates, receiver-hitch plates, and removable winch cradles. A safe plate is built around at least a 2:1 safety factor, so the plate, bolts, and mount points can all carry roughly double the winch’s rated pull without permanent deformation.