Properly attaching a hook to a winch cable is crucial for ensuring safe and efficient operation. A secure connection between the hook and cable ensures safety and allows your winch to function optimally, whether using synthetic rope or steel cable.
This guide covers everything you need to know about attaching a hook to a winch cable, including step-by-step methods, safety precautions, and the best tools for the job. From using cable clamps to tying secure knots, we’ll help you achieve a reliable connection for any situation.
Let’s dive into the process and explore the best practices for both synthetic and steel winch cables.
Quick Answer
How do you attach a hook to a winch cable? Attaching a hook to a winch cable requires precision and safety. Follow these steps:
- Inspect the cable: Look for frays, rust, or kinks. Replace the cable if damaged.
- Choose the right hook: Use a forged, load-rated hook that matches the cable type (steel or synthetic).
- Select an attachment method:
- Steel cable: Use a U-bolt cable clamp and a thimble to loop the cable around the hook eye.
- Synthetic rope: Use a soft shackle, splicing technique, or secure knot like a bowline.
- Install the hook:
- Insert the cable through the thimble and clamp it securely with a torque wrench.
- Ensure the cable lays flat and tight, with no twisting.
- Test the setup: Lightly tension the winch to check the connection. Never use a hook without load-testing.
Tip: Always wear gloves and follow the manufacturer’s safety guidelines for cable and hook compatibility.
Gather The Necessary Materials
To begin, ensure you have all necessary materials at hand:
- Hook: Select a hook that matches the cable’s load capacity and compatibility.
- Winch Cable: The lifeline of the operation, chosen based on the weight and type of loads.
- Protective Gloves: Essential for hand protection against sharp wires and strain.
- Cable Clamps (Optional): Used for a non-knot attachment, providing a strong hold.
Using the right tools is crucial for achieving a secure hook connection. Consider tools for splicing or alternative methods, such as a figure-eight knot, to avoid weakening the integrity of synthetic ropes.
Using the right tools guarantees a secure and efficient attachment of hooks to winch cables.
Prepare the Winch Cable
Preparation of the winch cable is crucial for a successful attachment:
- Inspect the Cable: Look for any signs of wear, damage, or fraying. A damaged cable can compromise the entire operation.
- Clean the Cable: Remove any dirt, grease, or debris. A clean cable ensures a better grip and a secure attachment.
- Determine the Appropriate Length: Ensure the hook is positioned to balance the load effectively.
Attach the Hook to the Winch Cable
Method 1: Using a Cable Clamp
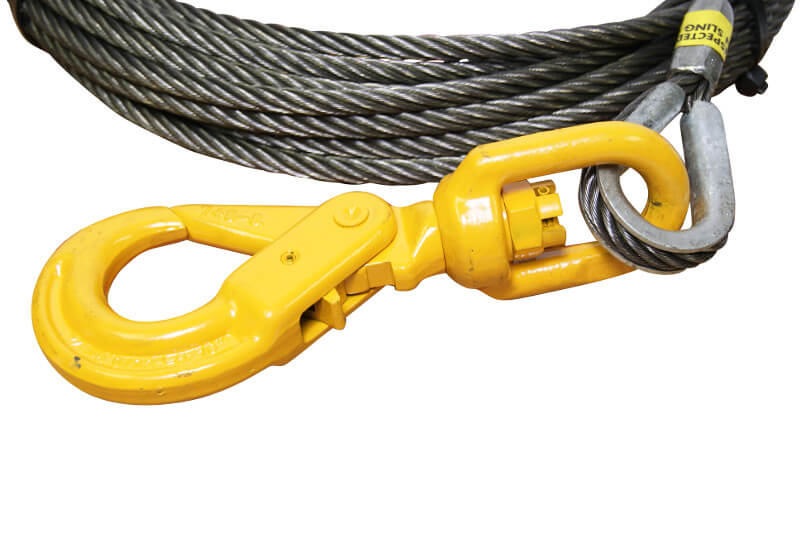
Using a cable clamp to attach a hook to a winch cable is a preferred method in many settings, especially where the load demands a robust and fail-safe connection.
- Thread the end of the cable through the clamp: This initial step involves sliding the cable end through one side of the clamp. Ensure that you have selected a cable clamp compatible with the diameter and material of your winch cable (or) Select a cable clamp that is compatible with the diameter and material of your winch cable. For steel cables, a U-bolt clamp offers a strong hold, while synthetic ropes may require a soft shackle or splicing method for optimal performance.
- Ensure the cable is not twisted and lays flat within the clamp.
- Loop it around and thread it back through the clamp: After threading the cable through, loop the end of the cable around to form a secure loop. This loop serves as the attachment point for the hook, either directly or through a connecting link. Once the loop is formed, bring the end of the cable back through the clamp, ensuring it parallels the initial part of the cable inside the clamp.
- Tighten the clamp securely: This is crucial for ensuring the cable does not slip. Use a suitable tool, like a wrench, to tighten the nuts on the U-bolt of the clamp. It’s important to tighten these nuts evenly to avoid uneven pressure on the cable, which could cause damage over time.
- Advantages of using a cable clamp:
- Quick and Effective: This method can be completed in a few minutes with the right tools, making it efficient, especially in time-sensitive situations.
- Strong, Reliable Hold: Cable clamps are designed to handle heavy loads, making them ideal for industrial applications where safety is paramount.
- Disadvantages of using a cable clamp:
- Requires Additional Hardware: You need to have cable clamps on hand, which might not always be available in all settings.
- May Not Be Suitable for All Cable Types: Some cables, especially those that are very flexible or small in diameter, might not hold as securely under heavy loads.
Method 2: Tying a Knot
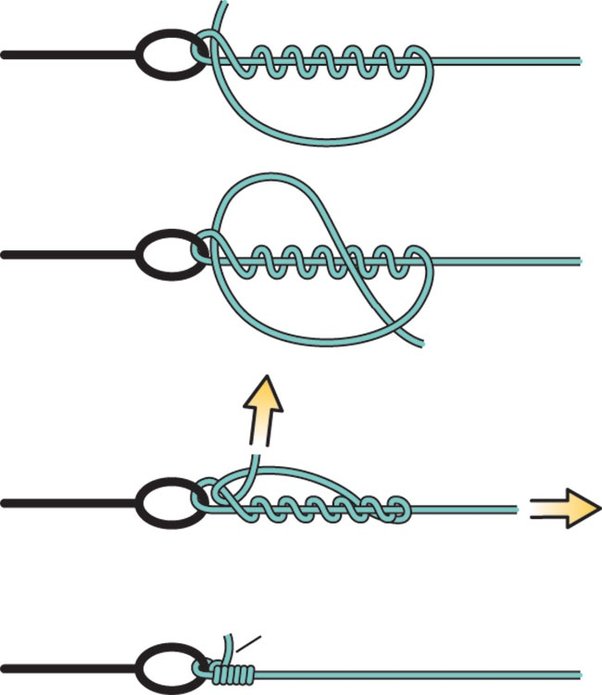
Tying a knot is an alternative method that can be used when you don’t have cable clamps available, or when a semi-permanent attachment is needed.
- Best Knot: The Bowline Knot
- Why the Bowline Knot?: This knot is known for its robustness and its ability to maintain strength under load. It is easy to tie and untie, even after being subjected to a heavy load, which makes it a favorite in both maritime and climbing applications.
- Step-by-Step Instructions:
- Form a small loop in the standing part of the rope: This loop acts as the base of the knot.
- Pass the end of the rope up through the loop: This creates the initial ‘lock’ on the knot.
- Wrap the end around the standing part and back down through the loop: This completes the knot, making it ready to tighten.
- Tighten securely: Pull on both the end and the standing part of the cable to cinch the knot tight. This ensures the load is distributed evenly across the knot, reducing the risk of slippage.
For synthetic ropes, the figure-eight loop knot is an excellent alternative to the bowline knot. This knot maintains more of the rope’s original strength, making it ideal for dynamic load situations. It is also easier to inspect for security under load, ensuring reliability in critical applications.
- Advantages of tying a knot:
- No Additional Materials Needed: This method does not require any additional tools or hardware.
- Highly Secure in Dynamic Load Situations: The bowline knot tightens under load but is easy to untie when no longer needed.
- Disadvantages of tying a knot:
- Requires Skill to Tie Correctly: Incorrectly tied knots can significantly weaken the system.
- Can Be Difficult to Untie After Heavy Use: While the bowline is easier to untie than many knots, it can still become very tight and difficult to loosen after being loaded.
Both methods provide reliable ways to attach a hook to a winch cable, each with its own set of advantages and appropriate applications.
Choosing the right method depends on the specific requirements of the task, available materials, and the operator’s skill in handling winch equipment.
If you’re looking for winches designed for easy hook attachment, check out our top recommendations.
Test the Connection
Before using the winch, testing the connection is imperative:
- How to Test:
- Pull gently on the hook to ensure it holds under light stress.
- Increase load gradually to test under more realistic conditions.
- Signs of a Secure and Stable Attachment:
- No slippage at the connection point.
- Uniform tension distribution along the cable.
For synthetic winch ropes, inspect the connection under light load first and look for any signs of slippage or weakening of the rope fibers. Regular testing is critical for maintaining safety, especially when switching between synthetic and steel cables.
Maintenance and Safety Tips
Regular maintenance and adherence to safety guidelines are essential:
- Regular Inspection: Check the cable and hook before each use for signs of wear or damage.
- For synthetic ropes, store them in a dry, UV-protected space to prevent degradation. Steel cables should be cleaned and lubricated periodically to prevent rust and wear. Always replace any damaged components immediately to avoid accidents.
- Proper Storage: Coil the cable neatly without kinks or knots to prevent damage.
- Safety Precautions: Always wear gloves and protective gear, and ensure bystanders are clear of the load path.
Conclusion
Properly attaching a hook to a winch cable is critical for safety and operational efficiency.
By following the detailed steps and safety tips provided, users can ensure that their equipment operates safely and effectively.
Always prioritize safety and perform regular checks to keep your equipment in top condition.
