Wiring a winch means connecting heavy-duty cables to your vehicle’s battery, installing a switch or remote, and securing the wires away from heat and sharp edges. Always use thick-gauge wire, tighten connections fully, and test the system without a load before real use.
Quick Answer
How to wire a winch?
Follow these steps:
- Choose the Right Cables: Use heavy-gauge wires rated for your winch’s maximum amp draw and total cable length.
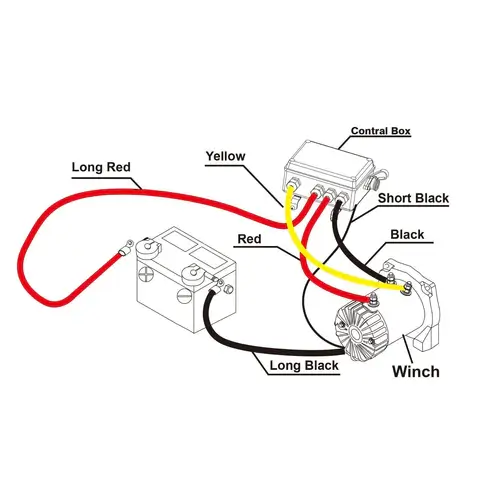
- Connect to the Battery: Positive (red) to the battery’s + terminal, negative (black) to the − terminal. Clean, tight connections are essential.
- Install the Switch: Mount a toggle or remote switch in a safe, accessible location. Connect it to the winch control box using insulated wiring.
- Secure the Wiring: Route cables away from moving parts, heat, or sharp edges. Use zip ties and abrasion sleeves for protection.
- Test the System: Run the winch with no load to confirm proper winding and direction. Listen for any unusual sounds or delays.
Understanding Winch Wiring Basics
The core of winch wiring lies in the electric motor, which powers the drum to wind or unwind the cable. This mechanism is critical for ensuring smooth and efficient operation during recovery tasks.
When you activate the winch, the electric motor kicks into gear, turning the drum. The direction in which the drum spins (clockwise or counterclockwise) determines whether the rope is being wound up or released.
When wiring a winch, it’s important to prioritize safe winch installation practices, such as ensuring cables are abrasion-resistant and compatible with high-load currents. This not only extends the lifespan of your winch system but also enhances safety during operations.
This simple yet powerful mechanism is essential for various tasks, from pulling vehicles out of mud to hoisting heavy objects. If you want easy installation without complicated wiring, explore our best winches for simple wiring setups — perfect for DIY enthusiasts and quick recovery gear installs.
Recovery systems wiring plays a crucial role in optimizing this mechanism for tasks that demand reliable and safe operation.
Key Components of Winch Wiring
Power Source: The most common power source for a winch is the vehicle’s battery. It’s crucial that the battery has enough capacity to handle the winch’s power demands without affecting the vehicle’s normal operations. In some cases, especially with heavy-duty winches, a separate battery might be required to ensure adequate power supply.
Heavy-Duty Wires: Given the significant power draw of a winch, it’s imperative to use heavy-gauge wires. These wires are designed to handle high currents without overheating or degrading.
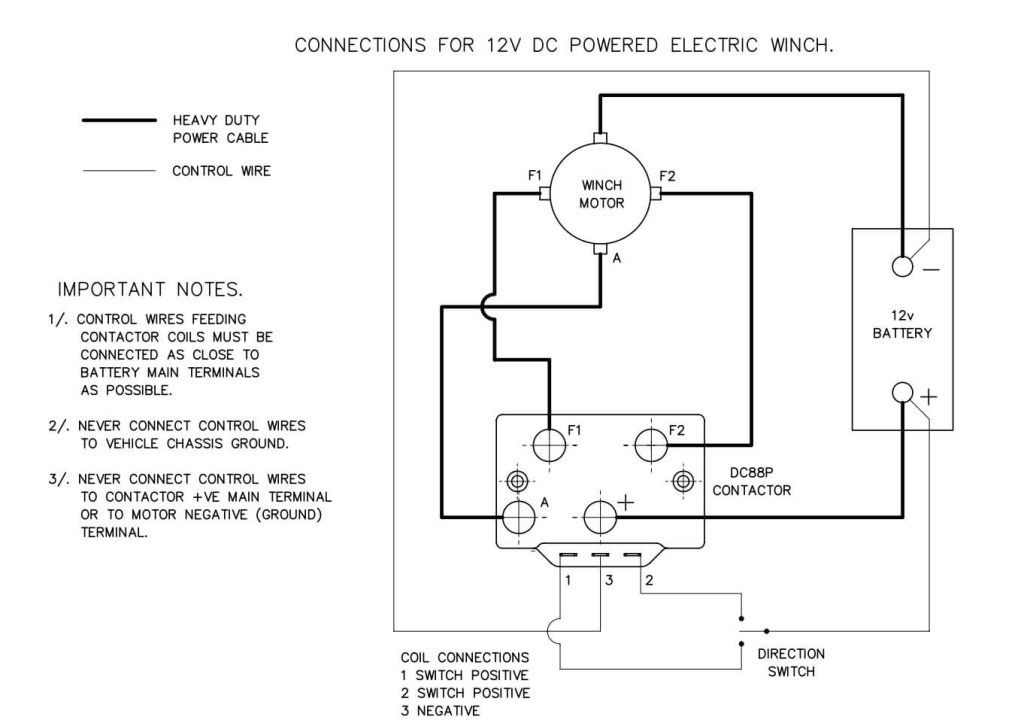
In addition, solenoid switches and manual safety mechanisms provide an extra layer of control and protection during high-load operations, ensuring optimal performance and minimizing risks in off-road recovery scenarios.
The thickness of the wire, often referred to as the gauge, should be chosen based on the amperage draw of the winch and the length of the wire run. Longer wire runs typically require thicker wires to minimize voltage drop.
Control Mechanism: This is what you use to operate the winch. It can be a remote control, which allows operation from a distance, adding a layer of safety, or a manual switch, which might be mounted inside the vehicle or directly on the winch itself.
The control mechanism is connected to both the power source and the winch motor and is responsible for controlling the direction and speed of the drum’s rotation.
Using a quick disconnect system enhances safety and allows for modular wiring setups, particularly for off-road vehicle recovery systems. This system is especially beneficial for users who frequently move their winch between vehicles or setups.
Safety Considerations in Winch Wiring
- Proper Installation: Incorrect installation can lead to short circuits, overheating, and even fires. Following the manufacturer’s guidelines for wiring is crucial.
- Ensure all connections are waterproof and weatherproof, especially when exposed to off-road elements, to prevent electrical short circuits. This is a critical step in providing environmental protection for electrical components and maintaining safe electrical setups in challenging terrains.
- Regular Inspections: Regularly check the connections and the condition of the wires for any signs of wear, corrosion, or damage. This is especially important in off-road vehicles where the winch wiring can be subjected to harsh conditions.
- Correct Usage: Using a winch for purposes beyond its rated capacity can put undue strain on the wiring and motor. Always adhere to the manufacturer’s specifications for load capacity to ensure safe electrical setups and reliable performance.
Tools and Materials Needed for Winch Wiring
When it comes to wiring a winch, having the right tools and materials is crucial for a successful and safe installation. This section breaks down the essential tools and materials you’ll need and explains why each is important.
Essential Tools
- Wire Strippers: These are used to remove the insulation from the ends of the electrical cables without damaging the wire itself. Precision is key in this step, as poorly stripped wires can lead to weak connections or short circuits.
- Crimping Tools: After stripping the wires, you’ll need to attach connectors. Crimping tools are designed to securely fasten the metal connectors to the stripped wire ends. A good crimping tool ensures that the connection is strong, stable, and has good electrical conductivity.
- Screwdrivers: Various screwdrivers (both flat-head and Phillips) are required for loosening and tightening the connections in the winch and the control mechanism. It’s important to have a set of screwdrivers of different sizes to fit various screws that you might encounter during the installation process.
Necessary Materials
- Heavy-Duty Electrical Cables: The cable needs to be capable of handling the high current that a winch draws. The gauge (thickness) of the cable should be appropriate for the amperage draw of your winch and the length of the cable run. Using under-gauged cable can result in overheating and potentially cause a fire hazard.
- Select heavy-duty electrical cables specifically rated for vehicle recovery applications to handle peak amperage during winch operation. This ensures optimal performance and reduces the risk of overheating, even under extreme load conditions.
- Suitable Connectors: Connectors are used to join the wires securely to the winch, the power source, and the control mechanism. They need to be of high quality to ensure a stable connection and minimize resistance. The choice of connectors may vary depending on the winch model and the type of wiring setup.
- Reliable Winch Wiring Kit: Many winch models come with a wiring kit that includes appropriately gauged cables and connectors specifically designed for that model. These kits take the guesswork out of selecting the right materials and ensure compatibility with your winch.
Quality and Compatibility
- High-Quality Materials: It’s imperative to use high-quality wires and connectors. Low-quality materials not only pose a safety risk but can also affect the performance of your winch. They might wear out faster or fail under the heavy electrical load during winch operation.
- Compatibility: Ensure that all materials and tools are compatible with your specific winch model. Incompatibility can lead to inefficient operation or damage to the winch. If in doubt, consult the winch’s user manual or contact the manufacturer for recommendations.
Step-by-Step Guide to Wiring a Winch
Wiring a winch correctly is essential for its safe and efficient operation. Below is a detailed guide on how to wire a winch, focusing on each critical step of the process.
1. Connecting to Power Source
- Choosing the Right Wires: Start by selecting heavy-gauge wires that are capable of handling the winch’s current without overheating. The gauge required will depend on your winch’s specifications and the distance between the winch and the power source (usually the vehicle’s battery).
- Making the Connection: Begin by disconnecting the vehicle’s battery to prevent any electrical hazards. Connect one end of the wire to the positive terminal of the winch and the other end to the positive terminal of the battery. Do the same for the negative terminals. It’s crucial to ensure that the connections are clean and free from corrosion for optimal conductivity.
2. Routing the Wires
- Planning the Route: Before securing the wires in place, plan the route from the battery to the winch. The route should be as direct as possible while avoiding areas that can damage the wire, such as sharp edges or high-heat components of the vehicle.
- Securing the Wires: Once the route is planned, secure the wires along the route using cable ties or clamps. Make sure the wires are not loose but also not overly tensioned, as this could lead to wear or damage over time.
3. Installing the Control Switch
- Choosing the Location: The control switch or remote should be installed where it is easily accessible. For a dashboard switch, choose a spot that is within easy reach but out of the way of regular vehicle controls. For a remote control, ensure it can be securely stored when not in use.
- Wiring the Switch: Connect the control switch to the winch’s control box. This typically involves connecting a few wires from the control box to the switch, following the manufacturer’s wiring diagram. Ensure that the wires are properly insulated and secured.
4. Securing Connections
- Checking the Connections: Once everything is connected, it’s important to double-check all connections. Make sure they are tight and secure. Loose connections can not only impair the performance of the winch but also present a significant safety risk.
- Protecting the Connections: Use electrical tape or heat shrink tubing to protect and insulate the connections. This helps prevent corrosion and short circuits, especially if the connections are exposed to the elements.
Following these steps carefully will ensure that your winch is wired safely and efficiently. Remember, the key to a successful installation is not just in following the steps but in understanding the purpose behind each connection.
This ensures not only a functioning winch but also a safe one. Always refer to your winch’s manual for specific instructions and safety warnings. If you’re not confident in your ability to wire the winch safely, don’t hesitate to seek professional help.
How to Wire a Winch to a Trailer Plug
Wiring a winch to a trailer plug is a practical solution for those requiring flexibility and portability in their winch setup.
This approach is particularly beneficial for individuals who use winches across multiple trailers or need a mobile winching system.
This method is ideal for users needing flexibility in their recovery systems wiring, offering a mobile solution that is both safe and efficient.
By incorporating a quick disconnect system, users can achieve modular winch wiring and simplify transitions between vehicles or setups. This setup supports portable winch setups while ensuring safe and reliable operation under varying conditions.
The process primarily involves integrating a quick disconnect system, ensuring a stable and secure connection that can be easily managed.
Understanding the Quick Disconnect System
- What is a Quick Disconnect? A quick disconnect system consists of a set of connectors that allow for easy, tool-free connection and disconnection of electrical cables. This system is particularly useful in applications where the winch needs to be moved or removed frequently.
- Advantages: The primary benefit is the convenience it offers. It enables the winch to be connected to or disconnected from the power source (in this case, the trailer plug) quickly and safely, without the need for intricate rewiring each time.
Steps for Wiring a Winch to a Trailer Plug
- Selecting the Right Connectors: Choose a quick disconnect connector that is compatible with the trailer plug and capable of handling the winch’s electrical load. Ensure that both the male and female parts of the connector are of high quality and rated for outdoor use.
- Preparing the Winch and Trailer Wiring:
- On the winch side, attach one part of the quick disconnect system to the end of the winch’s power and ground cables. This usually involves crimping or soldering the connectors onto the wire and then sealing them with heat shrink tubing for protection.
- On the trailer side, the other part of the quick disconnect system needs to be wired to the trailer plug. This might require extending the existing wiring from the trailer plug to a more accessible location for the winch.
- Ensuring Proper Polarity: When wiring the connectors, it’s crucial to maintain proper polarity. The positive wire (usually red) should connect to the positive terminal, and the negative wire (usually black) to the negative terminal. This is important to prevent electrical issues and potential damage to the winch.
- Testing the Setup: Once the wiring is complete, test the connection by connecting the winch to the trailer plug via the quick disconnect system. Operate the winch to ensure that it functions correctly and that the connection is stable.
Additional Considerations
- Weatherproofing: Since the setup will likely be exposed to outdoor elements, ensure all connections and exposed wires are well-protected against moisture and dirt. Use weatherproof connectors and coverings where necessary.
- Cable Management: Properly manage the cables to avoid damage during transit. This includes securing loose cables and ensuring they don’t interfere with the movement of the trailer or the operation of the winch.
Wiring a Winch with a Toggle Switch
Integrating a toggle switch into your winch’s wiring system provides a more direct and accessible means of control.
This setup is particularly advantageous for operating the winch from within your vehicle, enhancing both convenience and safety.
Below is a detailed explanation of how to wire a winch with a toggle switch, focusing on achieving both forward and reverse operations.
Understanding Toggle Switches
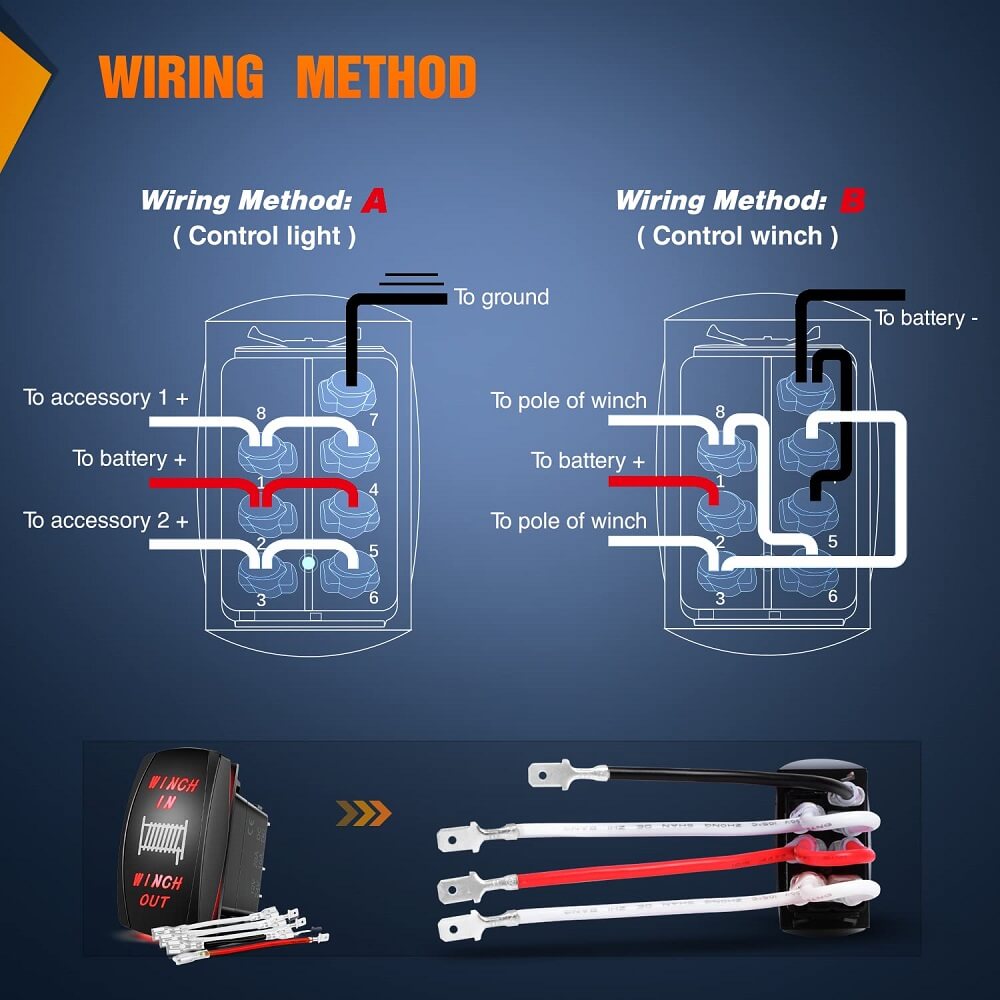
- What is a Toggle Switch? A toggle switch is a type of electrical switch characterized by a lever or handle that can be toggled between two positions. In the context of winch wiring, these two positions typically correspond to winding and unwinding the cable.
- Types of Toggle Switches: For winch operation, a double-pole, double-throw (DPDT) switch is often used. This type of switch allows you to control both the direction (forward or reverse) and the on/off state of the winch motor.
Steps for Wiring the Toggle Switch
- Selecting the Right Switch: Ensure the toggle switch you choose can handle the current draw of your winch. It should be rated for both the voltage and amperage of your winch system.
- Preparing the Wiring:
- Identify the power (positive) and ground (negative) wires of your winch.
- You will also need additional wires to connect the switch to the winch and the power source. The gauge of these wires should be compatible with the winch’s power requirements.
- Connecting the Toggle Switch:
- Power Source to Switch: Connect the positive wire from the power source (battery) to the center terminal of the switch. This wire will provide power to the switch.
- Switch to Winch: Connect one set of terminals on the switch to the corresponding terminals on the winch. These connections will control the winding direction of the winch.
- Ground Connection: The negative (ground) wire from the winch should be connected directly to the negative terminal of the power source.
- Ensuring Polarity for Directional Control:
- The toggle switch needs to be wired in such a way that flipping it one way sends power to the winch motor for winding, and flipping it the other way reverses the polarity, allowing for unwinding.
- This is typically achieved by cross-connecting the terminals on the switch so that changing the switch position changes the direction of the current flow to the winch motor.
- Testing the Setup:
- After all connections are made, test the winch operation.
- Ensure that flipping the switch in one direction operates the winch to wind the cable and flipping it in the opposite direction unwinds the cable.
Additional Considerations
- Safety First: Always disconnect the power source before starting any wiring work to avoid electrical hazards.
- Secure Mounting: The toggle switch should be securely mounted in a location that is easily accessible but not prone to accidental activation.
- Waterproofing: If the switch is exposed to the elements or mounted outside the vehicle, use a waterproof switch or provide a waterproof cover to prevent moisture ingress.
Bonus Tip: Label your wires! This will save you time and frustration during future maintenance or troubleshooting.
Testing and Troubleshooting a Newly Installed Winch
After you’ve installed a winch, whether it’s wired directly to a battery, to a trailer plug, or through a toggle switch, it’s vital to conduct thorough testing and troubleshooting to ensure everything is working correctly.
This process is crucial for verifying the functionality and safety of the winch.
Here’s a detailed look at how to effectively test and troubleshoot your winch setup.
Testing the Winch
- No-Load Test:
- Purpose: This initial test is to check the basic functionality of the winch without any strain on the system.
- Process: Activate the winch using its control mechanism (remote control, switch, etc.) to wind and unwind the cable. Observe if the winch operates smoothly in both directions. Listen for any unusual noises that might indicate a problem.
- Light Load Test:
- Purpose: After the no-load test, a light load test helps to check the winch under working conditions.
- Process: Attach a light load (significantly under the winch’s maximum capacity) to the cable. Operate the winch to lift or pull the load. Monitor the winch’s performance, ensuring it can handle the load without any issues, such as overheating, stalling, or erratic movement.
Troubleshooting the Winch
- Check All Connections:
- Inspect all electrical connections, ensuring they are tight and secure. Loose connections can cause intermittent operation or no operation at all.
- Check for any signs of corrosion or damage to the connectors and cables. Corroded or damaged connections can impede electrical flow and affect the winch’s performance.
- Ensure Sufficient Power Source:
- Verify that the battery or power source is in good condition and has enough capacity to operate the winch. A weak or undercharged battery can lead to poor winch performance.
- Check the voltage at the winch’s power input while operating to ensure it’s receiving sufficient power.
- Inspect the Winch Motor and Solenoid:
- The motor should operate smoothly without excessive noise or heat. Overheating or strange noises can indicate internal problems.
- A good solenoid is responsible for directing current to the winch motor. If the winch is not responding correctly to the controls, the solenoid may be faulty or improperly wired.
- Check the Control Mechanism:
- If using a remote control, ensure it’s functioning correctly and that the signal is not being obstructed.
- For toggle switches or dashboard controls, confirm they are wired correctly and functioning as intended.
- Assess Mechanical Components:
- Inspect the winch drum, cable, and hook for any signs of damage or wear. A frayed cable or damaged drum can be a significant safety hazard.
Conclusion
Ready to tackle those tough recoveries with confidence? Now that you’re equipped with the knowledge of how to wire a winch safely and effectively, it’s time to put those skills to the test and unleash your winch’s power!
Remember these key takeaways:
- Safety First: Always prioritize safety by disconnecting the battery, wearing protective gear, and following manufacturer’s guidelines.
- Choose Your Wiring Method: Select the wiring setup that best suits your needs and preferences, whether it’s a trailer plug for convenience, a toggle switch for manual control, or a remote control for added safety.
- Consult the Manual: Your winch’s manual is your trusted guide, providing specific instructions and diagrams for your particular model.
- Double-Check Connections: Ensure all wires are tightly connected and have the correct polarity to avoid malfunctions and potential hazards.
- Test Thoroughly: Once the wiring is complete, test your winch in a safe environment to verify its functionality and identify any issues before heading out on the trails.
Troubleshooting Common Winch Wiring Problems
Even with proper installation, winch wiring issues can arise, especially under challenging conditions. Below are some of the most common problems and their solutions to ensure your winch remains reliable:
1. Problem: Voltage Drops
- Cause: This often occurs when wires are too long or under-gauged, leading to resistance and reduced power.
- Solution: Use heavy-gauge cables rated for the winch’s peak amperage and minimize wire length. Ensure all connections are clean and tight to reduce resistance.
2. Problem: Overheating Wires
- Cause: Excessive current draw or undersized wires can lead to overheating during operation.
- Solution: Upgrade to thicker, heat-resistant cables and avoid running the winch continuously for extended periods. Allow the winch to cool between heavy pulls.
3. Problem: Intermittent Power Loss
- Cause: Loose or corroded connections can result in inconsistent power delivery.
- Solution: Inspect and tighten all terminals, and use dielectric grease to protect connections from moisture and corrosion. Regularly check connections exposed to off-road elements.
4. Problem: Winch Motor Doesn’t Engage
- Cause: This could result from a faulty solenoid, damaged control switch, or an incomplete circuit.
- Solution: Test the solenoid using a multimeter to ensure proper operation. Replace damaged components and check the wiring diagram to verify correct installation.
5. Problem: Battery Draining Quickly
- Cause: A parasitic draw from improperly installed wiring or a short circuit in the system.
- Solution: Install a power cutoff switch to disconnect the winch when not in use. Check for frayed wires or exposed terminals that may be causing a short circuit.
6. Problem: Winch Operates in One Direction Only
- Cause: The control switch or toggle wiring may be misconfigured or damaged.
- Solution: Verify the wiring to the toggle switch, ensuring it is correctly connected for forward and reverse operation. Replace the switch if necessary.
7. Problem: Frequent Fuse or Circuit Breaker Trips
- Cause: This is usually caused by an overloaded circuit or an undersized fuse.
- Solution: Confirm that the fuse or circuit breaker rating matches the winch’s peak current draw. Upgrade components if necessary, and ensure the winch is not overloaded.
Preventive Maintenance Tips:
- Inspect Regularly: Check all wiring for signs of wear, abrasion, or exposure to heat sources.
- Keep Connections Clean: Use corrosion-resistant materials and weatherproof your connections.
- Follow Manufacturer Guidelines: Adhering to recommended practices ensures the longevity of your winch system.
- Seek Professional Help If Needed: Don’t hesitate to seek assistance from a qualified mechanic or electrician if you have any doubts or encounter challenges during the wiring process.
