Installing a winch on your truck ensures reliable recovery when off-roading or hauling. This guide explains how to safely wire a winch to your truck battery using a step-by-step method recognized for safety, durability, and compatibility with most winch brands.
What You’ll Need:
Wrench set, drill (optional), protective gloves
Winch with complete wiring kit
Heavy gauge wires (per manufacturer’s recommendation)
Circuit breaker or inline fuse (sized for your winch)
Ring terminals, zip ties, and cable loom
What is the Best Way to Wire a Winch to Your Truck?
The best way to wire a winch to your truck involves mounting it securely, connecting heavy-gauge power cables to the battery, installing a solenoid, and ensuring proper grounding. This step-by-step guide covers the entire process.
Tools and Materials Needed
List of Essential Tools
To successfully install a winch, you’ll need a DIY winch installation toolkit or a winch wiring toolkit.
This includes:
- Socket set
- Wire cutters and strippers
- Crimping tool
- Screwdrivers
- Multimeter
Required Wiring and Connectors
Having the right wiring and connectors is crucial:
- Heavy-gauge power cables
- Ring terminals
- Heat shrink tubing
- Electrical tape
Safety Equipment
Essential Safety Gear for Winch Wiring
- Safety glasses
- Insulated gloves
- Fire extinguisher
Also check: Top 5 Truck Winch
Preparing Your Truck for Winch Installation
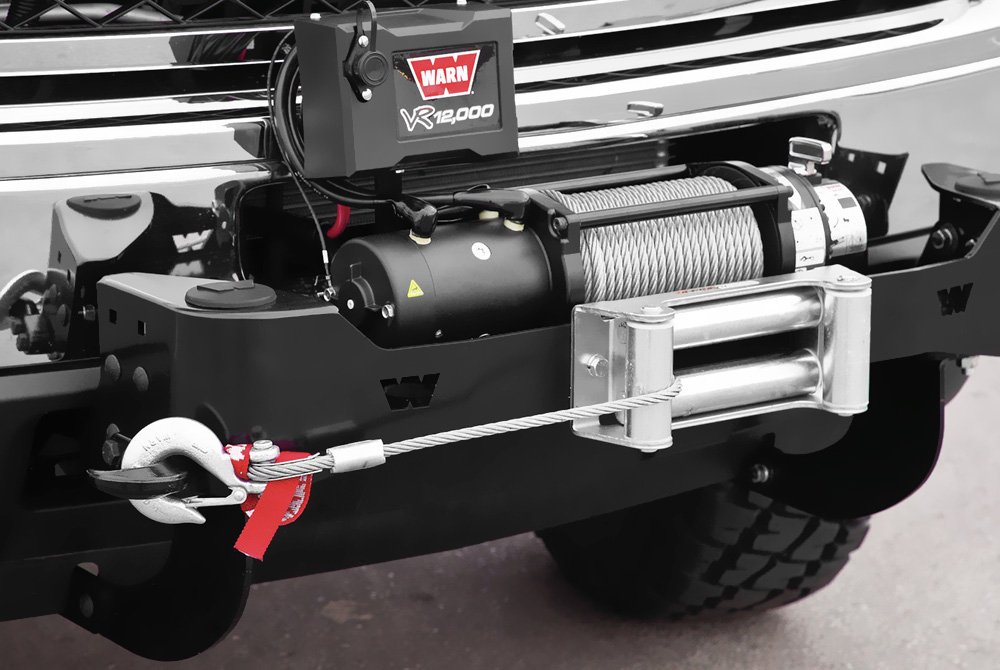
Choosing the Right Location for the Winch: Mount the winch in a location that offers easy access and ensures the cable can spool out without obstruction.
The front bumper is a common choice, but ensure it’s structurally capable of supporting the winch.
Installing a Winch Mounting Plate (If Necessary): If your truck doesn’t have a mounting plate, you’ll need to install one. This plate should be bolted securely to the frame to handle the stress of winching operations.
How to Safely Wire a Winch to Your Truck Battery: Step-by-Step Wiring Process
Wiring a winch to your truck involves several detailed steps to ensure everything works correctly and safely. Let’s go through each step in more detail.
Disconnecting the Battery
Safety is paramount when working with your truck’s electrical system. Begin by disconnecting the battery to prevent any accidental shorts or shocks. Here’s how you do it:
- Locate the Battery: Open your truck’s hood and find the battery.
- Disconnect the Negative Terminal: Using a wrench, loosen the nut on the negative terminal (usually marked with a minus sign and often black). Lift the terminal off the battery post and tuck it away to avoid accidental contact.
- Disconnect the Positive Terminal: Repeat the process with the positive terminal (marked with a plus sign and usually red). This step ensures there’s no power running through your truck’s electrical system while you work.
Routing the Power Cables
Power cables carry the electrical current from your battery to the winch. Proper routing ensures safety and efficiency:
- Choose the Right Path: Plan the best route for routing winch power cables to the battery, ensuring cables avoid hot or moving engine parts. This usually involves running the cables along the truck’s frame.
- Use Cable Ties: Secure the cables with cable ties at regular intervals. This keeps them in place and prevents them from getting snagged or worn out.
- Protect the Cables: Use protective sleeves or conduit if the cables pass through areas with sharp edges or high heat. This prevents abrasion and potential damage.
Installing the Solenoid
Where Should You Install the Winch Solenoid?
Install the winch solenoid close to the battery or winch, in a dry, secure spot protected from elements and physical damage.
The solenoid is a crucial component that acts as a high-power switch between the battery and the winch motor:
- Select a Location: Find a dry, secure spot close to the battery or the winch. It should be accessible but protected from elements and physical damage.
- Mount the Solenoid: Use the provided mounting hardware to secure the solenoid. Ensure it’s firmly attached and doesn’t move.
Connecting the Winch to the Solenoid
Proper connections ensure the winch operates safely and efficiently:
- Identify Terminals: The solenoid has several terminals. Typically, there are terminals for the battery connection, winch motor connection, and control switch wires.
- Attach Power Cables: Connect the power cable from the winch to the appropriate terminal on the solenoid. Tighten the connections with a wrench to ensure they are secure.
- Attach Battery Cables: Connect a heavy-gauge cable from the solenoid’s battery terminal to the positive terminal of the truck’s battery. Ensure this connection is also tight and secure.
Wiring the Control Switch
The control switch allows you to operate the winch from inside the truck:
- Run Control Wires: Run winch control switch wires from the solenoid into the truck’s cab, ensuring they are routed safely through existing grommets or sealed holes. Use existing grommets or drill a small hole if necessary, but be sure to seal any new holes to prevent water ingress.
- Connect to Solenoid: Attach the control wires to the designated terminals on the solenoid. Refer to the winch’s wiring diagram to ensure correct placement.
- Mount the Switch: Install the control switch in a convenient location inside the cab, such as on the dashboard. Secure it with screws or adhesive, depending on the design.
Grounding the System
How Do You Properly Ground a Winch?
To properly ground a winch, connect the ground wire from the winch to a clean, metal surface on the truck’s chassis near the winch location.
A proper ground connection is essential for the electrical system to function correctly:
- Select a Ground Point: Choose a solid, clean metal surface on the truck’s chassis. It should be close to the winch for the best performance.
- Clean the Surface: Use sandpaper or a wire brush to remove any paint, rust, or dirt from the grounding point. A clean surface ensures a good electrical connection.
- Attach the Ground Wire: Connect the ground wire from the winch to the cleaned surface using a bolt or screw. Ensure the connection is tight and secure to prevent it from loosening over time.
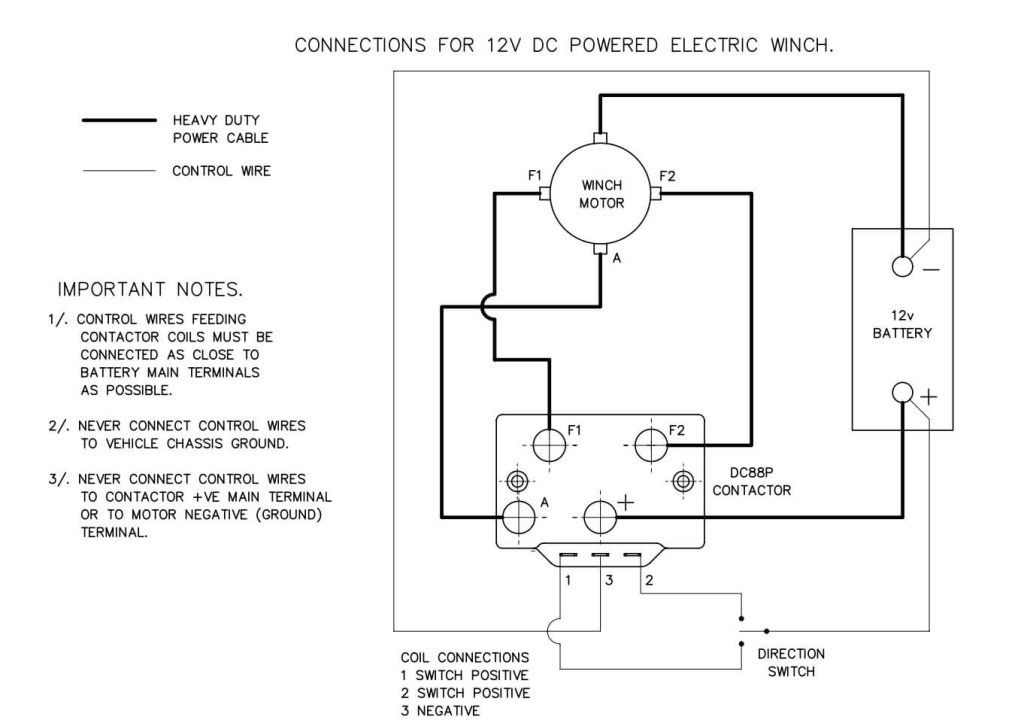
Understanding and Following Wiring Diagrams
When wiring a winch to your truck, understanding and following the wiring diagrams is crucial. These diagrams provide a visual representation of the electrical connections needed for proper installation and operation.
Interpreting Winch Wiring Diagrams
Winch wiring diagrams can initially seem overwhelming, but breaking them down step-by-step makes them manageable. Here’s how to interpret them effectively:
Identify Key Components: Most wiring diagrams will label the key components, such as the winch motor, solenoid, battery, and control switch. Familiarize yourself with these parts on the diagram.
Follow the Power Path: Trace the power flow from the battery to the winch motor. Typically, the positive cable runs from the battery to the solenoid and then from the solenoid to the winch motor. This path shows how electricity travels to power the winch.
Understand Control Switch Wiring: The control switch, often located inside the truck’s cab, operates the solenoid. The diagram will show the control switch connected to the solenoid with thin wires. These connections allow you to activate the winch from the driver’s seat.
Locate the Ground Connections: Ground connections are essential for completing the electrical circuit. The diagram will show the ground cable running from the winch motor to the truck’s chassis. Ensure the grounding point is a clean, bare metal surface for a solid connection.
Pay Attention to Wire Colors and Labels: Diagrams usually use different colors or labels for each wire to avoid confusion. Match the wire colors and labels in the diagram with the actual wires you have to ensure accurate connections.
Check for Additional Components: Some diagrams may include additional components like fuses, circuit breakers, or relays. These parts protect the electrical system from overloads and short circuits. Ensure you understand their placement and connection as shown in the diagram.
Common Wiring Configurations
While each winch model may have specific wiring instructions, most follow similar configurations. Here are the common wiring setups:
Basic 12V Winch Wiring:
- Positive Cable: Runs from the battery’s positive terminal to the solenoid’s input terminal. From the solenoid’s output terminal, another positive cable connects to the winch motor’s positive terminal.
- Negative Cable: Connects the winch motor’s negative terminal directly to the battery’s negative terminal or a grounding point on the chassis.
- Control Switch Wires: Two wires from the control switch connect to the solenoid. These wires control the solenoid’s operation, allowing you to engage or disengage the winch motor.
24V Winch Wiring (for more powerful winches):
- Positive Cables: Similar to the 12V setup but using two 12V batteries connected in series to create a 24V system. The first battery’s positive terminal connects to the solenoid’s input, and the second battery’s positive terminal connects to the winch motor.
- Negative Cables: The first battery’s negative terminal connects to the second battery’s positive terminal. The second battery’s negative terminal connects to the winch motor’s negative terminal or the chassis ground.
- Control Switch Wires: As with the 12V setup, these wires run from the control switch to the solenoid.
Hydraulic Winch Wiring (less common but useful for heavy-duty applications):
- Power Source: Hydraulic winches do not connect to the battery for power. Instead, they connect to the truck’s hydraulic system.
- Control Switch: The control switch wires connect to a solenoid that operates the hydraulic valve, allowing you to control the winch.
Testing the Winch Installation
Once you’ve finished wiring your winch, it’s time to test it to ensure everything is working correctly.
- Reconnect the Battery: First, reconnect the battery terminals. Start with the positive terminal, followed by the negative terminal. Make sure both connections are tight.
- Power Up the Winch: Turn on the winch by using the control switch. Listen for the sound of the winch motor starting up. It should operate smoothly without any strange noises like grinding or clicking.
Checklist for Testing Your Winch Installation
- Reconnect the battery terminals.
- Power on the winch using the control switch.
- Test with a small load (e.g., a log).
- Ensure smooth cable spooling and motor operation.
Checking for Proper Operation
After the initial power-up, you need to test the winch with a small load to confirm it’s working correctly.
- Select a Test Load: Choose a light object to pull, like a small log or a bundle of firewood. This helps you avoid overloading the winch during the test.
- Engage the Winch: Use the control switch to start pulling the load. Observe how the winch cable winds onto the drum and ensure the control switch responds correctly.
- Monitor Performance: The winch should pull the load smoothly and steadily. If you notice any jerking or hesitation, there may be an issue with the wiring or connections.
Troubleshooting Common Wiring Issues
If your winch fails to operate, troubleshoot common winch wiring issues, such as loose connections, damaged cables, or solenoid malfunctions.
Identifying and Resolving Electrical Problems
- Check Connections: Inspect all the electrical connections you made during the installation. Ensure they are tight and free of corrosion. Loose or corroded connections can prevent the winch from working properly.
- Use a Multimeter: A multimeter helps you check for continuity and voltage in the wires. Measure the voltage at the winch motor and solenoid to ensure they are receiving power from the battery.
- Inspect Cables: Look for any signs of damage or wear on the power cables. Damaged cables can lead to poor performance or complete failure.
When to Seek Professional Help
If you’ve checked all connections and cables but the winch still doesn’t work, it might be time to call in a professional.
- Persistent Issues: If you encounter problems that you can’t resolve, such as persistent electrical issues or malfunctioning components, seek professional assistance.
- Safety Concerns: If you’re unsure about any step of the installation or troubleshooting process, consulting a professional can prevent damage to your truck or winch and ensure your safety.
Upgrading Your Truck’s Electrical System
When to Consider a Dual Battery Setup
Using a winch frequently or for heavy loads can drain your truck’s battery quickly. To avoid being stranded with a dead battery, you might consider a dual battery setup.
This setup involves installing a second battery dedicated to powering accessories like the winch. Here’s why and how you might do it:
Increased Power Supply: A dual battery setup ensures that one battery handles your truck’s primary functions, while the second battery powers the winch and other accessories. This setup provides a more reliable power source for demanding tasks.
Installation Process: Install a battery isolator to manage the charging of both batteries. This device ensures that both batteries charge properly and prevents one from draining the other.
Mount the second battery in a secure location, typically in the engine bay or a custom tray in the bed of the truck.
Installing a High-Output Alternator
A high-output alternator is another upgrade to consider if you regularly use your winch or other high-power accessories. The alternator is responsible for charging your truck’s battery and powering electrical systems while the engine is running.
Benefits of a High-Output Alternator: Standard alternators might not keep up with the power demands of a winch and other accessories. A high-output alternator can produce more current, ensuring your batteries stay charged even under heavy load.
Installation Process: Replacing the alternator involves removing the old one and installing the new high-output model.
Ensure it matches your truck’s specifications and is compatible with your existing electrical system. You may also need to upgrade the wiring to handle the increased current.
FAQs
How Do I Wire a Winch Directly to the Battery?
Connect the winch’s positive cable to the battery’s positive terminal via a solenoid. Connect the negative cable to a clean, metal surface on the truck’s chassis for proper grounding.
What Size Cable Do I Need for Winch Wiring?
Use heavy-gauge cables, typically 2 AWG or thicker, to ensure safe and efficient winch wiring. The thicker cables help handle high current loads without overheating.
Can I Use My Truck’s Existing Battery for Winch Wiring?
Yes, you can use your truck’s existing battery for light to medium-duty winching. For heavy-duty or frequent winching, consider installing an auxiliary battery to avoid draining your main battery.
Where Should I Mount the Winch Solenoid?
Mount the winch solenoid close to the battery or winch in a dry, secure location that is protected from elements and physical damage. This ensures reliable operation and minimizes wiring length.
How Do I Protect Winch Cables from Damage?
Protect winch cables by routing them away from hot engine parts or moving components. Use cable ties and protective sleeves or conduit to prevent abrasion and heat damage.
Why Is My Winch Not Working After Installation?
Check for common issues like loose connections, corroded terminals, damaged cables, or a malfunctioning solenoid. Use a multimeter to verify that power is reaching the winch motor.
Conclusion
Installing and wiring a winch to your truck can be a rewarding DIY project. By following this guide, you’ll ensure a safe and efficient setup, ready to tackle any heavy-duty task.
Regular maintenance and adhering to safety practices will keep your winch running smoothly for years to come.
