Mastering winching techniques is essential for safe and effective off-road vehicle recovery. Whether you’re stuck in mud, climbing steep terrain, or pulling another vehicle, understanding how to use your winch properly can prevent equipment damage and injuries. This guide explains key winching methods — including single-line, double-line, and angled pulls — as well as critical safety protocols and gear essentials. Learn how to assess recovery situations, select anchor points, and communicate with your team to ensure every winch operation is secure and successful.
Quick Answer: What are the basic winching techniques?
- Single-Line Pull: Connect the winch cable directly to a secure anchor. Ideal for simple recoveries.
- Double-Line Pull: Use a snatch block to double pulling strength, reducing load on the winch.
- Angle Pull: Reroute the line with a snatch block to avoid obstacles while maintaining line tension.
Essential Safety Tips:
Wear gloves, use a winch dampener, inspect cables, and stay clear of the tensioned line during operation.
Quick Answer
What are the basic winching techniques?
The basic winching techniques include:
- Single-Line Pull: Attach the winch cable directly to a stable anchor for simple and efficient recovery.
- Double-Line Pull: Use a snatch block to double the winch’s pulling power, ideal for heavier loads.
- Angle Pull: Redirect the winch cable around obstacles using a snatch block, maintaining safety and line tension.
Key Safety Tips: Always wear gloves, inspect the winch cable, maintain a safe distance, and use tree straps to protect anchor points.
Safety First

Winching, while an invaluable tool in off-roading and recovery situations, comes with its own set of risks.
To mitigate these risks, it’s crucial to adhere to safety essentials, from wearing the right gear to conducting pre-winch checks and establishing clear communication protocols.
Also, it’s important to maintain safe distance while winching.
Winch Safety FAQ
What are the essential safety steps for winching?
Essential safety steps for winching include wearing gloves to prevent rope burns, maintaining a safe distance from the winch line, inspecting the cable for damage, and ensuring clear communication during operations.
Safety Gear: Protecting Yourself and Your Equipment
1. Personal Protective Equipment (PPE):
- Gloves: Essential for protecting your hands from rope burns, cuts, and abrasions. Gloves should offer a good grip and be made of durable materials.
- Eye Protection: Flying debris or a snapping cable can cause serious eye injury. Safety glasses or goggles are a must.
- Sturdy Footwear: Proper footwear provides stability and protection. Boots with a firm grip and ankle support are recommended.
2. Reliable Straps and Shackles:
- Straps: Use high-quality, durable straps designed for winching. They should be rated for at least the weight of your vehicle.
- Shackles: Select shackles that can withstand the load. Ensure they are properly rated and free from damage or wear.
Essential Winching Equipment and Their Uses
| Equipment | Purpose | Safety Rating |
|---|---|---|
| Gloves | Hand protection | High |
| Tree Strap | Anchor point protection | High |
| Snatch Block | Increasing pulling power | High |
| D-Shackles | Securely connecting straps | High |
| Synthetic Rope | Lightweight pulling cable | High |
Pre-Winch Checks: Ensuring Equipment Readiness
1. Thorough Inspection:
- Winch and Line: Check for any signs of damage, fraying, or wear. A damaged line can be a critical failure point.
- Anchor Point: Ensure that the anchor point is secure and capable of handling the load without shifting or failing.
What should you check before winching?
Before winching, inspect the winch cable for wear, ensure the anchor point is stable, and confirm that your winch’s pulling capacity exceeds the load.
2. Understanding Winch Capacity:
- Know the Limits: Every winch has a maximum pulling capacity. Exceeding this limit can lead to equipment failure and pose a safety risk.
- Consider the Situation: The actual pulling power required can vary based on the situation, such as the weight of the vehicle and the resistance of the recovery environment.
Winch Hand Signals: Effective Communication During Recovery
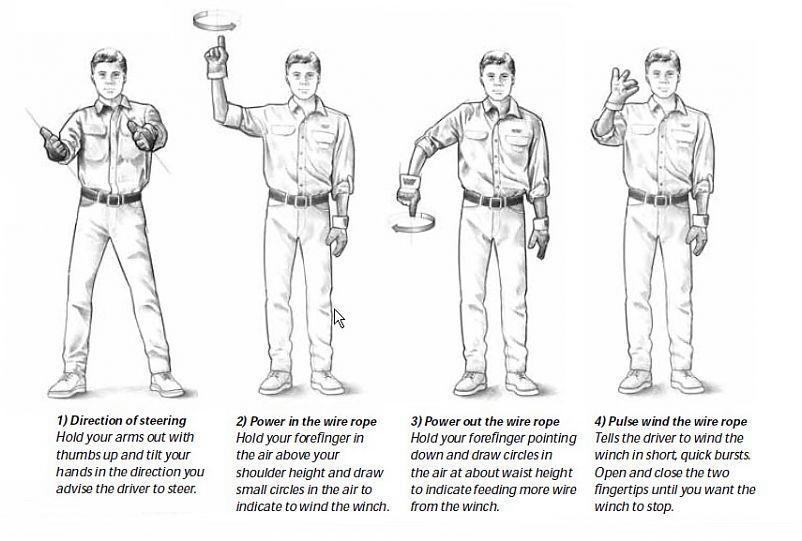
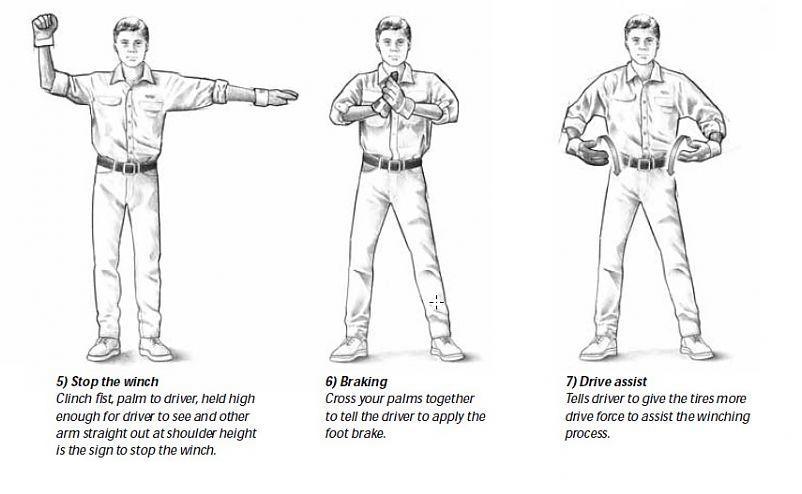
1. Establishing Clear Hand Signals:
- Importance: In noisy environments or when verbal communication isn’t possible, hand signals are vital for coordination.
- Standard Signals: Develop a set of standard signals for start, stop, increase tension, and release tension.
2. Maintaining Visibility and Eye Contact:
- Visibility: The winch operator and the signaler should always be in a position where they can see each other clearly.
- Eye Contact: This ensures that signals are seen and understood, reducing the risk of miscommunication.
Setting Up Your Winch
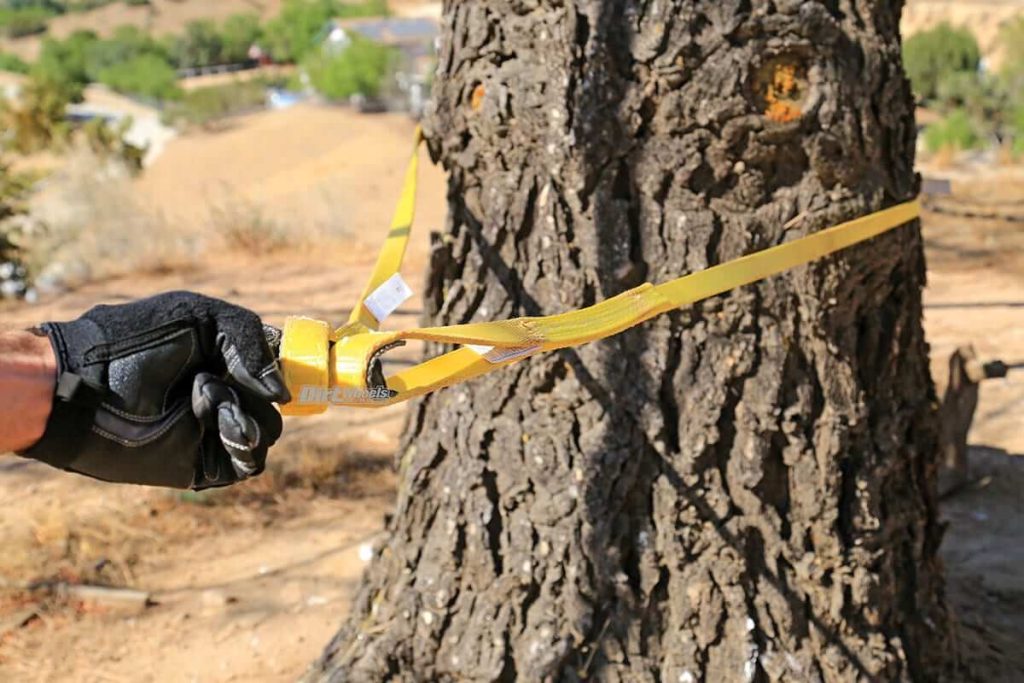
Setting up your winch correctly is crucial for a successful and safe winching operation. This involves two key steps: finding a suitable anchor point and attaching the winch cable properly.
Finding a Suitable Anchor Point
The anchor point is the foundation of your winching operation. It’s the point to which your winch cable will be attached and against which the winch will pull. The choice of anchor point is critical because if it fails, the entire winching operation can become dangerous.
- Types of Anchor Points:
- Large Tree: A common anchor point, especially in wooded areas. Look for a healthy, living tree with a thick trunk. Avoid dead or rotting trees as they can snap under pressure.
- Boulder: A large, solid rock can serve as a good anchor point. Ensure that the boulder is stable and won’t roll or shift when force is applied.
- Another Vehicle: In some situations, especially in open areas without trees or boulders, another vehicle can serve as an anchor. The vehicle should be of equal or greater weight than the one being winched and securely braked.
- Assessing the Anchor Point:
- Stability: The anchor must be immovable and stable. If there’s any doubt about its stability, find another anchor point.
- Distance: The anchor point should be as close as possible to ensure maximum pulling power, but far enough to fully extend the cable if needed.
- Alignment: Ideally, the anchor point should be in a direct line with your vehicle. Angled pulls can be less effective and more dangerous.
Attaching the Winch Cable
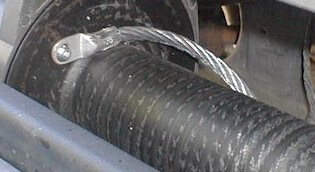
Once you’ve identified a suitable anchor point, the next step is to securely attach the winch cable.
- Unspooling the Cable:
- Carefully unspool enough cable from the winch drum to reach the anchor point. Avoid dragging the cable on the ground as this can cause wear and tear.
- Using a Tree Trunk Protector and D-shackle:
- If using a tree, wrap a tree trunk protector around it. This strap helps distribute the winch’s force around the tree, minimizing damage to the tree bark.
- Thread the end of the winch cable through the loops at the ends of the tree trunk protector.
- Attach a D-shackle through the loops. A D-shackle is a U-shaped piece of metal with a screw pin. It’s used to securely connect the winch cable to the tree trunk protector or directly to an anchor point.
- Hook the winch cable to the D-shackle. Ensure that the shackle is tightly closed and secured.
- Ensuring a Firm Connection:
- Double-check that the connection between the cable, D-shackle, and the anchor point is firm and secure. There should be no loose parts or weak links.
- The winch line should be as straight as possible to the anchor point. This ensures an even distribution of force and reduces the risk of the cable snapping or the winch being pulled sideways.
By carefully selecting a suitable anchor point and properly attaching the winch cable, you set the stage for a safe and effective winching operation. Remember, the time spent setting up correctly can save you from potential hazards and make your winching process much smoother.
How to Winch: Basic Winching Techniques
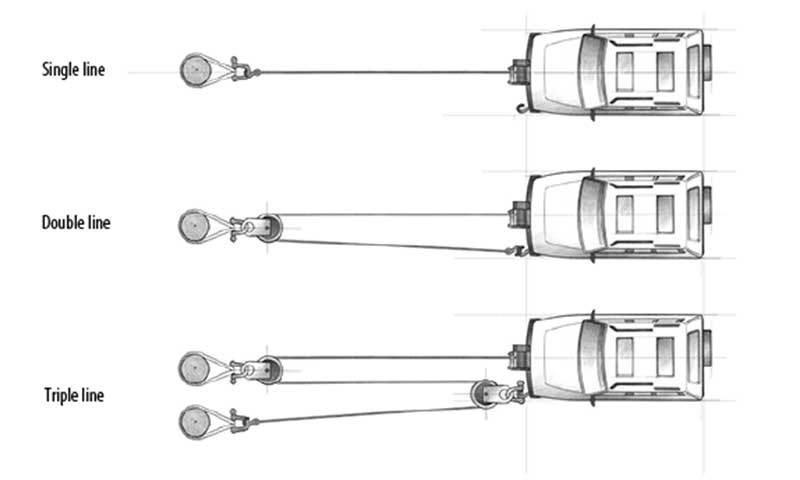
Winching is a skill that combines knowledge, precision, and safety. Understanding the basic techniques is essential for anyone involved in off-road driving or vehicle recovery. Let’s delve into the three fundamental winching techniques: the single line pull, the double line pull, and angled pulls.
Quick Definitions for Common Techniques
- Single-Line Pull: A direct pull where the winch line extends straight to the anchor point.
- Double-Line Pull: A technique using a snatch block to double the pulling force.
- Angle Pull: A setup where snatch blocks redirect the winch line around obstacles.
Direct Pull

1. Simplicity and Efficiency:
The direct pull is the most straightforward winching technique, characterized by its simplicity and efficiency. It involves a linear pull, where the winch line extends directly from the winch to the anchor point.
2. Secure Attachment
The key to a successful direct pull lies in securely attaching the winch line. This means connecting one end of the line to a stable anchor point and the other to the vehicle’s designated recovery point.
The recovery point on the vehicle must be robust and capable of withstanding the forces exerted during winching.
3. Controlled Engagement:
Engaging the winch should be done slowly and steadily. This gradual engagement allows for monitoring the line tension and the movement of the vehicle.
It’s crucial to ensure that the winch line remains tight and free of slack, as this reduces the risk of snapping or sudden jolts, which can be dangerous.
Angle Pull
1. Adjusting Pull Direction:
The angle pull technique is used when a straight-line pull is not feasible due to obstacles or the positioning of the vehicle. This method involves using snatch blocks or fairleads to redirect the winch line, changing the angle of the pull.
2. Safe Line Angles:
When setting up an angle pull, it’s vital to maintain safe line angles. This means avoiding acute angles that can put excessive strain on the winch and increase the risk of line failure. The goal is to create an angle that allows for effective pulling without overloading the winch.
Double Line Pull
1. Doubling the Power:
The double line pull is a technique used to increase the winch’s pulling power. This is achieved by using a pulley or snatch block to create a double line setup. Essentially, the winch line is looped through the pulley and then back to the vehicle, effectively doubling the pulling force.
2. Correct Setup:
Setting up a double line pull requires careful attention to ensure even tension distribution on both lines. The pulley or snatch block should be securely attached to a strong anchor point. The winch line must be evenly spooled and properly aligned to prevent tangling or uneven load distribution.
Winching Techniques FAQs
What is the best winching technique for beginners?
The best winching technique for beginners is the single-line pull, as it is straightforward and involves directly attaching the winch cable to a secure anchor point.
Advanced Winching Techniques
While mastering the basics of winching empowers you to handle many situations, there are times when you might need to tap into more advanced techniques. This section explores two optional but powerful tools in your off-road toolkit: rolling recovery and tree winching.
How do you perform advanced winching techniques?
To perform advanced winching techniques like angled pulls, use snatch blocks to redirect the cable, ensuring the angle is wide enough to prevent excess strain on the equipment.
Rolling Recovery:
Imagine getting stuck in a ditch or rut where traction is simply elusive. That’s where rolling recovery shines. This technique utilizes the winch to gradually pull the vehicle onto its wheels, one at a time.
How it works:
- Secure Anchor: Anchor the winch line to a stable point beyond the obstacle, ensuring a safe line angle.
- Tire Placement: Strategically position the wheels for optimal traction. For rear-wheel drive vehicles, engage reverse gear and position the front wheels facing uphill. For front-wheel drive, engage first gear and point the front wheels downhill.
- Gentle Pull: Winch slowly and methodically, guiding the tires onto the stable ground with steering control. Avoid jerking or overloading the winch.
- Repeat and Advance: Once one wheel gains traction, repeat the process with the other. This gradual approach minimizes risk and increases success.
Key Points:
- Proper tire placement: This is crucial for maximizing traction and minimizing wheel spin.
- Controlled winching: Patience and smooth operation are essential to avoid yanking the vehicle or exceeding the winch’s capacity.
- Steering control: Actively guide the tires onto stable ground throughout the recovery process.
Tree Winching
Sometimes, a sturdy tree might be your only available anchor point. While convenient, tree winching demands utmost caution and proper technique to avoid damage to the tree or harm to yourself.
Safety First:
- Tree Selection: Choose a healthy, live tree with a thick trunk, free of cracks, decay, or loose branches.
- Tree Protectors: Use dedicated tree saver straps or thick blankets to prevent bark damage and distribute the pulling force safely.
- Anchor Point: Secure the winch line around the trunk base, not higher up, to minimize leverage and potential tree uprooting.
Equipment You’ll Need
Before we dive in, let’s talk gear. You’ll need a tree strap or chain – this is non-negotiable. Chains are tough, but straps are kinder to trees.
Then, gather your shackles, hooks, and any other strapping gear like thimbles. These little gadgets will ensure your winch is securely attached without turning your tree into a modern art sculpture.
And of course, don’t forget your tools for wrapping and tightening everything up.
How to Attach a Winch to a Tree
- Positioning the Winch: Find a spot where your winch line is as straight as possible to the tree. This reduces stress on the equipment and the tree.
- Wrapping the Tree Strap Correctly: Wrap that strap around the tree like you’re giving it a big, protective hug. Make sure it’s snug and covers a good surface area to distribute the force evenly.
- Securing the Shackle to Strap: Hook up the shackle through the loops of your strap. This metal U-shaped piece is your best friend for connecting everything securely.
- Attaching the Winch Hook to the Shackle: Now, bring in your winch hook. Attach it to the shackle, ensuring it’s closed properly. No half-hearted connections here.
- Taking Up Slack & Tightening Strap: Gently tighten the winch to remove any slack. You want it firm but not so tight that you’re playing tug-of-war with the tree.
- Checking Mount Stability and Safety: Give everything a once-over. If it looks solid and you’ve followed the steps, you’re golden.
Winching Technique:
- Angle Control: Maintain a straight line pull if possible, or use snatch blocks to minimize angles and stress on the tree.
- Slow and Steady: Winch smoothly and slowly, monitoring the tree for any signs of strain or movement.
- Alternative Anchors: If possible, consider safer alternatives like rocks, boulders, or vehicle recovery points before resorting to a tree.
Remember: Tree winching should be a last resort and requires exceptional caution and proper setup. Prioritize other anchor points whenever possible.
By mastering these advanced techniques, you unlock a wider range of recovery possibilities and enhance your off-road preparedness. Be mindful of safety at all times, practice caution, and seek professional guidance if unsure about any procedure.
Winching in Different Environments: Adapting to Unique Challenges
Winching is not a one-size-fits-all operation; it requires adapting techniques to suit different environmental conditions.
Each terrain – be it mud, rocky landscapes, or snow and ice – presents its own set of challenges that impact the approach to winching. Understanding these nuances is crucial for effective and safe vehicle recovery.
Winching in Mud
1. Challenges in Mud:
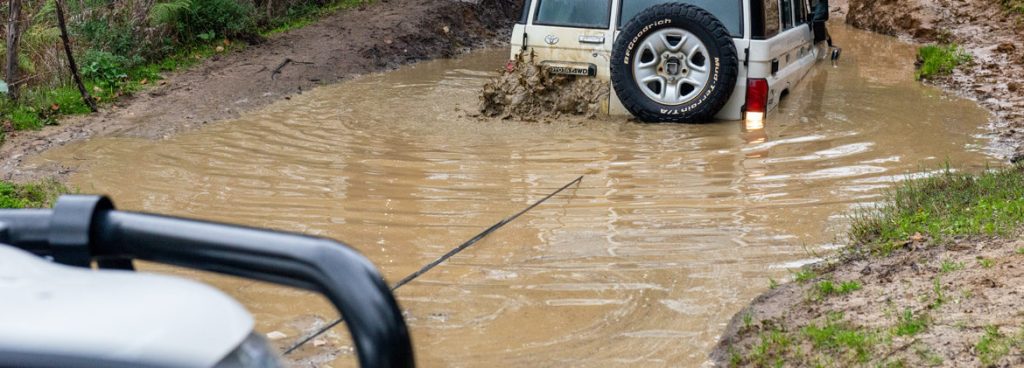
- Mud poses a significant challenge due to its slippery nature and the ease with which vehicles can become deeply stuck. The suction effect of mud can create a resistance that is much higher than the vehicle’s actual weight.
2. Rope Maintenance:
- In muddy conditions, the winch rope, especially if it’s a synthetic type, can become clogged with mud and debris. This not only adds weight to the rope but can also degrade its integrity.
- Regular cleaning and maintenance of the rope are essential. After a recovery operation in mud, the rope should be thoroughly washed and inspected for any signs of wear or damage.
Winching on Rocky Terrains
1. Robust Anchor Points:
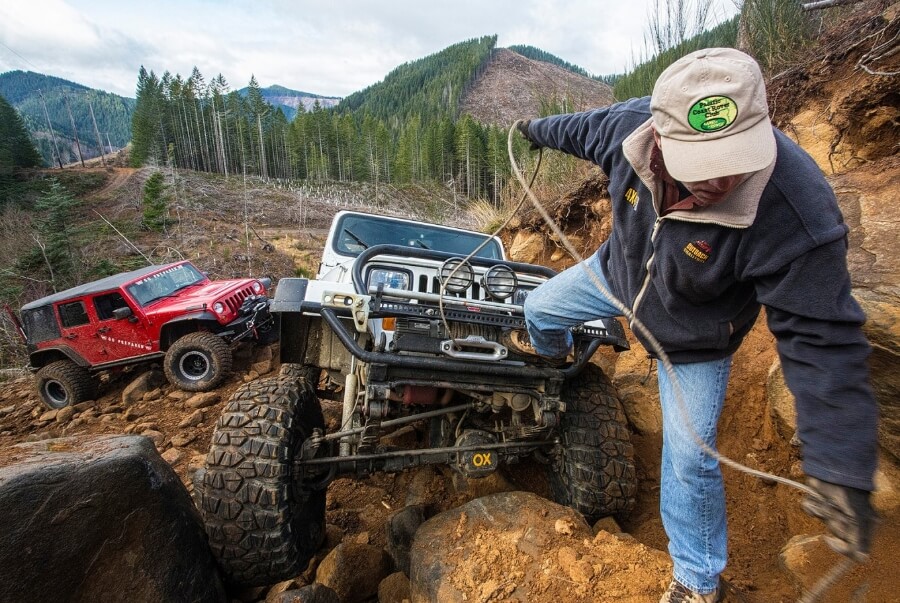
- Rocky terrains often require more robust anchor points. The anchor must be solid enough to withstand the high forces of winching without dislodging.
- Natural anchors like large, stable rocks or deeply rooted trees can be effective, but always assess their stability before use.
2. Increased Power Needs:
- The uneven and often steep nature of rocky terrains can demand more power from the winch. This is where techniques like the double line pull can be particularly beneficial.
- The winch and all associated equipment must be capable of handling these increased demands without failure.
Winching in Snow and Ice

1. Additional Strain on Equipment:
- In cold environments, the winch motor and rope face additional strain. The motor may have to work harder, especially if the battery is affected by the cold.
- The rope, whether synthetic or steel, can become brittle in extreme cold, increasing the risk of snapping.
2. Meticulous Operation:
- Operating the winch in snow and ice requires a meticulous approach. It’s important to keep the rope as straight as possible to avoid lateral pressures that can lead to snapping.
- The anchor points in snowy conditions can be challenging to find. It might require creativity, like using snow anchors or even other vehicles, provided they have a stable position.
Winching Etiquette and Environmental Considerations: Balancing Skill with Responsibility
Winching, while a highly technical and skill-intensive operation, also demands a strong sense of responsibility towards the environment and fellow off-roaders. This aspect of winching is often encapsulated in the concept of winching etiquette and environmental considerations. Let’s explore these in detail.
Respecting Nature: Environmental Stewardship in Winching
1. Use of Tree Trunk Protectors:
- When using trees as anchor points, it’s crucial to prevent damage to them. Tree trunk protectors are wide, durable straps that distribute the winch’s force around a larger area of the tree, minimizing harm to the bark and underlying tissue.
- This practice not only protects individual trees but also supports the broader health of the forest ecosystem.
2. Avoiding Sensitive Areas:
- Responsible winching involves recognizing and avoiding environmentally sensitive areas. This includes wetlands, areas with rare or endangered plant species, and habitats critical for wildlife.
- By steering clear of these areas, off-roaders can minimize their ecological footprint and contribute to the conservation of natural habitats.
Respecting Fellow Off-Roaders: Safety and Cooperation
1. Ensuring Safety During Recovery Operations:
- Safety is paramount in winching operations, not just for the operator but for everyone involved. This includes maintaining a safe distance, using appropriate signals, and ensuring all bystanders are aware of the winching activity.
- Clear communication and cooperation are key, especially in group off-roading scenarios where multiple vehicles and individuals are involved.
2. Cooperation and Assistance:
- Winching etiquette extends to offering assistance to fellow off-roaders in need. This could mean helping to set up a winch, offering advice, or simply providing moral support.
- It’s about fostering a sense of community and mutual support, which is at the heart of the off-roading culture.
After Winching – Maintenance and Storage
Proper maintenance and storage of your winch are as crucial as its operation. After a winching task, taking the time to rewind, store, and maintain your winch will extend its lifespan and ensure it’s ready for the next use. Let’s explore these aspects in detail.
How to Maintain Your Winch After Use
After use, clean the winch rope with soap and water if it’s synthetic, or inspect for frays if it’s steel. Store the winch in a dry environment to prevent corrosion.
Rewinding and Storing
- Rewinding the Cable:
- After each winching operation, it’s essential to rewind the cable onto the drum carefully. This should be done evenly and tightly. Uneven or loose winding can lead to cable damage such as kinks or binds, which can weaken the cable over time.
- If you have a synthetic rope, ensure it’s free from twists as you wind it back onto the drum. For steel cables, watch for burrs or frayed strands that might need attention.
- Storing the Winch:
- The winch should be stored in a dry and clean environment to prevent rust and corrosion. Moisture can be particularly damaging, especially to the winch’s electrical components and steel cables.
- If the winch is mounted on a vehicle that’s regularly exposed to the elements, consider using a winch cover to protect it from dust, dirt, and moisture.
Regular Maintenance Checks
- Inspection:
- Regularly inspect your winch for any signs of wear, corrosion, or damage. This includes checking the cable, the drum, the motor, and the remote control.
- Pay special attention to the cable. Look for frayed strands or kinks in steel cables and abrasions or cuts in synthetic ropes. If any damage is noted, replace the cable immediately.
- Lubrication:
- Lubricate the winch’s moving parts as needed. This includes the drum, the gears, and the cable (if it’s steel). Use a lubricant that’s suitable for the winch and the environment in which it’s used.
- Avoid over-lubrication as it can attract dirt and grime, which can lead to wear.
Cleaning and Care
- Post-Use Cleaning:
- After using the winch, especially in muddy, sandy, or salty conditions, it’s important to clean it thoroughly. Dirt and grit can get into the winch mechanism and cause wear.
- For the cable, if it’s synthetic, wash it with mild soap and water and let it dry completely before rewinding it onto the drum. For steel cables, wipe them down and check for rust, applying a rust inhibitor if needed.
- Winch Care:
- Regularly check and tighten any loose bolts and connections. This ensures that the winch operates smoothly and reduces the risk of mechanical failure.
- If your winch has electrical components, check the connections and wiring for any signs of wear or corrosion. Ensure that the connections are tight and free from corrosion.
By following these steps for rewinding, storing, and maintaining your winch, you ensure that it remains in optimal condition, ready for your next adventure or task. Remember, a well-maintained winch is a reliable winch.
FAQs
Can I use any tree as an anchor point?
Choose a sturdy tree, ideally with a trunk diameter larger than 12 inches. Always use a tree trunk protector to prevent damage to the tree.
How often should I replace my winch cable?
Inspect your cable before and after each use. Replace it if you notice frayed strands, kinks, or significant wear.
Is it safe to winch alone?
While it’s possible to winch alone, it’s always safer to have a spotter or assistant to help monitor the winching process and ensure safety.
Conclusion
Mastering these winching techniques can empower you to tackle challenging off-road situations with confidence. By prioritizing safety, understanding winch mechanics, and practicing common techniques, you’ll be well-equipped to recover your vehicle and continue your adventures. For complex recoveries or further training, seek guidance from experienced professionals.
For easy-to-use options, see our selection of beginner-friendly winches to get started.
Additional Resources
For those eager to learn more, there are plenty of resources available. Online forums, instructional videos, and local off-roading clubs offer valuable insights and opportunities to learn from experienced winchers. Remember, winching is not just a skill; it’s an essential part of the off-roading experience.
