To test a winch solenoid, use a multimeter to check continuity and voltage at key terminals. Signs of a faulty solenoid include clicking sounds without motor movement, erratic winch behavior, or a winch that doesn’t engage. This guide provides step-by-step testing methods and replacement instructions.
This guide will teach you how to identify solenoid issues, troubleshoot common problems, and replace faulty solenoids effectively.
Let’s go
Key Takeaways
Locate the Solenoid: Find the solenoid near the winch motor or vehicle battery, consulting your vehicle’s manual if needed.
Disconnect the Battery: Ensure safety by disconnecting the battery, starting with the negative terminal.
Remove the Solenoid Cover: Access the solenoid by removing its cover using appropriate tools.
Use a multimeter to check voltage and continuity for solenoid issues.
Inspect the Solenoid: Check for visible damage like rust, corrosion, burnt spots, or broken wires.
Troubleshoot power supply and grounding problems to ensure smooth winch operation.
Test for Proper Voltage Supply: Measure the voltage at the solenoid’s input terminals; it should match your vehicle’s manual specifications (around 12 volts).
Check for Ground Connections: Ensure a solid ground connection using a multimeter to measure resistance.
Perform a Voltage Drop Test: Check for significant voltage loss across the solenoid by measuring input and output voltage while the winch is activated.
Reinstall the Solenoid Cover: Reassemble any removed covers, reconnect the battery (positive first), and test the winch to ensure proper function.
Signs of a Faulty Winch Solenoid
So, how can you tell if your winch solenoid is on the fritz? Here are some common symptoms to watch for:
- Winch Not Engaging: If you press the control button and nothing happens, the solenoid might be at fault.
- Clicking Sounds: Hearing a clicking noise when trying to operate the winch is a classic sign of a solenoid issue. Clicking noises often signal incomplete activation of solenoid contacts due to poor grounding or insufficient power.
- Intermittent Operation: If your winch works sporadically, the solenoid could be struggling to maintain a connection.
- No Power: If there’s no power reaching the winch motor, it could be due to a faulty solenoid.
- Unusual heat generation around the solenoid housing, which could indicate electrical overload.
Tools and Materials Needed
Before you start testing, gather the following tools and materials:
Multimeter: Essential for measuring voltage and continuity.
Jumper Wires or Solenoid Test Lead: Helpful for bypassing and testing connections.
Basic Hand Tools: Pliers, screwdrivers, and wrenches.
Safety Equipment: Gloves and eye protection to keep yourself safe.
Step-by-Step Guide: How to Test a Winch Solenoid
Ready to test your perfect winch solenoid? Let’s go through each step in detail for a thorough understanding.
1. Locate the Winch Solenoid
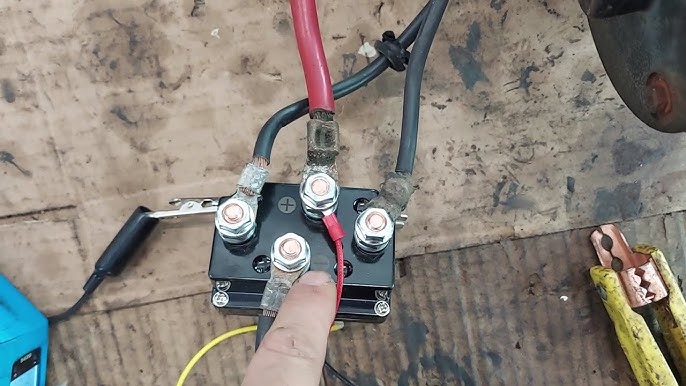
The first step is to find the solenoid on your vehicle. Typically, the solenoid is mounted near the winch motor or the vehicle’s battery.
The solenoid, a small box-like component, plays a crucial role in controlling electrical flow in the winch system. It has multiple electrical connections.
If you’re having trouble locating it, consult your vehicle’s manual, which should have a diagram of the electrical system.
2. Disconnect the Battery
Safety is paramount when working with electrical components.
Start by disconnecting the battery to avoid any accidental shocks or short circuits.
Use a wrench to loosen the nuts on the battery terminals and carefully lift the cables away.
Always disconnect the negative terminal first to minimize the risk of a short circuit.
3. Remove the Solenoid Cover or Access Panel
Once the battery is disconnected, you’ll need to access the solenoid. Many solenoids are protected by a cover or an access panel. Using a screwdriver or the appropriate tool, remove any screws or fasteners holding the cover in place.
Inspect the housing for physical damage like burnt marks or corrosion, common causes of solenoid failure. Be gentle to avoid damaging any components inside.
4. Inspect the Solenoid
With the solenoid exposed, take a close look for any visible signs of damage.
Check for rust, corrosion, burnt spots, or any broken wires.
These signs can indicate that the solenoid has been compromised.
If you notice severe damage, replace the solenoid immediately.
5. Test for Continuity
Next, it’s time to test the solenoid for continuity. Continuity means that there is an unbroken electrical path in the solenoid. Testing continuity ensures that electrical flow is uninterrupted within the solenoid circuit, a crucial diagnostic step.
Set your multimeter to the continuity setting. Touch the multimeter probes to the solenoid’s terminals. If the multimeter beeps or shows a reading close to zero, the solenoid has continuity. If it doesn’t, the solenoid might be faulty and need replacing.
6. Test for Proper Voltage Supply
To ensure the solenoid is receiving the correct voltage, set your multimeter to measure DC voltage. Reconnect the battery temporarily for this test.
A working solenoid typically requires 12 volts DC. Use the multimeter probes to confirm the voltage level against your winch’s specifications.
Place the multimeter probes on the solenoid’s input terminals. The voltage reading should match the specifications in your vehicle’s manual, usually around 12 volts for most winch systems. If the voltage is significantly lower or absent, there may be an issue with the power supply.
7. Check for Ground Connections
A good ground connection is crucial for the solenoid to function correctly.
Check the grounding point where the solenoid connects to the vehicle’s chassis.
Use your multimeter to ensure there’s a solid connection.
Set the multimeter to the resistance (ohms) setting and place one probe on the ground terminal of the solenoid and the other on the vehicle’s chassis.
A low resistance reading indicates a good ground connection. High resistance means a poor ground, which can cause operational issues.
8. Perform a Voltage Drop Test
If the solenoid still seems problematic, you might need to perform a voltage drop test. This test checks if there’s a significant voltage loss across the solenoid, which can hinder its performance. A voltage drop exceeding 0.5 volts may indicate internal resistance or damaged solenoid contacts, which require replacement.
With the winch activated, measure the voltage at the solenoid’s input and output terminals. A significant difference in voltage (more than 0.5 volts) indicates a problem with the solenoid or the connections.
9. Reinstall the Solenoid Cover or Access Panel
After completing all the tests, and if the solenoid checks out, securely reinstall any covers or panels you removed.
Ensure all screws and fasteners are tightened properly to protect the solenoid from dirt and moisture.
Reconnect the battery, starting with the positive terminal first, and then the negative.
Test the winch to ensure everything is functioning correctly.
Interpreting Test Results
After testing, here’s what your results mean:
- Good Continuity and Voltage: Your solenoid is likely in good condition.
- No Continuity or Low Voltage: Replace the solenoid.
- Poor Ground Connection: Clean and secure the ground connection to resolve issues.
How To Replace Faulty Winch Solenoid
If your tests indicate that the solenoid is faulty, replacing it is a straightforward process. Here’s a detailed guide on how to fix a broken solenoid for a winch.
1. Disconnect the Battery
Safety is the top priority when working with electrical systems.
Begin by disconnecting the battery to prevent any accidental shocks or short circuits.
Use a wrench to loosen the nuts on the battery terminals, starting with the negative terminal first.
This minimizes the risk of a short circuit. Once the negative terminal is disconnected, move on to the positive terminal.
2. Remove the Faulty Solenoid
Locate the faulty solenoid, which is usually mounted near the winch motor or the vehicle’s battery.
Carefully disconnect any wires or cables attached to the solenoid.
Note the positions and connections of each wire to ensure correct reassembly.
Using the appropriate tools, remove any mounting screws or bolts holding the solenoid in place.
Lift the solenoid out of its position once it’s free from all connections and mounts.
3. Install the New Solenoid
Position the new solenoid where the old one was mounted. Secure it with the mounting screws or bolts you removed earlier.
Carefully reconnect the wires and cables to their respective terminals on the new solenoid.
Ensure each connection is tight and secure to prevent any electrical issues.
Double-check the wiring to confirm that all connections match the original setup.
4. Reconnect the Battery and Test the Winch
With the new solenoid in place, reconnect the battery.
Start with the positive terminal and then connect the negative terminal.
Once the battery is securely connected, test the winch to ensure it operates correctly.
Press the winch control button to check if the winch engages smoothly.
Listen for any unusual sounds and observe the winch’s performance to confirm that the new solenoid is functioning properly.
Maintenance and Prevention Tips
To keep your winch solenoid in top shape:
- Regular Inspections: Check for signs of wear or damage periodically.
- Keep It Clean: Remove dirt and debris that can cause corrosion.
- Protect from Elements: Shield the solenoid from harsh weather conditions.
FAQs
How do you test a winch solenoid?
To test a winch solenoid, first disconnect the battery for safety. Use a multimeter to check for continuity across the solenoid terminals. Reconnect the battery and measure the voltage at the input and output terminals. Perform a voltage drop test while activating the winch to detect any issues. Replace the solenoid if the readings are outside normal ranges.
What are the signs of a faulty winch solenoid?
Signs of a faulty solenoid include the winch not engaging, clicking sounds during operation, intermittent performance, no power reaching the winch motor, or unusual heat around the solenoid housing.
Can a winch solenoid be repaired?
In some cases, a winch solenoid can be repaired by cleaning corroded terminals, tightening loose connections, or replacing minor components. However, if the internal contacts are burnt or damaged, the solenoid will need to be replaced.
How often should I check my winch solenoid?
It’s recommended to inspect your winch solenoid every 6 months or before any critical off-road or heavy-duty use. Regular maintenance helps prevent unexpected failures.
Why is my winch making a clicking sound?
A clicking sound typically indicates that the solenoid contacts are incomplete or failing to activate properly. This may be due to poor grounding, insufficient power, or internal wear in the solenoid.
Conclusion
Testing and maintaining your winch solenoid is crucial for reliable winch operation. Regular checks can prevent unexpected failures. Testing your winch solenoid not only ensures reliable performance but also prevents unexpected breakdowns during critical operations.
If you’re ever unsure, don’t hesitate to seek professional help. Keeping your winch in good working order ensures you’re always ready for whatever challenges come your way.
