A winch cable hook is a critical load-bearing component in off-road recovery and towing operations. Over time, wear, rust, or deformation can compromise its safety. Knowing when and how to replace a hook ensures safe and reliable winching. This guide provides clear steps to help you replace your hook properly and avoid injury or equipment failure.
Here are signs that your winch hook needs immediate replacement:
- Hook size or style is incompatible with your current setup
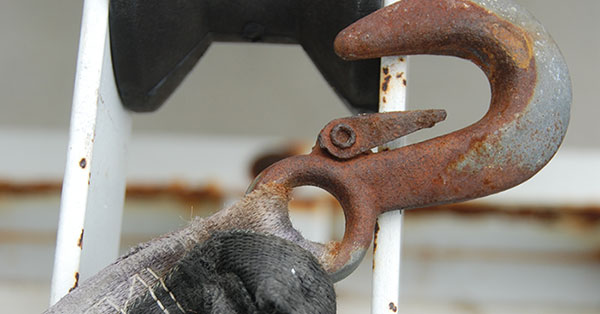
- Cracks, bending, or deformation
- Rust or corrosion, especially around the latch
- Difficulty securely attaching the hook to the winch cable
- Latch no longer closes fully or safely
Quick Answer
How to replace a winch cable hook?
To safely replace a winch cable hook, disconnect the winch power, unwind the cable, remove the retaining pin or bolt from the old hook, attach the new hook securely using the appropriate fastener, and rewind the cable carefully. Always wear gloves and safety gear during the process to avoid injury.
Safety Precautions
Before beginning the replacement process, it’s essential to take the following safety precautions:
- Disconnect the battery: To prevent accidental activation, ensure the winch is fully powered down. This step is critical for safe hook reattachment and cable management.
- Wear protective gloves: Protect your hands from cuts and abrasions by wearing heavy-duty gloves.
- Ensure the winch is not under load: Never attempt to replace the hook while the winch is under tension, as this can lead to serious injury.
Tools and Materials Required
To replace your winch cable hook effectively, ensure you have the following tools and materials (suitable for both steel and synthetic winch cables):
- Replacement winch cable hook (Select best winch hook from my list)
- Pliers
- Wrench or socket set
- Electrical tape
- Cable cutters (if needed)
Step-by-Step Guide to Replace Winch Cable Hook
Step 1: Unwind the Cable
To begin the replacement of the winch cable hook, start by carefully unwinding the cable from the winch drum.
This should be done slowly and methodically to ensure the cable is laid out straight, preventing kinks or tangles that could cause damage or make the replacement process more difficult.
It’s essential to keep the cable organized, as this will aid in a smoother reinstallation later.
Step 2: Remove the Old Hook
Loosen the Set Screw
With the cable unwound, locate the set screw that holds the hook to the cable end. Using a wrench or socket set, loosen this screw.
The size of the wrench or socket will depend on your winch model, so having a set with various sizes is beneficial.
Turn the screw counterclockwise until it is loose enough to allow for the hook removal.
Detach the Hook from the Cable
After the set screw is loosened, gently pull the hook away from the cable.
If the hook is corroded or has been in place for a long time, this might require some extra effort.
In some cases, if the hook is too worn or rusted, cutting it off with cable cutters might be necessary.
Step 3: Prepare the New Hook
Inspect the New Hook for Defects
Before attaching the new hook, thoroughly check it for cracks, rust, or any deformities that could impair its function.
This is crucial, as any unnoticed defect could lead to failure under load, posing a safety risk.
Ensure the New Hook is Compatible
Confirm that the new hook is compatible with your winch’s cable specifications, including its load rating, size, and suitability for steel or synthetic ropes. This includes ensuring the hook is the correct size for the cable diameter and has the appropriate load rating for the winch.
Using an incompatible hook could result in poor performance or damage.
Step 4: Attach the New Hook
Slide the New Hook onto the Cable
Introduce the new hook to the end of the cable. Slide it over the cable end, making sure it fits snugly. This might require aligning the cable properly with the hook’s opening.
Secure the Set Screw
Once the hook is in place, re-tighten the set screw that you loosened earlier.
Make sure the screw is tight and secure to prevent the hook from slipping off during operation. Use your wrench or socket set to tighten the screw clockwise until it is firmly in place.
Test the Connection
After securing the hook, perform a gentle pull test to ensure it is well attached. This test checks the stability of the hook and the integrity of the set screw’s hold.
If the hook holds firm, it’s ready for use; if not, re-tighten and test again.
Step 5: Wind the Cable Back onto the Winch Drum
Ensure Even Winding
Finally, wind the cable back onto the winch drum. This should be done carefully to ensure the cable lays evenly across the drum.
Uneven winding can cause premature cable wear, fraying, or jamming during winch operations. Maintain even tension to prevent operational issues later.
It’s essential to maintain tension on the cable as you wind it to avoid loops or slack that could tangle later.
Testing and Maintenance
After replacing the winch cable hook, it’s crucial to test the winch under a light load to ensure proper functionality.
Regular maintenance, such as cleaning and lubricating the winch components, will prolong the life of your winch and keep it in top condition.
Troubleshooting Common Issues
If you encounter any of the following issues during or after the hook replacement process, here are some solutions:
- Frayed or damaged cable: If the cable is severely damaged, it may need to be replaced entirely. Consult your winch manual or a professional for guidance.
- Difficulty attaching the new hook: Ensure that the hook is compatible with your winch and cable size. If the issue persists, seek assistance from a qualified technician.
- Winch not functioning properly after hook replacement: Double-check that all connections are secure and the battery is reconnected. If the problem continues, consult your winch manual or a professional for further troubleshooting.
FAQs
What are the signs of a damaged winch cable hook?
Visible cracks, deformation, corrosion, or inability to securely attach the hook are common signs that the winch cable hook needs replacement.
Can synthetic winch ropes use the same hooks as steel cables?
Yes, but ensure the hook is compatible with the material type, load rating, and cable diameter to prevent failure.
How often should a winch cable hook be replaced?
Replace the winch cable hook when it shows visible wear, such as cracks or excessive rust, or after extreme load-bearing use.
Conclusion
Replacing a winch cable hook is a straightforward process that can be accomplished with the right tools and knowledge.
By following these steps and prioritizing safety, you can keep your winch in optimal working condition. Regular maintenance will extend its lifespan and ensure reliable performance.
