Installing a winch fairlead ensures your cable is guided smoothly onto the drum, prevents fraying, and extends the life of your winch system. This guide walks you through each step—from selecting the right type (roller vs. hawse) to torque specs and safety checks—so you can install it correctly the first time.
Tools and Materials Needed
List of Essential Tools
Before you start, gather the following tools:
- Wrenches
- Sockets
- Drill
- Measuring tape
- Screwdrivers
- Marker or pencil
Fairlead and Mounting Hardware
Make sure you have the correct fairlead for your winch, along with all necessary mounting hardware such as
- Wrenches
- Sockets
- Drill
- Measuring tape
- Fairlead and mounting hardware (bolts, washers, and nuts)
Optional Tools for Easier Installation
While not essential, these tools can make the job easier:
- Ratchet set
- Torque wrench
- Center punch
Step 1: Choose the Right Fairlead
Matching Fairlead to Winch Capacity and Cable Type
Choosing the right fairlead is crucial for your winch system’s smooth operation and longevity. It must match your winch’s capacity and cable type.
Winches come in different capacities, typically measured in pounds or kilograms, so ensure your fairlead can handle the rated load.
Additionally, the type of cable—whether wire rope or synthetic rope—dictates the type of fairlead you need.
Roller Fairlead for Wire Rope, Hawse for Synthetic
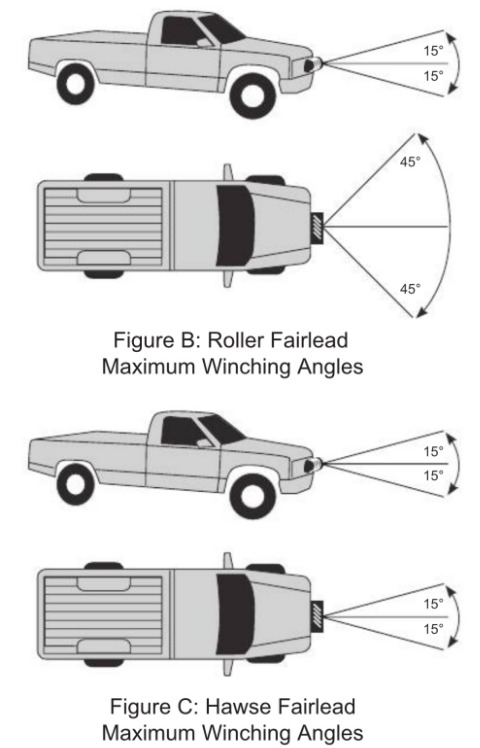
The two main types of fairleads are roller fairleads and hawse fairleads. Each type has specific applications:
Roller Fairlead: Designed for wire rope, a roller fairlead has four rollers (two vertical and two horizontal) that guide the rope onto the winch drum.
The rollers reduce friction and prevent the wire rope from fraying or wearing out prematurely. The smooth operation of the rollers is crucial when using a heavy-duty wire rope, as it ensures the rope doesn’t get damaged during winching.
Hawse Fairlead: Typically used with synthetic ropes, a hawse fairlead is a simple, smooth, rounded piece of metal (usually aluminum or steel) with a hole through which the rope passes.
The smooth surface minimizes abrasion on the synthetic rope, which is more susceptible to damage from sharp edges or excessive friction compared to wire rope.
Considerations for Mounting Location and Winch Plate
Before you install your fairlead, you need to consider its mounting location on your vehicle and the compatibility with your winch plate. Here are some key points:
Mounting Location: The fairlead must be positioned where the winch cable can run straight through it without any obstructions.
The mounting location should allow the cable to pull in a direct line to prevent it from dragging against the edges of the fairlead or other components, which could cause damage.
Winch Plate: Ensure that your winch plate is compatible with the fairlead. Most winch plates come with pre-drilled holes for mounting a fairlead, but you should verify that these holes align with the mounting points on your fairlead.
If your winch plate lacks the necessary holes, you may need to drill them to match your fairlead’s specifications.
Step 2: Prepare the Mounting Surface
Locating the Fairlead Mounting Holes on the Winch Plate
To begin the installation, locate the pre-drilled mounting holes on your winch plate. These holes are where the bolts will pass through to secure the fairlead.
If your winch plate does not have pre-drilled holes, use a marker or pencil to mark the spots where you will need to drill. Ensure these marks are accurately positioned to align with your fairlead’s mounting points.
Cleaning and Inspecting the Mounting Area
Before you start drilling or mounting, thoroughly clean the mounting area. Remove any dirt, rust, or debris that could interfere with a secure installation.
Inspect the area for any signs of damage or wear that could weaken the mounting surface. A clean and intact mounting surface is crucial for ensuring the fairlead is firmly attached and functions properly.
Drilling New Holes if Necessary (with Measurements)
If your winch plate requires new holes for mounting the fairlead, measure carefully before drilling. Use a measuring tape to ensure the holes are spaced correctly and aligned with the fairlead’s mounting points.
Mark the spots clearly, then use a drill to create the holes. Ensure the holes have the correct diameter for your mounting bolts.
This step is crucial to avoiding misalignment and ensuring a secure fit.
Step 3: Position and Secure the Fairlead
Aligning the Fairlead with the Cable Path
Once the mounting surface is prepared, position the fairlead so that it aligns perfectly with the winch cable’s path.
The alignment is crucial for smooth operation and to prevent the cable from rubbing against the sides of the fairlead. Ensure that the cable can run straight through the fairlead without any deviations.
Inserting Bolts and Washers
With the fairlead in position, insert the bolts through the fairlead and into the mounting holes on the winch plate.
Place washers on the bolts to distribute the load evenly and prevent the bolts from loosening over time. Washers also protect the mounting surface from damage caused by the bolts.
Tightening Nuts to Manufacturer’s Specifications
Tighten the nuts according to the manufacturer’s specifications. Use a torque wrench to achieve the recommended torque settings.
This ensures that the fairlead is securely attached and won’t come loose during operation, which could lead to cable damage or failure.
Step 4: Route the Winch Cable
Feeding Wire Rope or Synthetic Line through the Fairlead
Next, feed the winch cable through the fairlead. If you’re using wire rope, ensure it passes smoothly through the rollers of the roller fairlead. For synthetic rope, guide it through the hawse fairlead’s opening.
This step requires patience to ensure the cable doesn’t get caught or kinked.
Ensuring Proper Alignment and Smooth Operation
As you feed the cable through, ensure it is properly aligned and can move smoothly through the fairlead.
The alignment is key to preventing kinks, tangles, or excessive friction, which can damage the cable. A smooth operation is crucial for effective winching.
Tips for Avoiding Kinks and Tangles
To avoid kinks and tangles, keep the cable straight and taut during the routing process.
Avoid any sharp bends or twists that could cause the cable to kink. If necessary, have a helper guide the cable while you feed it through the fairlead.
Step 5: Test the Installation
Running the Winch In and Out to Check Fairlead Function
Once the cable is routed, test the installation by running the winch cable in and out a few times. This will help you check if the fairlead is functioning correctly and if the cable is moving smoothly without any obstructions.
Inspecting for Any Rubbing or Misalignment
While testing, inspect the cable and fairlead for any signs of rubbing or misalignment. The cable should move freely without dragging against the sides of the fairlead. Any rubbing or misalignment can cause wear and damage to the cable.
Making Final Adjustments if Needed
If you notice any issues during the test, make the necessary adjustments. Ensure the fairlead is properly aligned and that the cable runs smoothly through it. Final adjustments are crucial for ensuring the longevity and efficiency of your winching system.
Maintenance and Care
Regularly inspect the fairlead and its hardware. Look for signs of wear or damage. If you have a roller fairlead, apply lubrication to keep the rollers moving smoothly.
Replace any worn or damaged components promptly to ensure the fairlead continues to function properly.
Conclusion
Installing a fairlead involves selecting the right one, preparing the mounting surface, positioning and securing it, routing the winch cable, and testing the installation.
A properly installed fairlead ensures smooth cable operation, reduces wear, and extends the lifespan of your winch cable.
With minimal effort, you can keep your winch and fairlead in top condition for years.
