To repair a broken winch cable, you need to remove the damaged section and replace it with a new steel or synthetic line using the correct tools and safety steps. This guide walks you through identifying cable damage, removing old cable from the drum, and securing a new cable or rope so your winch operates safely and effectively again.
How to Assess Winch Cable Damage
Assessing the damage to a winch cable is a critical first step in the repair process and should be done with a methodical and safety-conscious approach.
Safety First: Disable Power to the Winch
Before touching the winch cable, the most important action to take is to ensure that the winch is completely powered off.
This might involve disconnecting the winch from its power source, whether it’s electrically powered by a vehicle’s battery or a separate power unit.
The reason for this precaution is to eliminate any risk of the winch engaging while you’re working on it, which could lead to injury or further damage to the equipment.
Locating Visible Signs of Damage
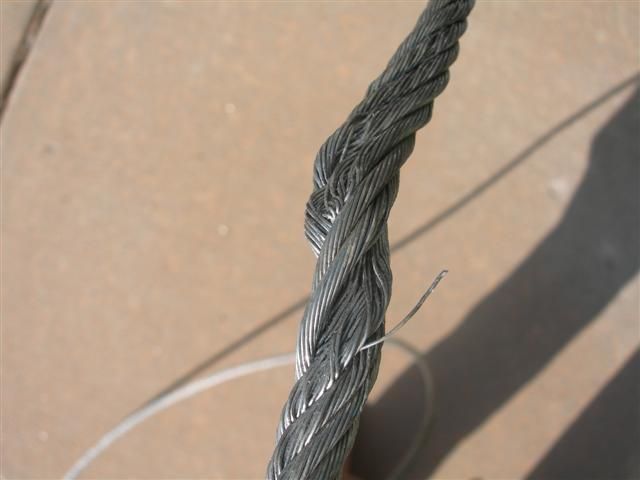
With safety measures in place, the next step is to inspect the winch cable for any signs of wear or damage.
This involves looking for:
- Fraying: Where the strands of the cable start to unravel, indicating a weakening in the cable’s structure.
- Kinks: Sharp bends or twists in the cable that could compromise its integrity and strength.
- Broken Strands: Individual steel wires within the cable that have snapped, significantly reducing the cable’s overall capacity to bear loads.
- Cable Fatigue: Signs of overall wear and tear that weaken the cable’s integrity over time.
These signs of damage are indicators that the cable is compromised and may not be reliable for future use.
Unwinding the Cable for Inspection
To ensure a comprehensive assessment, it’s necessary to unwind the cable from the winch drum fully.
Unwinding the cable allows you to inspect its entire length, not just the parts that are immediately visible.
As you unwind, pay close attention to the feel and appearance of the cable, noting any irregularities or additional damage that wasn’t initially visible.
This step is crucial because damage can occur anywhere along the length of the cable, not just at the ends or the most used sections.
Determining Repairability or Replacement
After thoroughly inspecting the cable, you’ll need to make a decision: Can the cable be repaired, or does it need to be completely replaced?
The extent and type of damage largely determine this decision.
For example, A cable with minor fraying or a single kink may be repairable, especially if the damaged section can be safely removed without shortening the cable too much or compromising its load-bearing capacity.
However, if the cable has multiple areas of damage, broken strands throughout its length, or severe kinks, replacement is often the safer and more reliable choice.
Removing the Broken Winch Cable
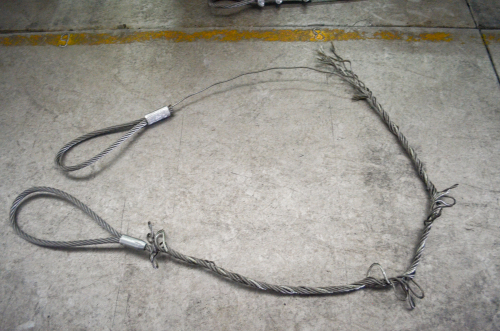
Removing a broken winch cable is a critical process that requires patience and attention to detail to ensure it’s done safely and effectively.
1. Unwinding the Cable Completely from the Drum
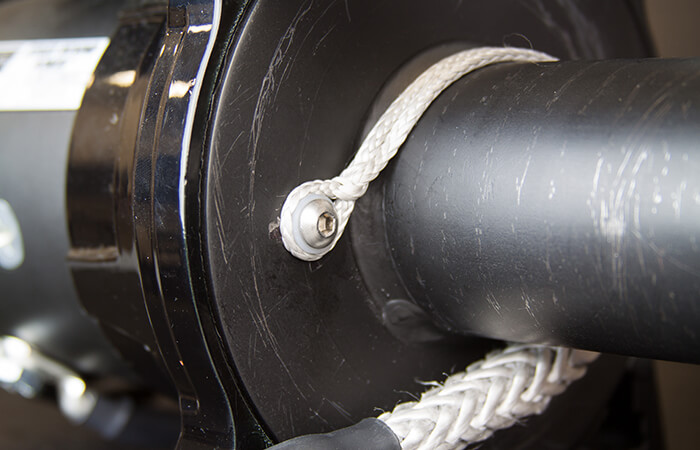
The first step is to unwind the cable from the winch drum. This is done by manually releasing the tension on the cable, allowing it to freely unspool.
It’s important during this step to handle the cable gently to avoid any sudden release of tension that could cause the cable to whip or snap back, potentially causing injury.
- Dealing with Resistance: As you unwind the cable, you might encounter resistance, especially if the cable has kinks, is severely worn, or has areas where it’s damaged and causing it to catch on the drum. Handle these areas with care, applying steady and controlled force to ease the cable off without causing further damage.
2. Identifying Problem Areas
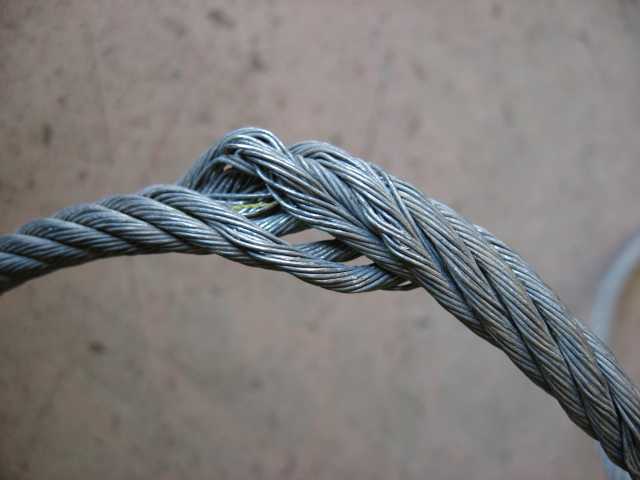
As the cable unwinds, take note of any sections that show significant wear or damage.
This observation will be crucial for understanding the type of wear your cable typically undergoes and can inform your selection of a replacement cable that might resist similar damage better.
- Paying Attention to Stubborn Cable Sections: If a section of the cable is particularly difficult to remove, it might be due to damage that has caused it to deform and bind against the winch drum. In these cases, extra care is needed to gently free the cable without damaging the winch drum or mechanism.
To effectively perform a cable replacement, use a guide or tutorial to ensure safe and proper removal techniques.
3. Setting the Old Cable Aside for Reference
Once the cable is fully unwound and removed, it’s wise to keep it aside for reference. This old cable will serve multiple purposes:
- Sizing Your Replacement: Use the old cable to determine the exact diameter and length of the replacement cable you’ll need. Matching the size ensures that the new cable will fit your winch correctly and function properly.
- Understanding Wear Patterns: Examining the old cable can also provide insights into how it was used and what led to its failure. This information can be invaluable in preventing similar issues with the new cable.
4. Selecting the New Cable
With the old cable as a reference, you can now choose a new winch cable that matches the original in size (diameter and length) and, ideally, exceeds its performance in terms of durability and load capacity.
This is also the time to consider whether a different type of cable (for example, switching from steel to synthetic) might better suit your needs.
- Considering Load Capacity: Ensure that the new cable’s load capacity rating matches or exceeds that of your winch and the tasks you commonly use it for. This is crucial for safe operation.
- Quality and Brand: Opt for a cable from a reputable brand known for its durability and safety features. A higher-quality cable might cost more upfront but will likely offer better performance and greater durability, reducing the need for frequent replacements.
Selecting a Replacement Winch Cable
Selecting the correct replacement for a broken winch cable is a crucial decision that impacts the safety, efficiency, and durability of your winch.
This task involves understanding various factors that contribute to the cable’s performance and longevity.
Cable Diameter and Length
- Diameter: The thickness of the cable is a critical factor that directly influences its strength and load-bearing capacity. Choosing a cable with the appropriate diameter ensures that it can handle the maximum load your winch is designed to pull. A cable that’s too thin might not withstand the stress, while one that’s too thick could be difficult to spool properly and might not fit your winch.
- Length: The length of the cable needs to be sufficient for your typical usage scenarios. Longer cables allow for more extensive reach but can add to the weight and bulk, possibly affecting the winch’s performance. It’s important to balance the need for length with practicality and performance considerations.
Consider switching to synthetic cables for added flexibility and safety, especially in environments prone to cable fraying.
Number of Wire Strands
- Construction: Winch cables are made up of numerous individual wire strands twisted together. The number of strands and the way they are woven affect the cable’s flexibility, strength, and resistance to abrasion. Cables with more strands are generally more flexible and resistant to wear but may be less durable under direct, heavy loads compared to cables with fewer, thicker strands.
- Choice: The choice between a more flexible cable with many thin strands versus a stiffer, more durable cable with fewer thick strands depends on your specific needs. Consider the environments in which you use the winch and whether flexibility or durability is your priority.
Load Capacity Rating
- Matching or Upgrading: It’s essential to select a cable whose load capacity rating matches or exceeds that of your winch. Using a cable with a lower capacity than your winch can handle is a safety hazard, as it may break under load. Conversely, opting for a cable with a higher capacity can offer an extra margin of safety and durability but may come at a higher cost.
- Considerations: When selecting the load capacity, also consider the types of loads you typically haul. If you’re frequently near the upper limit of your winch’s capacity, opting for a cable with a higher rating can provide additional safety and longevity.
Choosing a Reputable Brand
- Quality and Safety: The importance of choosing a cable from a reputable manufacturer cannot be overstated. High-quality cables manufactured to industry standards are more likely to perform reliably and safely. Look for brands with positive reviews and proven track records in producing winch cables.
- Durability: Reputable brands often use superior materials and manufacturing processes, resulting in cables that are more durable and resistant to wear, kinking, and breaking. This means fewer replacements, better performance, and, most importantly, enhanced safety during operation.
When choosing a cable, prioritize reputable brands with certifications for high load capacities to ensure durability and long-term use.
Replacing a Winch Cable: How to
Threading a new winch cable onto the drum is a pivotal step that ensures the functionality and safety of the winch system. This process involves several key actions and considerations:
Routing the Cable Through the Winch’s Guide
- Starting Point: The process begins by feeding the end of the new cable through the winch’s guide, which is the pathway that directs the cable onto the drum. This guide ensures that the cable aligns correctly as it winds, preventing it from tangling or winding unevenly.
- Attention to Detail: It’s crucial to ensure that the cable is not twisted or kinked as it’s fed through the guide. Any twists or kinks can compromise the strength of the cable and lead to premature wear or failure under load.
Use the ‘crimping technique’ or ‘Flemish eye method’ for securing the cable end, as these methods are highly reliable for heavy-duty use.
Attaching the Cable to the Drum
- Securing the End: Once the cable is fed through the guide, the next step is to attach its end to the winch drum. This is typically done by threading the end through a hole in the drum and securing it with a clamp or knot, depending on the type of cable and drum design. The connection must be secure to prevent the cable from slipping when under tension.
- Initial Tension: Applying initial tension is important as it keeps the cable tight on the drum, preventing it from becoming loose or tangled during initial winding. This tension can be applied manually or by using the winch’s own tensioning mechanism, if available.
Evenly Winding the Cable Onto the Drum
- Flat and Even Layers: As the cable winds onto the drum, it’s important to ensure that it lies in flat, even layers. This means guiding the cable back and forth across the width of the drum as it wraps around. This careful layering prevents the cable from piling up in one area, which could lead to uneven distribution of tension and potential damage under load.
- Avoiding Cross-Overs: The cable should wind onto the drum without crossing over itself. Cross-overs can create points of excessive wear and increase the risk of the cable pinching or becoming damaged during use.
Maintaining Tension
- Continuous Tension: Throughout the winding process, maintaining tension on the cable is key to preventing slack. Slack in the wound cable can lead to it becoming loose, tangled, or unwound under operation, which could compromise the safety and efficiency of the winch.
- Final Checks: Once the cable is fully wound onto the drum, a final check to ensure there’s sufficient tension and the cable is evenly distributed across the drum will set the stage for safe and reliable winch operation.
Testing the Repaired Winch Operation
Before testing, perform a final cable inspection to confirm the absence of twists or kinks, as these can affect winch performance.
Testing the repaired winch operation is a crucial final step in ensuring that the newly installed winch cable is properly set up and ready for use.
This process involves several important stages, each designed to verify the winch’s functionality and the cable’s performance under load.
Here’s a closer look at each step:
Review Safety Protocols
- Recheck Connections: Before initiating the test, ensure all connections are secure, and the winch cable is properly attached to the drum and routed through the guide. This step is vital for preventing accidents due to loose components.
- Clear the Area: Ensure the area around the winch is clear of obstructions and that all bystanders are at a safe distance. This minimizes the risk of injury should the cable snap or the load shift unexpectedly.
- Wear Protective Gear: Operators should wear appropriate safety gear, including gloves and eye protection, to safeguard against potential hazards like flying debris or a snapping cable.
Operate the Winch to Ensure Smooth Cable Feeding
- Light Load Test: Begin with a light load that’s well within the winch’s capacity. This allows you to observe the cable’s winding and unwinding without placing excessive stress on the new installation.
- Watch for Smooth Operation: As the winch operates, closely watch how the cable feeds onto and off the drum. The cable should wind evenly without bunching up or crossing over itself. Any irregularities in how the cable lays could indicate a need for tension adjustments or re-routing.
Check New Cable Under Load
- Gradually Increase Load: If the initial light load test is successful, gradually increase the load to higher levels, approaching but not exceeding the winch’s maximum capacity. This tests the cable’s performance under more strenuous conditions.
- Monitor for Slippage or Stretching: Pay attention to any signs of slippage on the drum or excessive stretching of the cable. These can be signs that the cable isn’t properly secured or that there’s an issue with the cable’s load rating.
Make Final Adjustments to Cable Tension
- Adjust as Needed: Based on your observations during testing, you may need to make adjustments to the cable tension. If the cable seems too loose around the drum, additional tension may be needed to prevent slipping. Conversely, if the cable is too tight, it may need to be slightly loosened to avoid unnecessary strain on the winch motor and cable.
- Re-test After Adjustments: After making any adjustments, repeat the testing process to ensure that the changes have resulted in smooth, reliable operation.
FAQs
What tools are needed to fix a winch cable?
You will need cable clamps, crimping tools, a wrench, and safety gear like gloves and goggles.
Is it better to repair or replace a winch cable?
Minor damage like fraying or kinks can be repaired, but a severely broken cable should be replaced for safety and performance.
How do I know if my winch cable is damaged?
Signs of winch cable damage include visible fraying, kinks, broken strands, or a loss of tension. Regular inspections can help detect these issues early.
Can I switch from a steel cable to a synthetic winch cable?
Yes, you can switch to a synthetic cable for better flexibility, lighter weight, and enhanced safety, especially in environments where steel cables may corrode or fray.
How do I safely remove a broken winch cable?
To safely remove a broken winch cable, disconnect the winch from its power source, unwind the cable completely, and gently detach it while avoiding sudden releases of tension.
How often should I inspect my winch cable?
You should inspect your winch cable before each use and after heavy loads to ensure there is no damage, fraying, or wear that could compromise its performance.
Conclusion
Repairing a broken winch cable is a straightforward process that requires careful attention to detail, from assessing the damage to selecting the right replacement and installing it correctly.
The key to a successful repair lies in using high-quality parts and following the correct procedures for installation and testing.
Regular maintenance and inspection of the winch cable can prevent future failures, keeping your equipment in top condition and ready for whatever tasks lie ahead.
