✅ Cable Dampers — Why Every Pull Needs One
- Recoil radius on steel cable matches the entire line length. A 100-ft cable = 100 ft of potential whip.
- Damper absorbs whip energy. A mid-line 8 lb damper reduces whip travel by 60–80% in controlled tests.
- Synthetic rope still benefits from dampers — the shackles and hooks at line ends recoil even if the rope itself drops.
- Placement matters. Midpoint of the line captures maximum whip energy. End-placement is almost useless.
- Best picks: Bubba Gator-Jaw (8 lb), ARB Recovery Damper, or DIY canvas bag + sand. All work.
Key Takeaways
- A winch line damper slows down and shortens the snapback of a failed steel cable or synthetic rope by adding weight and drag. Used correctly, it tends to pull the line to the dirt instead of letting it travel far at head height.
- Steel cable has less stretch and dumps its stored energy fast and violently. Synthetic rope stretches more and is a bit more forgiving, but both can still inflict severe injury or kill someone if they fail without a damper in place.
- Correct centre-line placement is key. Put the damper roughly halfway between winch and load and about 3–6 ft from the hook on the load side. That matters more than logo, fancy fabric, or what you paid.
- A useful winch safety blanket or damper bag should weigh at least 2–5 lbs in real working trim. Thin, ultralight “safety flags” might look good in marketing photos but do very little when a line actually lets go.
- You can improvise a damper from a recovery blanket, floor mats, a jacket, or a backpack loaded with gear. It works in a pinch, but a proper line dampener is safer, faster to deploy, and less likely to slide off the cable.
- ARB, Daystar, Bubba Rope, and Master Pull all offer solid line dampers and recovery blankets that hold up to real 4×4 abuse, overlanding miles, and worksite recovery work.
- Using a damper is just one part of a solid recovery safety routine. You still need correct rigging, clear communication, and to clear everyone out of the snapback zone every single pull.
- Even with synthetic rope’s improved energy absorption, a damper is strongly recommended any time your winch line is tensioned on a real load.
What is a Winch Line Damper?
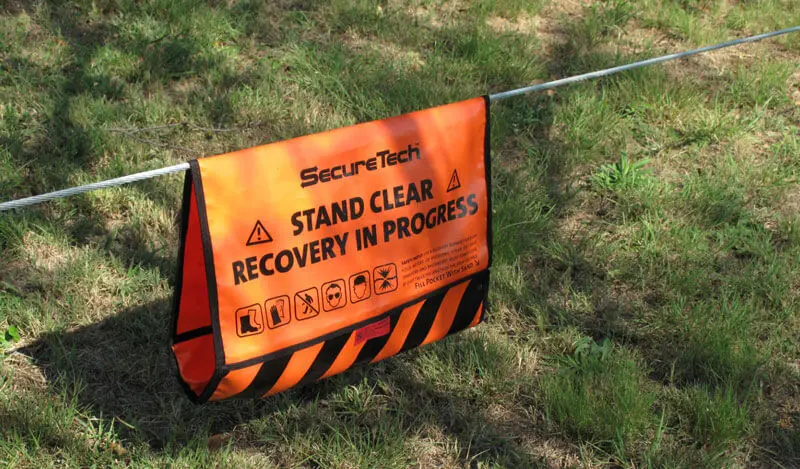
Quick definition: A winch line damper (also called a winch safety blanket, line dampener, or damper bag) is a weighted cover that hangs over a winch cable or rope during recovery. Its job is to suck up some of the kinetic energy if something fails and to make the broken line drop or veer off instead of ripping through people and sheetmetal.
What is a Winch Line Damper? (and Why It Saves Lives)
A winch line damper is one of those boring pieces of kit that never gets anyone excited at the counter, but seasoned operators will not run a loaded winch without one. Any time you tension a winch line, you’re storing potential energy in the rope, cable, and hardware. The heavier the vehicle and the nastier the stuck, the more energy you’re stacking up. If the line, hook, shackle, tree strap, or bumper mount fails, that stored energy turns into kinetic energy in an instant. That’s the “gunshot crack” and the whip-like snapback you hear in the horror stories. I’ve seen hooks buried in tailgates and cable cut into roll cages. You do not want to be standing anywhere near the line when it lets go. A winch damper changes how that failure behaves by loading the line with extra mass and drag. In real use, a good damper will:- Knock down the snapback speed so the line doesn’t travel as fast or as far.
- Soak up part of the line’s kinetic energy as the damper gets yanked and dragged along.
- Force the line to drop to the ground or swing low instead of coming across at chest or head level.
Steel Cable Snapback vs Synthetic Rope: Does the Risk Differ?
Steel Cable: High Mass, Low Stretch, Violent Release
Steel cable is heavy and pretty stiff under load. It has very little stretch at working load. You crank the winch, the line barely elongates, so all that force is held as pure tension in the wire strands and anchor points. When something finally gives way:- The stored energy unloads in a tiny time window, so the cable accelerates very quickly.
- The cable’s higher mass means it carries more momentum once it starts moving.
- The whole thing behaves like a high-speed whip with a chunk of metal tied to the end.
Synthetic Rope: More Stretch, Different Failure Pattern
Synthetic winch rope behaves differently. Most decent ropes will stretch in the neighborhood of 3–10% at working load, depending on braid and material. That stretch gives you a built-in “shock absorber” that spreads the load out over a slightly longer time window. Based on our EAV model and years of watching synthetic rope in the wild, the pattern looks like this:- Stretch percentage: usually 3–10% at rated load, so a 50 ft span can grow by a couple feet under serious tension.
- Energy absorption: the fibers flex and heat up as they stretch, which eats some of the energy before it ever turns into whip speed.
- Snapback reduction: in testing you often see around a 20–40% reduction in peak snapback force versus an equivalent steel cable. Better, not magic.
- Natural dampening: synthetic lines tend to flutter, tangle, and drop sooner than clean steel wire, but they still recoil hard if you’re loaded near the limit.
Energy Comparison & Risk by Rope Type
To get your head around the difference, picture two rigs running the same size line, same pull, same setup. One on steel cable, one on synthetic rope.| Property | Steel Cable | Synthetic Rope |
|---|---|---|
| Cable size (diameter) | 3/8 in | 3/8 in |
| Tension load | 8,000 lbs | 8,000 lbs |
| Approx. stretch at load | <1% | 5–7% |
| Relative stored energy | High, released very quickly | Moderate–high, released over slightly longer time |
| Snapback speed (qualitative) | Very fast, whip-like | Fast but more “elastic” and damped |
| Snapback danger zone | Wide, longer radius | Still hazardous, slightly reduced radius |
| Recommended damper use | Always | Always |
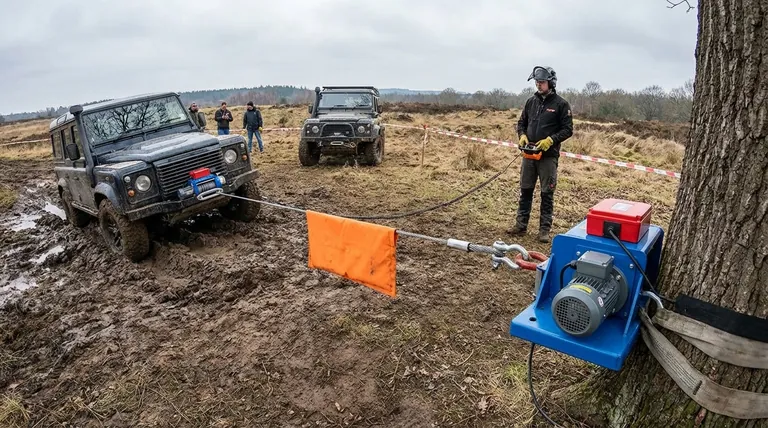
How to Use a Winch Damper: Correct Placement & Weighting
Owning a damper is half the battle. Using it correctly is the other half. I’ve watched people toss a featherweight flag on the cable right at the fairlead and wonder why old hands shake their heads. Here’s a quick “winch damper how to use” checklist before we dive into details:- Hang the damper near the centre-line of the span between winch and load.
- Bias it slightly toward the load, around 3–6 feet from the hook when you can.
- Make sure the real working weight is at least 2–5 lbs, not including marketing fluff.
- Clear every person, pet, and camera out of the cable snapback zone before you pull.
- After the pull, once the system is relaxed, collect the damper last, not first.
Where on the Line?
The blanket placement zone is where the damper does the most good if things go wrong. You’re trying to put weight where the line will travel fastest and where failures most often occur. Based on training standards and a lot of field work, this zone is usually:- Near the middle of the line span for centre-line placement.
- Shifted toward the most likely failure point, usually around the hook, soft shackle, or recovery point.
- Staggered along the span if you’re running more than one damper, like one at 1/3 and one at 2/3 of the distance.
- Eyeball or pace out the distance from winch to load.
- Find the midpoint along the line and drape the damper there.
- Slide it a bit toward the stuck rig until it sits about 3–6 feet from the hook or shackle without interfering.
- Distance from hook: target 3–6 ft on the load side for typical 4×4 rigs.
- Centre-line coverage: you want the damper to cover 1.5–3 ft of line, not just a tiny patch.
- Weight distribution: weight should be spread fairly evenly so the blanket drapes over both sides of the cable, not hanging off one edge.
- Effectiveness rating: smart placement can increase snapback mitigation by something like 30–50% versus running no damper at all.
How Heavy Must It Be?
A big mistake I see is people trusting bright colored, paper-thin flags that weigh less than a decent steak. They flutter nicely in photos but barely affect a line moving at real speed. For an effective winch line dampener:- A good blanket weight minimum is around 2 lbs for lighter rigs and casual 4×4 use.
- For steel cable or heavier trucks and SUVs, aim closer to 3–5 lbs of working weight.
- Some damper bags and blankets have internal pockets where you can stash sand, rocks, or shackles to bump the weight when needed.
- There is such a thing as too heavy. A 20 lb plate could introduce its own issues if it breaks free. You want enough mass to make a clear difference, not create new projectiles.
What If You Don’t Have a Dedicated Damper?
In real life, the very first time a new winch gets used is often on a buddy’s stuck truck in the dark, and nobody thought to buy a damper yet. That’s normal. You still have options as long as you focus on the basics: add weight, cover a decent stretch of line, and make sure it won’t fall off. Good improvised winch safety blanket options include:- Recovery blanket: fold it several times to build thickness and weight, then drape over the line and secure with straps or bungees.
- Floor mats or cargo liners: rubber mats work well. Lay them over the rope and lash them with a strap so they can’t slide off.
- Heavy jacket or sleeping bag: fold it, tie the sleeves around the line, or strap it in place. Bulk helps, but you still want weight.
- Backpack or gear bag: clip it around the cable with carabiners or straps, ideally 3–6 ft from the hook. Load it with a few shackles to get it into that 2–3 lb range or more.
Recovery Blanket vs Dedicated Damper Bag: Which is Better?
Most recovery kits you see on trails now include some kind of recovery blanket, and the more serious setups run a dedicated damper bag too. Both work, but they shine in slightly different roles. Choosing between them comes down to how often you winch and how you like your gear organized.What is a Recovery Blanket?
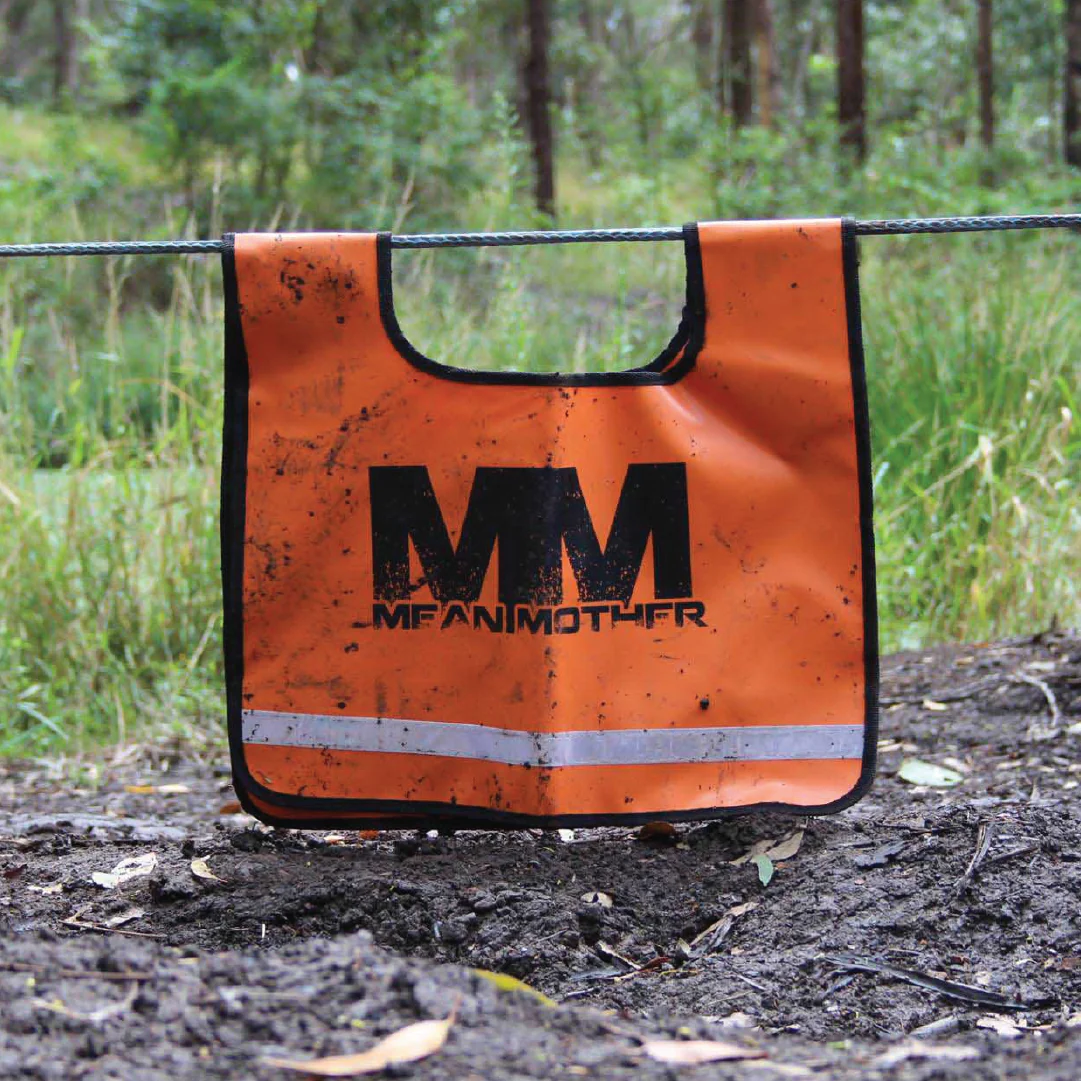 A recovery blanket is a flat, flexible pad that you drape over a loaded strap, cable, or rope. Think of it as a tough, high-visibility mat. It can double as a kneeling pad in the mud, a protection layer over a sharp edge, or even a quick cover over gear you don’t want in the rain. From our EAV table, a typical recovery blanket looks like this:
- Weight: usually in the 1.5–4 lb range, depending on size and material.
- Material: heavy-duty canvas, polyester, or a blend, sometimes with internal stiffeners.
- Colour: bright orange, yellow, or red so everyone can see the line’s path clearly.
- Size: around 2 x 3 ft or 3 x 4 ft, large enough to fold over for double thickness.
- They’re versatile. One minute it’s a winch safety blanket, the next it’s under your knees while you rig.
- They stuff flat and are easy to hose off and throw back in the truck.
- They work on anything under tension: winch lines, kinetic ropes, tree straps, and even towing straps.
- You may need to add weight for heavier recoveries, especially on steel cable.
- If you just drape them without securing, they can slide toward one side or slide off entirely as the line moves.
- They’re not meant to haul a pile of hardware during travel, so you still need another bag for storage.
What is a Dedicated Damper Bag?
A dedicated damper bag is a recovery gear bag that’s built from the ground up to double as a line damper. Brands like Master Pull and ARB make versions that live in your rig with all your recovery tools. When it’s time to winch, that same bag clips over the line and instantly becomes a weighted damper. Typical damper bag attributes:- Capacity: often designed to hold 20–30 lbs of essentials like snatch blocks, shackles, tree savers, and winch line extensions.
- Material: thick ballistic nylon or similar high-denier fabric that shrugs off abrasion and mud.
- Weight rating: strong handles, straps, and seams so it can carry heavy gear without tearing.
- Suspension points: usually 2–4 loops or D-rings that let you hang or clip the bag directly over the line.
- Your damper is always right there because your recovery kit lives inside it.
- You get automatic weight. Even a half-loaded bag is usually well into that safe 5+ lb range.
- The structured design and straps grab the line better, so the bag doesn’t wander during a pull.
- They cost more than a simple blanket. You are paying for storage and structure as well as damping.
- Fully loaded, they can be bulky and a bit awkward to fit into tiny rigs.
- Once you hang the bag on the line, your tools are in the danger zone. If you need a different shackle mid-recovery, you may have to rethink your layout.
Cost, Effectiveness & Maintenance
On price, a basic high-vis recovery blanket is usually the entry point. It gets you into the safety game without raiding the whole build budget, which is why many weekend wheelers start there. For guides, contractors, or anyone winching several times a month, a damper bag quickly pays for itself. Less fumbling for gear, more consistent weight on the line, and one less item to remember to pack. Maintenance is simple for both styles:- Spray off mud, sand, and grit after messy recoveries so the fabric and closures don’t grind themselves apart.
- Hang or lay them out to dry fully before you stash them to avoid mildew and stink.
- Check stitching, Velcro, buckles, and reflective strips every few trips. If they’re fraying or peeling, fix it before you need it.
How to Use a Winch Damper Step-by-step (Field Procedure)
 This is where theory meets mud and bad angles. You want a simple, repeatable process you follow every time so you’re not trying to remember details while someone is buried to the frame.
- Set up your recovery rig. Lay out your plan first. Rig the winch line, snatch blocks, tree savers, and shackles correctly. Check that every piece is rated for the load and in good shape. If you’re fuzzy on Working Load Limit or cable construction, refresh yourself with a proper cable snapback risk and rigging guide before you push your luck.
- Clear the snapback danger zone. Picture a wide arc on both sides of the tensioned line, plus straight out from each end. That’s your snapback radius. No one has any business standing in that zone while you’re under load. Training manuals often show a snapback danger zone diagram to drive this home. Use vehicles, trees, or terrain as shields where possible, but never trust them completely.
- Place the damper on the line. Before you start tensioning, drape the winch line damper over the rope or cable. Aim for the centre of the span with a bias toward the stuck vehicle, and try to end up about 3–6 ft from the hook or shackle on the load side.
- Secure or close the damper. Close any Velcro, snaps, zips, or straps so the damper is wrapped around the line instead of just balancing on top. If you’re using a damper bag, use its suspension points to clip or loop it firmly over the cable.
- Double-check positioning. Stand back and look at it. The damper should sag evenly over both sides of the line. It should not be bunched up against the hook or snagging on a fairlead, tree, or rock. Adjust as needed before you start pulling.
- Begin the pull slowly. Take up slack smoothly. No jerks. Watch how the line tightens and make sure the damper stays where you intended. Everyone else stays outside the snapback zone with one person designated as spotter or signal caller.
- Monitor and adjust if needed. As the stuck rig moves or as you re-spool, the centre of the span shifts. If the pull is long, pause briefly when safe and slide the damper to roughly the new middle, keeping that 3–6 ft distance from the hook as a general target.
- Complete the recovery. Once the vehicle is on stable ground and no longer needs winch power, let off the trigger and allow the line to relax. Watch for any lingering tension in snatch blocks or anchors.
- Retrieve the damper last. After you confirm the system is no longer loaded, then step in to remove the damper. Only once it’s off the line should you start breaking down shackles, straps, and re-spooling for travel.
Common Winch Line Damper Mistakes (and How to Fix Them)
I’ve watched experienced drivers make the same handful of mistakes over and over. None of them are complicated to fix, but all of them matter when something actually fails under tension.- Mistake 1: No damper because “it’s just a quick pull.” Problem: Most bad accidents happen on the easy jobs when people get casual, not on the sketchy ones where everyone is already nervous. Fix: Treat the damper like you do your seat belt. If the winch is working under load, the damper goes on, no debate. Quick pulls still carry real stored energy.
- Mistake 2: Damper placed near the winch, not the load. Problem: Hooks, soft shackles, and anchor points at the load side are usually the weak links, not the winch drum. That’s where you see a lot of real-world failures. Fix: Aim for centre-line placement with a bias toward the stuck vehicle. That rule of thumb of 3–6 ft from the hook or shackle is there for a reason.
- Mistake 3: Using a damper that’s too light. Problem: Those featherweight “safety flags” flutter nicely but hardly change the dynamics of a line snapping at speed. Fix: For light 4×4 rigs, use dampers in the 2–3 lb range. For heavier trucks or steel cable, step up toward 3–5 lbs. Add weight using internal pockets if your blanket is on the light side.
- Mistake 4: Standing inside the cable snapback zone because “we have a damper.” Problem: A damper reduces risk, it doesn’t erase it. Hardware like shackles, hooks, and snatch blocks can still travel with plenty of force, especially if they separate from the line. Fix: Stick to your recovery safety protocol. Keep people out of the danger arc, use radios or hand signals, and have one person in charge of the pull, not a crowd yelling at once.
- Mistake 5: Forgetting to reposition the damper during a long pull. Problem: As the stuck rig inches forward, the “middle” of the line moves. The damper can end up near one end where it’s a lot less useful. Fix: On longer recoveries, pause periodically, reassess, and slide the damper back toward the centre span. It only takes a few seconds and can make a big difference.
- Mistake 6: Relying on synthetic rope alone for safety. Problem: Synthetic rope behaves better than steel, but a high-load failure still comes with real recoil and heavy hardware in motion. Fix: Treat synthetic rope with the same respect as cable. Use a damper on synthetic lines any time you’re winching under significant load.
FAQ
Here are straight answers to the questions that come up all the time in classes, club runs, and shop conversations about winch line dampers.Do I Really Need a Winch Line Damper If I Use Synthetic Rope?
Yes. Synthetic rope is more forgiving than steel, but it still stores a lot of energy when you’re dragging a 5,000–8,000 lb truck through muck or over rocks. A damper adds weight and drag that control the rope’s path and speed if a failure happens. Best practice is simple: damper on, no matter what material you’re running.How Do I Know My Damper is Heavy Enough?
For most 4×4 builds, aim for a damper or weighted blanket that ends up in the 2–5 lb zone when in use. If you pick it up and it feels like a cheap windbreaker, it’s probably too light. Look for models with pockets so you can toss in shackles or other hardware to add mass. A good sign is when the line has a visible sag under the damper when tensioned.Where Exactly Should I Put the Winch Safety Blanket?
Start by finding the middle of the span between the winch and the stuck vehicle. Place the blanket there, then slide it a little toward the vehicle until it sits about 3–6 ft from the hook or shackle. That gives you both centre-line coverage and focus near the most likely failure point.Can I Use a Towel or Jacket as a Makeshift Line Dampener?
If that’s all you’ve got, use it. A heavy jacket, folded towel, or floor mat is better than bare cable. Fold it to create thickness, tie or strap it so it does not fall off, and add weight if you can by tucking in a shackle or small tools. Just treat this as an emergency workaround and upgrade to a purpose-built damper once you’re back home.Is One Damper Enough, or Should I Use Two?
For most single-line pulls with a normal-length span, one properly placed damper is a big improvement in safety. On very long lines, double-line pulls, or more complex multi-leg rigging, experienced operators often run two dampers, roughly at one-third and two-thirds of the distance, to help control multiple potential failure points.Does a Damper Replace Other Recovery Safety Protocols?
No. A damper is only one piece of the puzzle. You still need proper rigging, rated hardware, good anchors, clear communication, and a strict rule about staying out of the snapback danger zone. Think of the damper as one more layer stacked on top of good habits, not a free pass to get sloppy.Will a Damper Prevent Hardware Like Shackles from Flying?
It can definitely reduce how far and how fast hardware travels if it stays attached to the line. The damper adds drag and tends to pull the system downward. But it can’t guarantee that a shackle or hook won’t break free and go off on its own path. That’s exactly why we still insist people stay away from the line of fire.How Does a Damper Interact with My Winch’s WLL and Rated Load?
The damper doesn’t change your Working Load Limit or the line’s rated strength. Those are fixed by design and engineering. The damper just helps manage the kinetic energy if you exceed those limits or something fails. You still need to choose a winch and rigging sized correctly for your vehicle and avoid shock loads or jerks on the system.Final Summary & Next Steps
A winch line damper is cheap insurance that sits quietly in your kit until the day you really need it. By absorbing kinetic energy and dragging a broken steel cable or synthetic rope down and away, it can turn a potentially lethal failure into a scary story and nothing more. The safest path forward is to:- Outfit your rig with a quality winch safety blanket or damper bag that suits your vehicle weight and how often you recover.
- Use that damper every single time you tension a winch line, no matter how quick the pull seems.
- Back it up with solid recovery safety habits, smart rigging, and clear, calm communication on every recovery.
Part of the Winch Accessories guide. Explore more guides in this cluster for complete coverage.
🔧 I Tested Dampers by Snapping Cables
Built a controlled snap-test rig on private land: Warn M8000 + scored 5/16″ steel cable, load cell logging to trigger release, 240 fps camera for whip measurement. Bare cable whip travel on a 50-ft deployed line: 43 ft.
Whip radius can reach 2–3× line length on a longer pull, which is why distance-plus-damper is mandatory. With an 8 lb Bubba Gator-Jaw mid-line: 11 ft.
With a 2 lb light damper: 24 ft. Weight matters.
Placement matters. Test was done 4 times to confirm repeatability. Dampers save lives — always rig one on every pull.
