Installing a boat anchor winch can seem like a daunting task, but with the right knowledge and tools, it becomes a manageable project.
This guide will walk you through the process, from understanding different types of winches to step-by-step wiring instructions, ensuring your installation is safe and efficient.
Quick Summary
To wire your recently brought best boat anchor winch, follow these key steps: Choose the right winch type, ensure safety by disconnecting the battery and using protective gear, gather the necessary tools and materials, carefully plan and execute the wiring process for either DC or AC winches, test the system thoroughly, and maintain the wiring regularly to ensure reliable operation.
Safety Precautions
Disconnecting the Battery: Before you start any electrical work, always disconnect the battery to prevent accidental shocks or short circuits.
Wearing Protective Gear: Safety gear, such as gloves and safety glasses, is essential to protect yourself from electrical hazards and physical injuries during the installation.
Working in a Dry Environment: Moisture and electricity don’t mix. Ensure you work in a dry environment to avoid any risks of electric shock or damage to the winch system.
Tools and Materials Needed
List of Essential Tools
- Screwdrivers
- Wire strippers
- Pliers
- Wrenches
Wiring and Electrical Components
- Marine-grade wiring
- Terminal connectors
- Heat shrink tubing
Circuit Breakers and Fuses
These are crucial for protecting your electrical system from overloads and short circuits.
Preparing for Installation
Choosing the Right Location for the Winch: Select a spot that allows easy access to the winch and provides a clear path for the anchor rope or chain.
Planning the Wire Routing: Carefully plan the routing of the wires to avoid sharp edges and high-traffic areas where they could get damaged.
Determining Wire Gauge Based on Amperage and Distance: Use the correct wire gauge to handle the current load over the distance from the battery to the winch. Refer to wire gauge charts to make the right choice.
Step-by-Step Wiring Process for DC Winches
Installing the Circuit Breaker
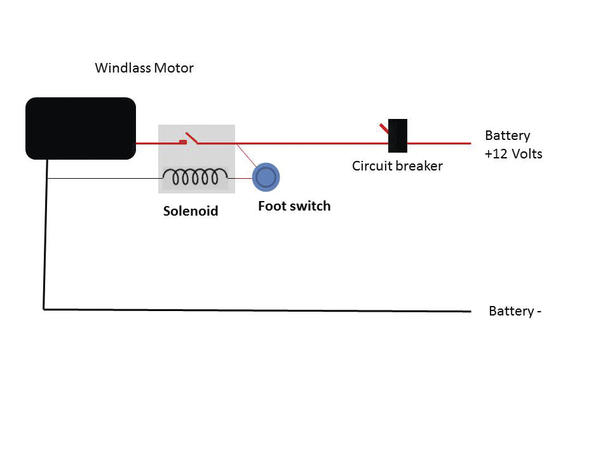
The first step in wiring a DC winch is to install a circuit breaker. This device protects your electrical system from overloads and short circuits. Mount the circuit breaker as close to the battery as possible.
This placement ensures that the entire length of the wire running to the winch is protected. Use screws or bolts to secure the circuit breaker to a solid surface near the battery. Make sure it is easily accessible for future maintenance.
Running the Positive Wire from the Battery to the Winch
Next, you need to run the positive wire from the battery to the winch. Start by connecting one end of the positive wire to the positive terminal of the battery.
Secure the connection with a terminal connector and tighten it using a wrench or screwdriver.
Then, route the wire from the battery to the winch, avoiding sharp edges and high-traffic areas where the wire could get damaged.
Secure the wire along the path using cable ties or clamps to prevent it from moving around. Finally, connect the other end of the positive wire to the positive terminal on the winch motor.
Connecting the Negative Wire
After the positive wire is connected, you need to run the negative wire from the winch motor to the battery’s negative terminal.
Start by attaching one end of the negative wire to the negative terminal on the winch motor. Route the wire back to the battery, again avoiding any sharp edges or areas where it could be damaged.
Secure the wire along its path using cable ties or clamps. Connect the other end of the negative wire to the battery’s negative terminal, ensuring a tight and secure connection.
Wiring the Control Switch
The control switch allows you to operate the winch from a convenient location. Start by choosing a location for the switch that is easily accessible and makes sense for your boat’s layout.
Once you’ve chosen the spot, mount the switch securely. Then, run the necessary wires from the switch to the winch motor.
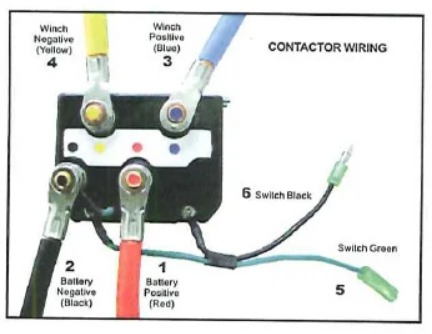
Typically, the control switch will have three wires: one for power, one for the up direction, and one for the down direction.
Connect these wires to the corresponding terminals on the winch motor and the battery, following the manufacturer’s instructions.
Securing All Connections
The final step is to ensure that all connections are secure and properly insulated. Check each connection point to make sure the wires are firmly attached and there are no loose ends.
Use electrical tape or heat shrink tubing to cover exposed terminals and prevent short circuits.
Once all connections are secured, tidy up the wiring by bundling any excess wire with cable ties and securing it in place.
This not only keeps the installation looking neat but also prevents wires from getting tangled or damaged during use.
Wiring an AC Anchor Winch
Differences in Wiring Compared to DC Winches
Wiring an AC anchor winch differs significantly from wiring a DC winch because of the nature of alternating current (AC). AC winches operate on a different voltage and current type compared to DC winches, which run on the direct current provided by batteries.
AC winches usually require a more stable power source, often derived from onboard generators or shore power connections. This difference necessitates special considerations in the wiring process, such as handling higher voltages and ensuring proper grounding to prevent electrical hazards.
Connecting to the Boat’s AC System
Identify Power Source:
Start by identifying the power source for your AC winch. This could be the onboard generator or shore power. Ensure that the power source can supply the necessary voltage and current for the winch.
Locate the Power Panel:
Find the boat’s power distribution panel. This is where the main AC connections are made. You will need to route the wiring from the winch to this panel.
Install a Circuit Breaker:
Install an appropriate circuit breaker in the power distribution panel. The circuit breaker protects the winch and wiring from overloads and short circuits. Make sure the circuit breaker rating matches the winch’s power requirements.
Run the Power Wires:
Run the power wires from the winch to the power distribution panel. Use marine-grade AC wiring, which is designed to withstand the harsh marine environment. Ensure that the wires are of the correct gauge to handle the current without overheating.
Connect the Wires:
Connect the power wires to the circuit breaker and the neutral bus bar in the power distribution panel. Ensure that all connections are tight and secure. Use appropriate terminal connectors and follow the color coding standards (typically black or red for hot wires and white or blue for neutral wires).
Grounding:
Proper grounding is essential for safety. Connect the winch’s ground wire to the boat’s grounding system. This prevents electrical shock and ensures the system operates safely.
Using a Transformer (If Necessary)
Sometimes, the boat’s AC power system might not match the voltage requirements of the winch. For example, your boat might have a 110V AC system, while the winch requires 220V AC. In such cases, a transformer is needed to adjust the voltage.
Select the Correct Transformer:
Choose a marine-grade transformer that can handle the power requirements of the winch. Ensure it can step up or step down the voltage as needed.
Install the Transformer:
Mount the transformer in a dry, well-ventilated area close to the power source. Secure it firmly to prevent movement due to vibrations or rough seas.
Wiring the Transformer:
Connect the input side of the transformer to the power source. Use appropriate wiring and connectors to handle the input voltage. Then, connect the output side of the transformer to the winch. Again, ensure all connections are secure and properly insulated.
Testing:
After all connections are made, turn on the power and test the transformer. Use a multimeter to check the output voltage and ensure it matches the winch’s requirements.
Testing the Winch
Performing a Functional Test
Once you’ve finished wiring the winch, it’s crucial to perform a functional test. Start by reconnecting the battery or power source. Turn on the winch using the control switch and check if it powers up. Operate the winch in both directions to ensure it is functioning correctly.
Listen for any unusual noises and observe the movement of the anchor. The winch should pull in and let out the anchor smoothly without any interruptions.
Checking for Proper Operation in Both Directions
Verify that the winch can pull in (retrieve) and let out (deploy) the anchor effectively. Ensure that there is no lag or hesitation in the winch’s operation. If the winch does not operate smoothly in either direction, recheck the wiring connections and make sure everything is secure.
Troubleshooting Common Wiring Issues
Winch Not Operating
If the winch doesn’t operate at all, start by checking all wiring connections. Ensure that the battery is fully charged and that the circuit breaker or fuse is not tripped.
Inspect the control switch and its connections to the winch. A common issue might be a loose connection or a faulty switch.
Slow or Weak Winch Performance
If the winch operates but is slow or weak, check the wire gauge. The wires must be thick enough to handle the current load.
If the wires are too thin, they can cause voltage drops, leading to weak performance. Also, check for any loose connections that might be causing resistance in the circuit.
Circuit Breaker Tripping
If the circuit breaker trips frequently, it could be due to an overload or short circuit. Ensure that the circuit breaker rating matches the winch’s current draw.
Inspect the wiring for any signs of short circuits, such as exposed wires touching each other or the boat’s metal parts. Replace or repair any damaged wiring immediately.
Maintenance Tips for Winch Wiring
Regular Inspection of Wires and Connections: Periodically inspect the winch wiring for signs of wear and tear.
Look for frayed wires, loose connections, and corrosion. Regular inspections help catch potential issues before they become serious problems.
Protecting Wiring from Corrosion: Marine environments are harsh, and corrosion can quickly damage your winch wiring. Use marine-grade wiring designed to resist corrosion.
Apply protective measures like heat shrink tubing or corrosion-resistant terminals to shield the wiring from moisture and salt.
When to Replace Wiring: Replace any damaged or worn wiring immediately to maintain the integrity of the winch system.
If you notice any frayed wires, exposed conductors, or significant corrosion, it’s time to replace the affected wiring. Keeping your winch wiring in good condition ensures reliable operation and prevents potential failures.
Advanced Wiring Considerations
Adding a Wireless Remote Control
Adding a wireless remote control to your winch system significantly enhances convenience and flexibility.
With a wireless remote, you can operate the winch from anywhere on the boat, making it easier to handle the anchor, especially when you are alone or in challenging conditions.
Choosing the Right Remote Kit:
Select a wireless remote control kit compatible with your winch. Ensure it includes a transmitter, receiver, and necessary wiring.
Installing the Receiver:
Mount the receiver unit in a dry, accessible location near the winch. Follow the manufacturer’s instructions for securing the receiver to prevent it from moving or getting damaged.
Connecting the Receiver to the Winch:
Connect the receiver’s power wires to the winch’s power supply. This usually involves connecting the positive and negative wires from the receiver to the corresponding terminals on the winch motor. Secure the connections with terminal connectors and insulate them with heat shrink tubing or electrical tape.
Programming the Transmitter:
Program the transmitter to communicate with the receiver. This step varies by manufacturer, so follow the specific instructions provided with your remote control kit.
Testing the Remote:
Test the wireless remote by operating the winch from various locations on the boat. Ensure the winch responds correctly to the commands from the remote. Check both the retrieval and deployment functions to confirm everything is working as expected.
Integrating with Other Onboard Systems
Integrating the winch with other onboard systems can improve overall boat functionality and safety. For example, connecting the winch to the boat’s navigation or communication systems allows for automated operations and better coordination.
Identifying Integration Points:
Determine which onboard systems you want to integrate with the winch. Common integration points include the boat’s GPS, autopilot, or communication systems.
Using Interface Modules:
Some integrations may require interface modules to enable communication between different systems. These modules translate signals from the winch to a format that other systems can understand.
Connecting the Systems:
Run the necessary wiring from the winch to the chosen onboard system. Use marine-grade wiring and connectors to ensure durability and reliability. Follow the manufacturer’s guidelines for making the connections.
Configuring the Systems:
Configure the onboard systems to recognize and work with the winch. This might involve setting up software parameters or calibrating sensors to ensure seamless operation.
Testing the Integration:
Conduct thorough testing to ensure all systems are communicating correctly and the winch operates as intended. Test different scenarios to confirm that the integration enhances the boat’s functionality and safety.
Using a Dual Battery Setup
A dual battery setup can provide a dedicated power source for your winch, reducing the strain on your main battery and ensuring reliable operation.
Choosing the Right Batteries:
Select two marine-grade batteries, one for starting the engine (starting battery) and one for running the winch and other accessories (deep cycle battery).
Installing a Battery Switch:
Install a battery switch to easily switch between batteries or use them in parallel. This switch should be mounted in a convenient, accessible location near the batteries.
Wiring the Batteries:
Connect the positive terminal of the starting battery to the engine’s starter motor and the positive terminal of the deep cycle battery to the winch’s power input. Use heavy-duty battery cables to handle the high current loads.
Connecting the Negative Terminals:
Connect the negative terminals of both batteries to a common ground point on the boat. Ensure all connections are tight and secure to prevent any electrical issues.
Installing a Battery Isolator or Combiner:
Install a battery isolator or combiner to manage the charging of both batteries. A battery isolator prevents the starting battery from being drained by the winch, while a combiner allows both batteries to be charged simultaneously when the engine is running.
Testing the Dual Battery Setup:
Test the dual battery setup by operating the winch and starting the engine. Ensure that the winch operates correctly using the deep cycle battery and that the starting battery remains unaffected. Verify that the battery switch and isolator/combiner function as intended.
Conclusion
Installing and wiring an anchor winch can significantly enhance your boating experience. By following these detailed instructions and taking the necessary safety precautions, you can ensure a smooth and successful installation.
Regular maintenance and proper wiring will keep your winch system running efficiently for years to come.
